
April 2015 Piece & Cut BOM
 04-03-2015, 06:15 AM
#11
Super Member

Join Date: Jul 2013
Location: South Dakota
Posts: 8,122
I decided I'd just do a one block medallion - but I got a bit carried away.
Ending up with a 12" block - that has 432 pieces. that's a record for me so far -
Time to get back to sewing. I have a today off work, but I also have to paint my Sewing Machine Shed - inside and out.
Ending up with a 12" block - that has 432 pieces. that's a record for me so far -
Time to get back to sewing. I have a today off work, but I also have to paint my Sewing Machine Shed - inside and out.
 04-03-2015, 09:32 AM
#12
Super Member
Join Date: Jul 2013
Location: South Dakota
Posts: 8,122
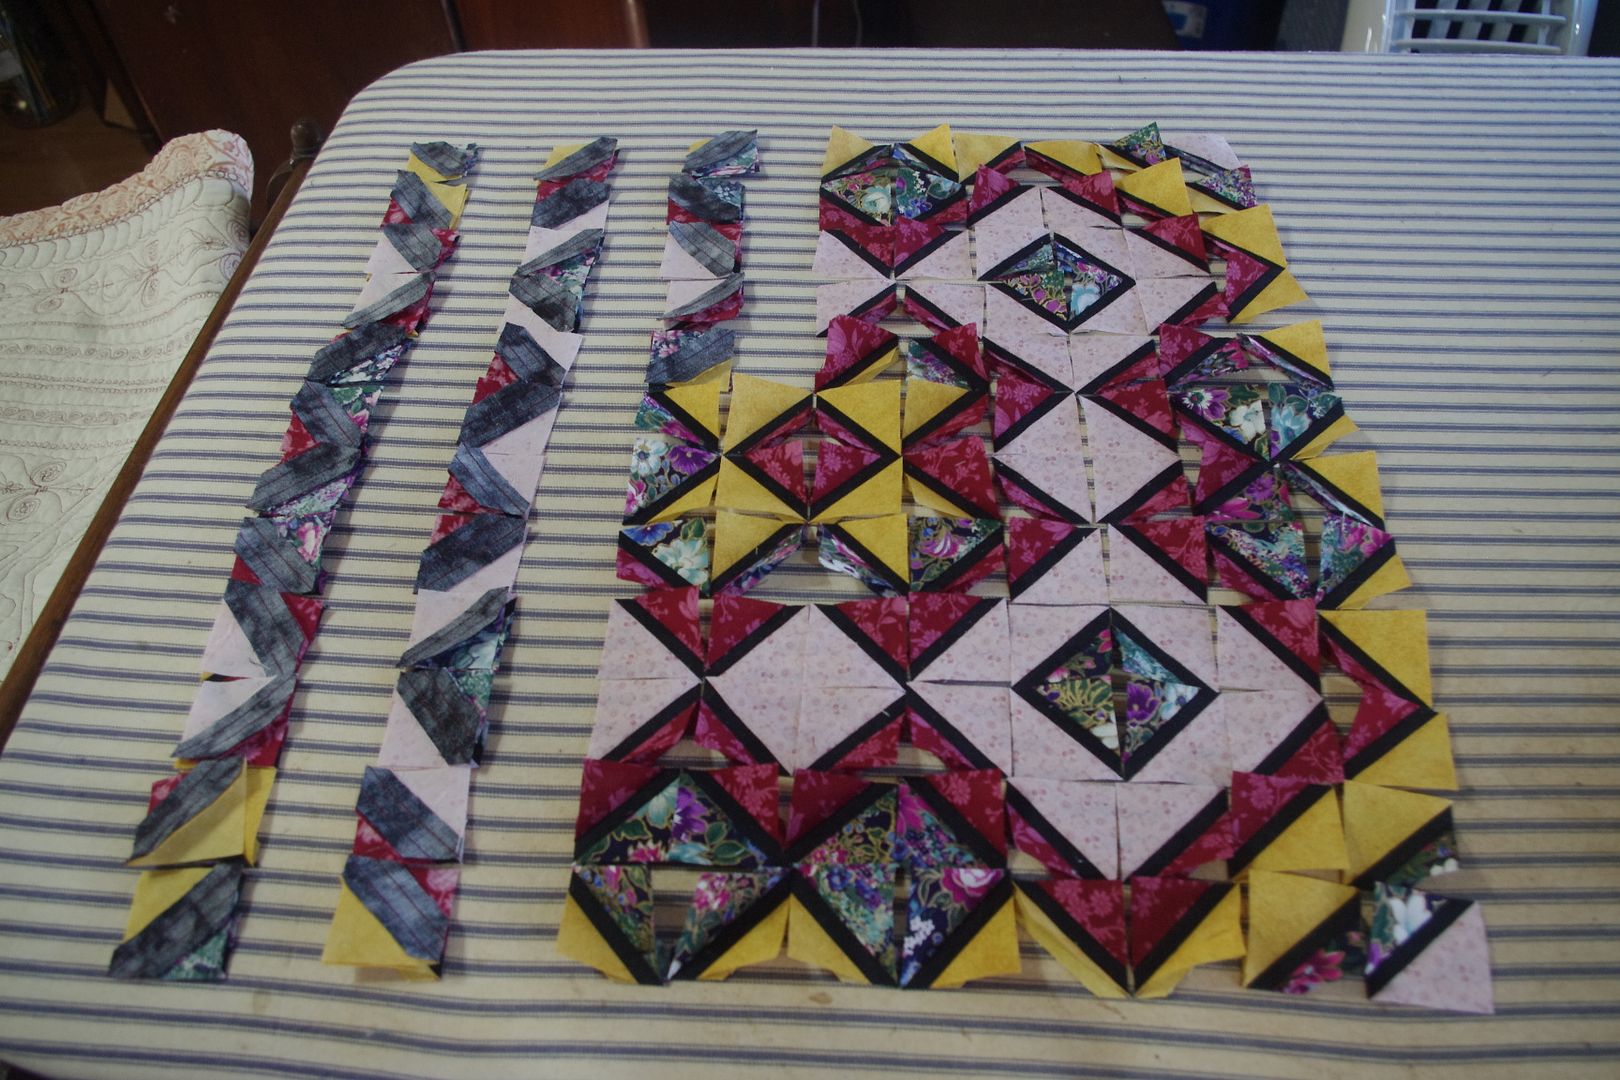
This was an experiment - and I decided I wasn't going to get worried about lining everything up. After all while, just getting it all together was challenging enough LOL!!
I got to this point and decided I'd better take a picture for reference, or I'd never get it laid back out correctly. And it's a good thing as I had three blocks in teh center with the wrong color combination- so I'd have never figured out where they went LOL!! I didn't realize it until they were sewed in pairs and I was matching my picture (printed BW) and then had to go look at the color one and realized my mistake.
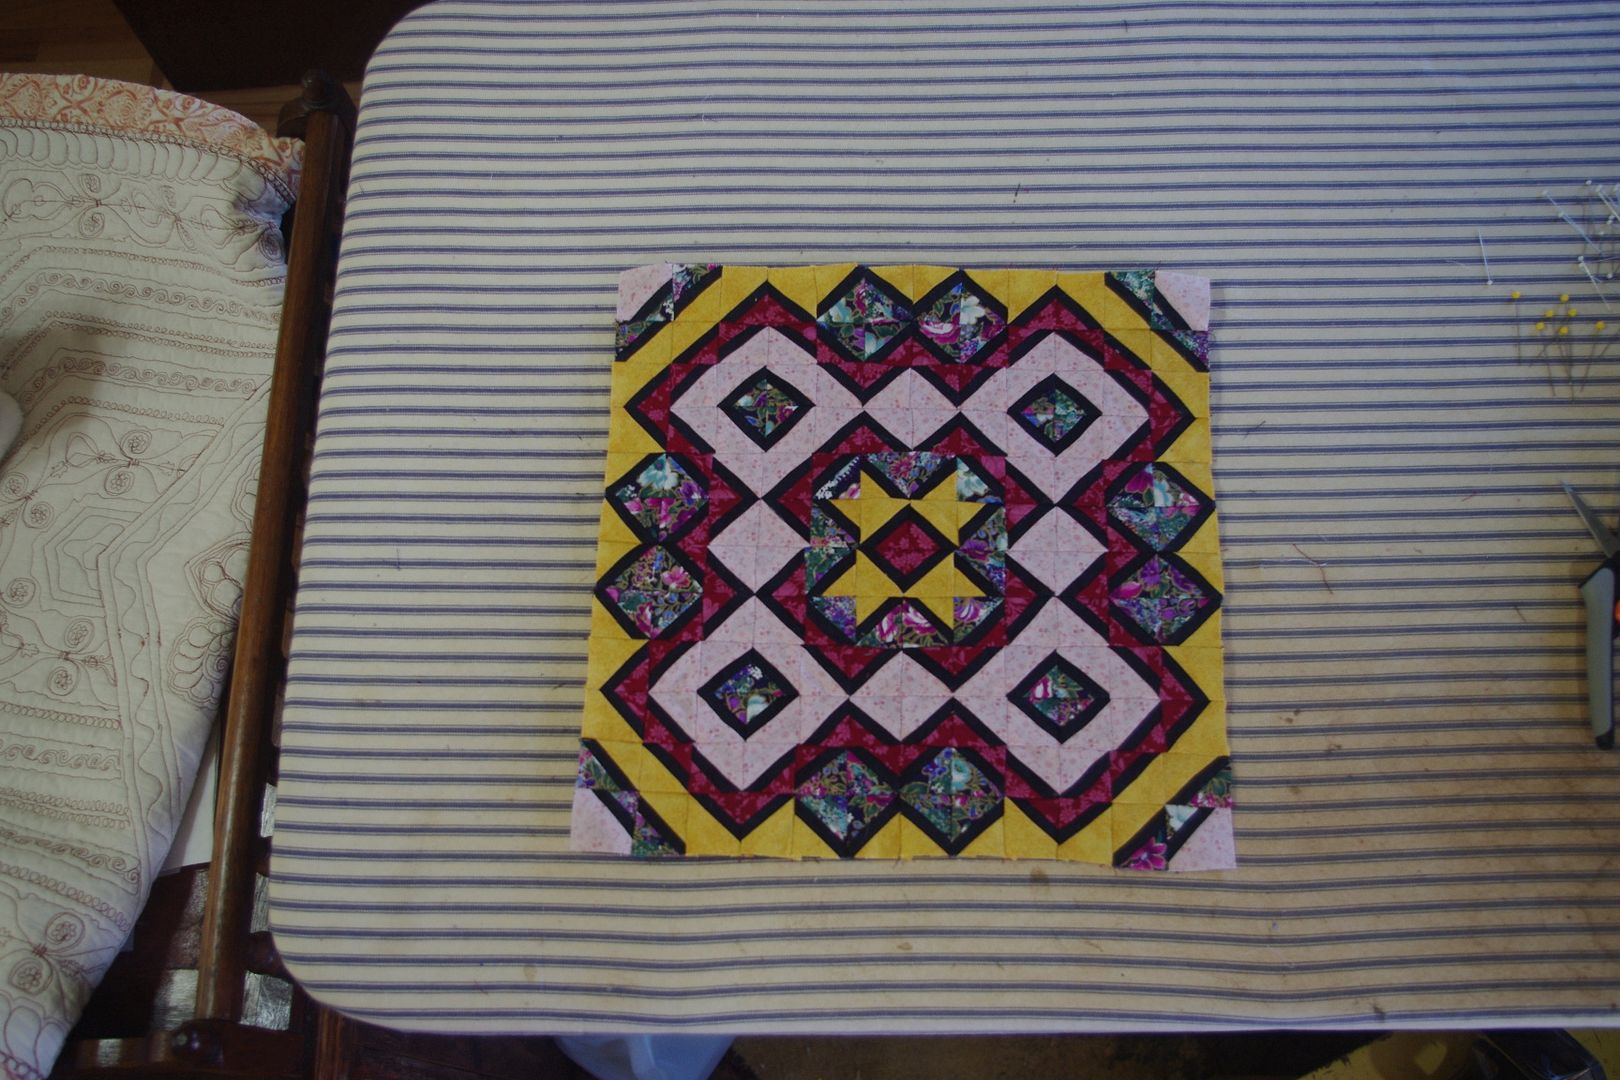
The completed block -
And the back side. There is more fabric in the seam allowances than on the face of the quilt.
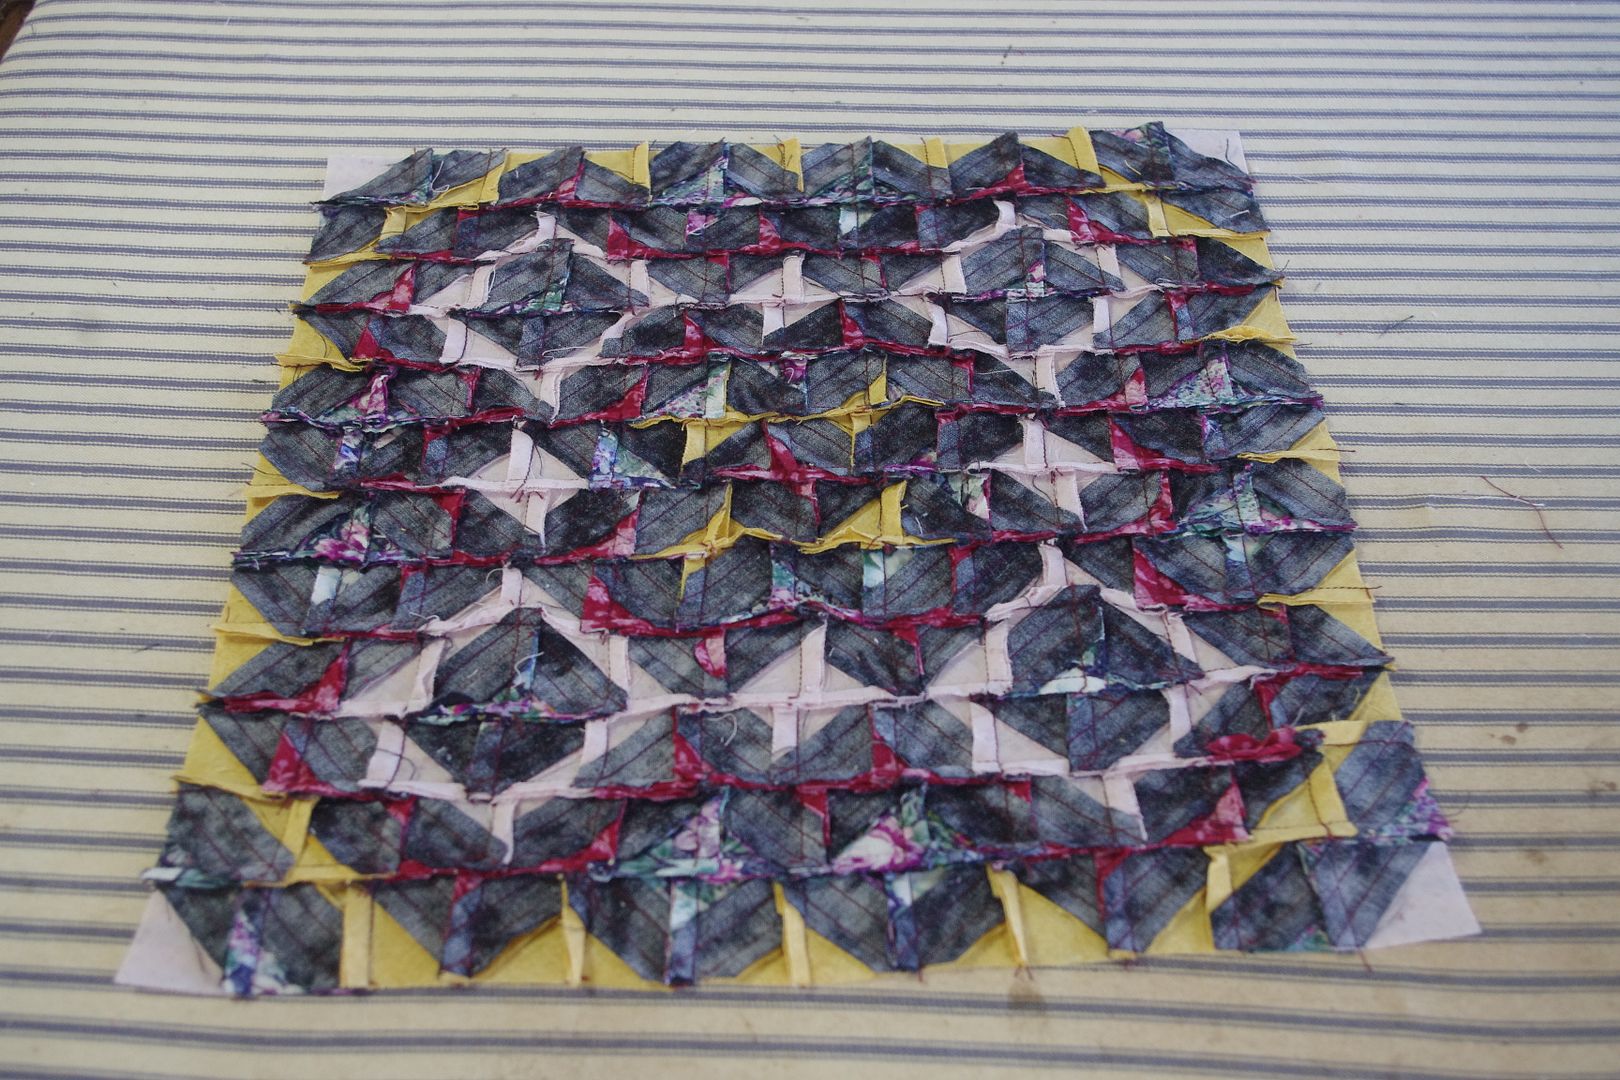
This is one of the few blocks I starched after getting it finished. I pinned it to the ironing board as I was pressing to hold it flat - and when it was blocked out decent, starched it so it would stay that way.
I got to this point and decided I'd better take a picture for reference, or I'd never get it laid back out correctly. And it's a good thing as I had three blocks in teh center with the wrong color combination- so I'd have never figured out where they went LOL!! I didn't realize it until they were sewed in pairs and I was matching my picture (printed BW) and then had to go look at the color one and realized my mistake.
The completed block -
And the back side. There is more fabric in the seam allowances than on the face of the quilt.
This is one of the few blocks I starched after getting it finished. I pinned it to the ironing board as I was pressing to hold it flat - and when it was blocked out decent, starched it so it would stay that way.
04-03-2015, 09:45 AM
#13
Power Poster
Thread Starter

Join Date: Mar 2009
Location: Salem Iowa
Posts: 15,666
What did you think about making the quilt block? It looks great! However you've turned the blocks and created a different quilt block from the one above LOL
It is fun to turn the blocks and make different looks. I have several diff versions of quilt blocks from this set of blocks.
It is fun to turn the blocks and make different looks. I have several diff versions of quilt blocks from this set of blocks.
04-03-2015, 10:56 AM
#14
Super Member

Join Date: Sep 2014
Location: Rural Oklahoma
Posts: 5,374
Originally Posted by Macybaby

This was an experiment - and I decided I wasn't going to get worried about lining everything up. After all while, just getting it all together was challenging enough LOL!!
I got to this point and decided I'd better take a picture for reference, or I'd never get it laid back out correctly. And it's a good thing as I had three blocks in teh center with the wrong color combination- so I'd have never figured out where they went LOL!! I didn't realize it until they were sewed in pairs and I was matching my picture (printed BW) and then had to go look at the color one and realized my mistake.
The completed block -
And the back side. There is more fabric in the seam allowances than on the face of the quilt.
This is one of the few blocks I starched after getting it finished. I pinned it to the ironing board as I was pressing to hold it flat - and when it was blocked out decent, starched it so it would stay that way.
04-03-2015, 01:25 PM
#16
Super Member
Join Date: Jul 2013
Location: South Dakota
Posts: 8,122
I started with the basic block, cut at 1.5", sewn to 1". I went 12 x 12 blocks to make it 12" finished. So it's 144 blocks, each one three pieces. So if I did my math right - that is 432 pieces.
I don't really use a template, I just sort of figure something and go with it. I cut the black strip at 3/4" wide, sewed it to one side and then pressed, and when I sewed the other side, I lined up with the sewing line and made sure to sew 1/4" away from it, lining up the edges, but not using them as the sewing reference. I wanted the black to be as uniform as I could get it.
I started with the basic 6 x6 and then went out from there, just looking at it and thinking what might look neat.
I consider doing these as "training". It's really helping me build skills and have fun while doing it. And if the end result isn't perfect, it doesn't really matter because the main goal is experience building. And making mistakes is a great way to learn what works and what does not. I have many, many years experience sewing clothing - but just a few with quilting.
I have a tendency to get sloppy with my 1/4" seam - too use to sewing 5/8" where the main thing was a straight seam. So this block was a lot of practice trying to be way more precise.
04-07-2015, 10:57 AM
#17
Super Member

Join Date: Dec 2014
Location: Texas
Posts: 2,535
[ATTACH=CONFIG]516206[/ATTACH]
Finished!! Thanks for the block, Rhonda, I really like the way it turned out! It'll either be a wall hanging or a table topper. My dining room is going to the blues. Planning dark blue binding!
lovely block!
Finished!! Thanks for the block, Rhonda, I really like the way it turned out! It'll either be a wall hanging or a table topper. My dining room is going to the blues. Planning dark blue binding!
lovely block!
 05-08-2015, 09:14 AM
#20
Power Poster
Thread Starter
Join Date: Mar 2009
Location: Salem Iowa
Posts: 15,666
Codi this isn't a pattern so much as a method. You only need to follow the link posted above to the directions for making the individual Triple Strip Blocks Here it is again Rhonda's New Shortcut Block- Triple Strip Block
Once you have learned to make the triple strip blocks then choose your fabrics and follow the layout I show above to see where to put the colors.
After you make the blocks you need then sew them into the quilt block.
The quilts I show are just Quilt blocks sewn together. The only difference between the Quilts I show is where I put the colors.

Thread
Thread Starter
Forum
Replies
Last Post
Mariposa
Member Swaps and Round/Row Robins
120
08-13-2015 07:48 AM
