
Magic Tiles

 03-28-2010, 02:52 AM
#12
Super Member
Join Date: May 2008
Location: Southern Ontario Canada
Posts: 1,474
THis was my very first quilt many moons ago as you can see the blck inbetween was a little off as I was learning my 1/4 inch.
Its a very easy pattern.
Have not seen any pic on the board so if you quilters have made this lets see them.
Gale
Its a very easy pattern.
Have not seen any pic on the board so if you quilters have made this lets see them.
Gale
03-28-2010, 03:41 AM
#13
Super Member
Join Date: Oct 2009
Posts: 5,453
Originally Posted by raptureready
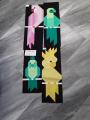
I don't have the pattern but I know how to do it. It's just a Wonky Nine patch with black strips in between. I saw a woman on Sewing With Nancy do one the other day. 9 squares of different fabrics stacked, cut two slashes each way with no particular measurements. I started mine with 12" blocks, most start with smaller. Once they're cut you take the first stack and put the top piece on the bottom, second stack put the top two on the bottom, third the top three and sew on before you start sewing. That will give you one piece of each fabric per block. Then just sew your black strips on between the first and second, the second and third, the 4th and 5th, 5th and 6th then sew a strip down one side of your first three that you've sewn together and sew the second strip onto that. Do the same with the last strip. Don't try to have your corners match, they don't need to. You'll have to square up each block when finished. hope that helps
Wonky 9 Patch/Quilt as you go
[ATTACH=CONFIG]33606[/ATTACH]
03-28-2010, 03:44 AM
#14
Super Member

Join Date: Feb 2010
Location: Illinois
Posts: 5,142
That's very pretty. I'm working on one now just to use up fabric but I don't like my choices in colors (and they're already cut) So I'm thinking I may put the black between the blocks to see if I like it better. Mine just has some pretty bland colors and I don't like it.
03-28-2010, 06:06 AM
#15
Super Member

Join Date: Aug 2008
Location: Home town: Rehoboth, MA Now living in OK
Posts: 7,774
Originally Posted by justwannaquilt
Isn't this the same concept but you would use 12 layers of fabric instead of 9 to create the 12 blocks?
http://patchwork-of-mini-grey.blogsp...-tutorial.html
http://patchwork-of-mini-grey.blogsp...-tutorial.html
03-28-2010, 12:37 PM
#16
Junior Member
Thread Starter

Join Date: Nov 2009
Location: Mid Central Florida
Posts: 130
To Raptureready:
Have some questions. Do you continue putting 4 pcs of fabric on the bottom, then 5 pcs when you get to that and 6 pcs on #6? Do you continue with 7,8 & 9?
Question 2: The black fabric that you use is it purchased dbl. binding or is it one thickness of 1" fabric that you sew on to the individual pieces?
 03-29-2010, 07:44 AM
#19
Super Member
Join Date: Feb 2010
Location: Illinois
Posts: 5,142
Yes. First stack- top piece to the bottom, second stack--top 2 to the bottom, 3rd stack-top three to the bottom, 4th stack top 4 to the bottom, stack 5 top 5 to the bottom, 6-top 6 to the bottom, 7-top seven to the bottom, 8--top 8 to the bottom, leave the 9th stack alone. When moving the pieces to the bottom, move all of them together, don't count them out or rearrange the one you're moving. ie: when taking three off and moving them to the bottom, grab all three and put them on the bottom at the same time.
I NEVER use pre-packaged binding (bias tape) because it's very cheap fabric and shrinks terribly. I use one thickness and sew it between---just a strip of fabric. I prefer using 1" because I want it to end up 1/2" after I get all three pieces together. Less than that I find too tedious, more I find clumsy looking.
I NEVER use pre-packaged binding (bias tape) because it's very cheap fabric and shrinks terribly. I use one thickness and sew it between---just a strip of fabric. I prefer using 1" because I want it to end up 1/2" after I get all three pieces together. Less than that I find too tedious, more I find clumsy looking.

Thread
Thread Starter
Forum
Replies
Last Post
debbiemarie
Main
58
01-21-2024 04:52 AM
