
Tip for Making Very Narrow Border or Sashing
 08-18-2012, 07:21 AM
#1
Super Member
Thread Starter

Join Date: Sep 2011
Location: Canadian in Minnesota
Posts: 3,078
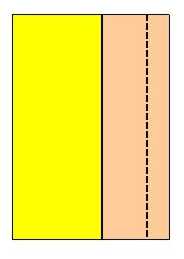
I had cut my yellow border strip at 1.5", but decided that a 1/4" yellow border looked much better and was trying to figure out how to cut it down or lay the next border far enough away from the edge to bring it down to the 1/4". That's when a lightbulb came on and I decided to sew a placing line 1/2" from the inner edge (1st photo), lay my next border against it and sew a 1/4" seam. This would work even if you wanted a 1/8" highlighting strip because you don't need to deal with very narrow strips of fabric.
[ATTACH=CONFIG]356279[/ATTACH][ATTACH=CONFIG]356282[/ATTACH][ATTACH=CONFIG]356283[/ATTACH]
[ATTACH=CONFIG]356279[/ATTACH][ATTACH=CONFIG]356282[/ATTACH][ATTACH=CONFIG]356283[/ATTACH]


 08-18-2012, 09:02 AM
#5
Super Member

Join Date: Jan 2009
Posts: 4,688
Here's another easy way to sew very narrow, accurate inserts.
Sew the first seam of the insert (orange) with a �" seam as usual.
Press the seam allowance away from the insert, turn it over and place the raw edge on top of the next piece of fabric to be added (green). Pin the edges.
Line up the left edge of your quarter inch foot with the first seam and sew the second seam.
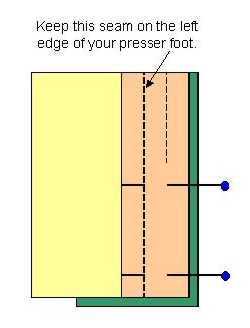
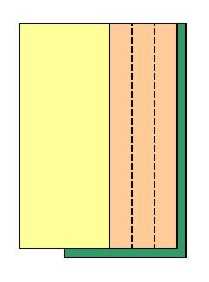
Trim the seam allowance if necessary and press open. The result is a perfectly straight �" insert.

This technique can be used for any width by using other foot markings or the arm-like quilting guide that comes with most sewing machines. As long as you follow the previous seam line, your inset strip will be a consistant width, dead on, no extra steps necessary. Your brain will have to flex a bit at first to sew on the left side, but it gets easy very fast.
Sew the first seam of the insert (orange) with a �" seam as usual.
Press the seam allowance away from the insert, turn it over and place the raw edge on top of the next piece of fabric to be added (green). Pin the edges.
Line up the left edge of your quarter inch foot with the first seam and sew the second seam.
Trim the seam allowance if necessary and press open. The result is a perfectly straight �" insert.
This technique can be used for any width by using other foot markings or the arm-like quilting guide that comes with most sewing machines. As long as you follow the previous seam line, your inset strip will be a consistant width, dead on, no extra steps necessary. Your brain will have to flex a bit at first to sew on the left side, but it gets easy very fast.
08-18-2012, 10:09 AM
#6
Senior Member

Join Date: Feb 2012
Location: Winston-Salem NC
Posts: 659
I love it! I think the sign of a great tip is that as soon as you see it you think "now why didn't I think of that?" because a great tip is so intuitively correct that it stuns you that you did not see it for yourself!
Thanks.
Alison
Thanks.
Alison


Thread
Thread Starter
Forum
Replies
Last Post
