
I changed my design plans and now my seams are an issue...what to do?
 05-07-2011, 07:32 PM
#1
Super Member
Thread Starter

Join Date: Sep 2010
Location: Enchanted Oaks, Tx
Posts: 1,750
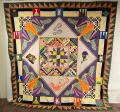
As you can see I'm doing a modified trip around the world for my next quilt. Originally I was going to have the 4 patch squares alternating with the solids. Then after making them all, I decided didn't like that layout and changed it to this. My plans are to pick up all the colors of the center of the quilt in the borders.
Since I'm new to sewing I'm not quite sure how to solve this problem: since I'm now sewing all the 4 patch squares together some of the seams aren't intersecting right even when I plan ahead. I think it's because I'm sewing patches to make the rows instead of sewing single strips together where I can plan all the seams better. So what would you suggest? Do I need to take apart all the blocks that don't match up when I sew them into rows so all the seams intersect right or is it okay for there to be a slight twist in the seam so that I can still make the seams intersect right? I hope this makes since. Since this is going to be a light weight quilt for a tropical climate there's not going to be batting. Does this factor into how I address this issue? (I think I'll be using flannel for backing).
Thanks for your input!
Karen
The beginning of the top on the design wall...all the smaller blocks are 4 patches
[ATTACH=CONFIG]194450[/ATTACH]
If you look closely you'll see that some of the seams will either be bulky if I iron them like they want to lie down or they will intersect if I turn them to the other side but then there's a twist in the seam.
[ATTACH=CONFIG]194451[/ATTACH]


 05-07-2011, 08:27 PM
#4
Power Poster

Join Date: Dec 2009
Location: Outside St. Louis
Posts: 38,181
I just let mine twist, doesn't seem to affect the finished quilt. After it is all finished, washed and dried I never look as closely at it as I do while quilting it. I figured how it happens but, always seem to on some quilts.
05-07-2011, 08:37 PM
#5
Power Poster
Join Date: Dec 2010
Location: Northern California mountains
Posts: 12,538
1. From here, it seems to me that some of you green squares, on the left side, are simply too small.
2. Are your seam allowances uniform at 1/4"? If they are a little bit too large, your 4 patches will be 2 little bits too small. I used to measure them incorrectly. The "scant 1/4" that people talk about means measure your 1/4" from the center of the seam to the outermost shred of the seam allowance.
3. I found that where seams cross, the allowance on the top should be placed so it reaches the needle before the seam does. This keeps the seam line from pushing apart. As Always quilting says, you can get the seam allowance back to going the 'right' way by clipping it near the cross seam.
4. Sometimes just pressing corrects the apparent problem. If it does not, what I woudl do is start over on the 4 patch area and use THESE 4 patches in another project. There is no way I would do that much frog stitching.
5. In the future, remember that it is a good idea to do some measurement checks as you go along, so you don't get this far into a problem.
You have a nice design here. The color placement is very attractive.
The top, also called a 'flimsy', needs to be flat regardless of how you are using it. A 2 layer quilt, also called a "summer quilt" shows any irrgularity more than a bulkier quilt might.
05-07-2011, 08:54 PM
#6
Super Member
Thread Starter
Join Date: Sep 2010
Location: Enchanted Oaks, Tx
Posts: 1,750
Originally Posted by QM
1. From here, it seems to me that some of you green squares, on the left side, are simply too small.
2. Are your seam allowances uniform at 1/4"? If they are a little bit too large, your 4 patches will be 2 little bits too small. I used to measure them incorrectly. The "scant 1/4" that people talk about means measure your 1/4" from the center of the seam to the outermost shred of the seam allowance.
3. I found that where seams cross, the allowance on the top should be placed so it reaches the needle before the seam does. This keeps the seam line from pushing apart. As Always quilting says, you can get the seam allowance back to going the 'right' way by clipping it near the cross seam.
4. Sometimes just pressing corrects the apparent problem. If it does not, what I woudl do is start over on the 4 patch area and use THESE 4 patches in another project. There is no way I would do that much frog stitching.
5. In the future, remember that it is a good idea to do some measurement checks as you go along, so you don't get this far into a problem.
You have a nice design here. The color placement is very attractive.
The top, also called a 'flimsy', needs to be flat regardless of how you are using it. A 2 layer quilt, also called a "summer quilt" shows any irrgularity more than a bulkier quilt might.
2. Are your seam allowances uniform at 1/4"? If they are a little bit too large, your 4 patches will be 2 little bits too small. I used to measure them incorrectly. The "scant 1/4" that people talk about means measure your 1/4" from the center of the seam to the outermost shred of the seam allowance.
3. I found that where seams cross, the allowance on the top should be placed so it reaches the needle before the seam does. This keeps the seam line from pushing apart. As Always quilting says, you can get the seam allowance back to going the 'right' way by clipping it near the cross seam.
4. Sometimes just pressing corrects the apparent problem. If it does not, what I woudl do is start over on the 4 patch area and use THESE 4 patches in another project. There is no way I would do that much frog stitching.
5. In the future, remember that it is a good idea to do some measurement checks as you go along, so you don't get this far into a problem.
You have a nice design here. The color placement is very attractive.
The top, also called a 'flimsy', needs to be flat regardless of how you are using it. A 2 layer quilt, also called a "summer quilt" shows any irrgularity more than a bulkier quilt might.
05-07-2011, 08:55 PM
#7
Super Member
Join Date: Oct 2010
Location: Washington State
Posts: 1,840
Originally Posted by AlwaysQuilting
When that happens to me I just clip, near the intersection, the twisted seam allowance on each block that's involved, without going thru the stitching. That way it lays down flatter.
05-07-2011, 09:06 PM
#8
Banned
Join Date: Nov 2010
Posts: 4,134
I wrote this whole long response about pressing seams, but when I looked again at the 2nd picture I saw something else. I could be way off but ......
The first and second rows of 4patches look fine (at the top of the 2nd pic) - the individual blocks lined up with nesting seam allowances, and it looks like a nice long flat seam when you joined the rows and pressed to one side.
So that should just carry on to the rest of the rows.
However, if you look at the last row of 4patches (the one closest to the camera), those blocks are turned a different way - so the long seam on the 4 patch is now horizontal instead of vertical (per the picture's orientation).
You might not have realized when you were sewing and pressing all those 4 patches together that they weren't all being assembled in the same manner. Of course, from the front they all look the same, but not the back, and that's where the seams are giving you a problem on this last row.
What do to about it?
You could just sew this seam and then press it open. This would distribute and eliminate some of the bulk. You just have to make sure the seam is properly opened on the back, flat on the front, and there are no tucks or pleats.
The other option is to take that last row apart, and repress it so it's just like the other blocks. But that would be a royal PITA. Because it wouldn't just be changing the orientation of the blocks - it would be repressing each one, and unless you were going to take it back to the 2patch sub-unit to really correct the issue, it's might not be worth the effort.
btw, a twisted seam here and there on the back is not the end of the world. It happens. As long as it's properly pressed on the front - with no tucks or pleats and a flat seam, it won't cause a problem. Well, maybe if you're hand quilting.
And I want to add that I think your checkerboard background is fabulous. You say you're a new quilter, but it's great that you're not just doing the same old, same old. It is a lot a more work than just plain patches, but it really catches the eye. Worth it!
I just located my first quilt top from 1998/9-ish. It was also a TATW. The seam allowances (of greatly varying widths) were pressed in very interesting directions within the same seam, and there was nary an intersection that matched up properly. I got a very good chuckle out of it. ;-)
Everyone has to start somewhere.
05-07-2011, 09:18 PM
#9
Super Member
Thread Starter
Join Date: Sep 2010
Location: Enchanted Oaks, Tx
Posts: 1,750
Originally Posted by MTS
I wrote this whole long response about pressing seams, but when I looked again at the 2nd picture I saw something else. I could be way off but ......
The first and second rows of 4patches look fine (at the top of the 2nd pic) - the individual blocks lined up with nesting seam allowances, and it looks like a nice long flat seam when you joined the rows and pressed to one side.
So that should just carry on to the rest of the rows.
However, if you look at the last row of 4patches (the one closest to the camera), those blocks are turned a different way - so the long seam on the 4 patch is now horizontal instead of vertical (per the picture's orientation).
You might not have realized when you were sewing and pressing all those 4 patches together that they weren't all being assembled in the same manner. Of course, from the front they all look the same, but not the back, and that's where the seams are giving you a problem on this last row.
What do to about it?
You could just sew this seam and then press it open. This would distribute and eliminate some of the bulk. You just have to make sure the seam is properly opened on the back, flat on the front, and there are no tucks or pleats.
The other option is to take that last row apart, and repress it so it's just like the other blocks. But that would be a royal PITA. Because it wouldn't just be changing the orientation of the blocks - it would be repressing each one, and unless you were going to take it back to the 2patch sub-unit to really correct the issue, it's might not be worth the effort.
btw, a twisted seam here and there on the back is not the end of the world. It happens. As long as it's properly pressed on the front - with no tucks or pleats it won't cause a problem. Well, maybe if you're hand quilting.
And I want to add that I think your checkerboard background is fabulous. You say you're a new quilter, but it's great that you're not just doing the same old, same old. It is a lot a more work than just plain patches, but it really catches the eye. Worth it!
I just located my first quilt top from 1998/9-ish. It was also a TATW. The seam allowances (of greatly varying widths) were pressed in very interesting directions within the same seam, and there was nary an intersection that matched up properly. I got a very good chuckle out of it. ;-)
Everyone has to start somewhere.
05-07-2011, 09:26 PM
#10
Banned
Join Date: Nov 2010
Posts: 4,134
Very exciting! And I can see why you want it perfect. But even it wasn't going overseas for such a special recipient, a few twisted seams wouldn't be the end of the world.
And next time you're making a quilt with a ton of pieced blocks that are going next to each other, the time to think about how you're going to press seams later on is when you're pressing the earlier seams. And you can see how the orientation plays a big part in the construction too. It was a big improvement for me when I started planning early on - the quilt tops went together faster and more smoothly because there weren't all those little hassles to deal with.
Don't second guess your choice to do the 4patch blocks. I think they make the quilt!
It will be beautiful and loved and appreciated and treasured in a way most of us can't even begin to comprehend.
Looking forward to seeing the completed quilt before you ship it off.

Thread
Thread Starter
Forum
Replies
Last Post
bearisgray
General Chit-Chat (non-quilting talk)
9
11-28-2011 10:08 AM
