
Design boards - how to make
 02-02-2013, 01:25 PM
#1
Super Member
Thread Starter

Join Date: Oct 2009
Location: St. Louis Cnty, MO USA
Posts: 1,064
Hello all - I've read that you can make a design board by purchasing a Project Board. The one I bought from Best Buy is a Tri-Fold project board that opens to 36 x 48 inches which is OK for me because I make mostly smaller quilt items anyway.
But what do you cover the board with (this one is white heavy weight cardboard, not the foam kind). I think I've read to cover it with white flannel (or felt?) but don't really know for sure and how would you attach it to the tri-fold board - glue all over, staples, tape?
I need some suggestions please. I've been hanging an old flannel backed table cloth to put the quilt squares on but it's kind of wobbly and thought something a little firmer would be nice.
Thanks for your help.
 02-02-2013, 01:33 PM
#2
Super Member
Join Date: Nov 2010
Location: Cadillac, MI
Posts: 6,487
My design wall is cream colored fleece and the fleece holds fabric very well. I used velcro for mine as I want it removable. Sticky back on the wall side and sew on on the fleece side - the velcro was packaged like that at WalMart.
02-02-2013, 01:36 PM
#3
Banned
Join Date: Nov 2010
Posts: 4,134
I use insulation boards.
They're around $12 at Home Depot or Lowes.
Size is 48"x96", but they can easily be cut to size if you need them a bit shorter or less wide.
Or if you need to stash them someplace unseen if you can't leave them out permanently.
They're covered on both sides.
I don't use ones that are just exposed styrofoam - too messy.
They come in a couple of thicknesses -I think 1/2" and 3/4 (or 7/8").
I use the 7/8" because they're sturdier just leaning against the wall. The thinner width doesn't necessary sag, but doesn't remain as ramrod straight.
I cover them with batting - you can use spray or staples or tape or thumbtacks to attach to the boards.
Because of the thickness, you can also use pins - just jab them in.
Which is why a harder surface would NOT work for me.
It limits what I can put up easily, and makes working with them a pain.
I have three boards lined up next to each other - I haven't bothered hanging them because I can't make up my mind about the final layout of other items in the room (hey, it's only been 3 years, what's the rush?).
Last edited by MTS; 02-02-2013 at 01:40 PM.
02-02-2013, 02:17 PM
#4
Banned
Join Date: Nov 2010
Posts: 4,134
Looks like the price went up a little bit to $14.25/board - still a great deal:
http://www.homedepot.com/h_d1/N-5yc1...&storeId=10051
http://www.homedepot.com/h_d1/N-5yc1...&storeId=10051
02-02-2013, 02:44 PM
#5
Senior Member
Join Date: Nov 2011
Location: Illinois/Wisconsin
Posts: 878
My husband cut some insulation boards (as mentioned above). His idea was to put them in the windows (north side) to cut down on cold drafts. This was awesome but in the end it did not work as the wood started to warp from moisture trapped between the two. However, I asked him to leave one set up in my sewing room. I bought some white flannel, sewed to lengths together and hung it from a curtain rod above the window (it hangs loose). This has worked very well for me and, yes, I can stick pins right into it if I need to. It can all come down in a few minutes but I have had it up for almost a year now. It is probably large enough for a lap quilt. Good enough for me. Whatever you decide to do, a design wall is so helpful. I love using mine. Yolanda Wood River
02-02-2013, 02:58 PM
#6
Super Member
Join Date: Jan 2010
Location: Texas
Posts: 5,500
I covered my design wall with Warm and Natural batting, but I understand flannel works fine. I attached mine with duct tape....folded the batting around the corners and taped on the back. That might work for you?
Dina
Dina
02-02-2013, 03:34 PM
#7
Super Member
Join Date: Aug 2010
Location: Delmarva Peninsula
Posts: 1,151
I used one of the insulation boards from Lowe's, I duct taped a solid flannel sheet from the thrift store to it. I also masking taped it to the wall, as the dogs liked to try to carry it around. I also made a small one from a cardboard box flattened out covered with a leftover piece of warm and natural, that is by my sewing machine to hold a sample square.
02-02-2013, 03:35 PM
#8
Junior Member
Join Date: Mar 2011
Posts: 246
I have two large pieces of insulation that I covered with a flannel backed tablecloth. I put the "slick" side to the inside and have the fuzzy side on the outside. Secured it with large straight pins. It holds the quilt blocks nicely.
One of the pieces will hold a twin size and with two it holds a queen. Very handy and inexpensive.
One of the pieces will hold a twin size and with two it holds a queen. Very handy and inexpensive.
02-02-2013, 04:19 PM
#10
Super Member
Join Date: Oct 2008
Location: The Finger Lakes of upstate NY
Posts: 3,465
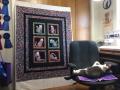
Funny this should come up; I thought about posting my design board this morning but didn't know if it would useful or not. This is how I lay out blocks; once the blocks are done, depending on the size of the quilt, I put them on a large piece of Warm and Natural that I have hung on a wall - or if that doesn't work, I lay them out on the floor, lol.
As I was making large blocks (15" from Bonnie Hunter's "Easy Street), I used a large piece of foam board I had, cut it down to 20" x 40" and scored it at 20". Originally, I covered it with Insulbright that I had as after hearing horror stories of it catching fire in the microwave, I wasn't going to use it for the original plan. I used a hot glue gun to adhere it. Unfortunately, I found that my pieces didnt really "stick" to it, it's too smooth. So I peeled that off and used a piece of Warm and Natural I had. When gluing, I run a little glue at the edge of the top, about 8" at a time, first one side, then bottom, other side and top, smoothing as I went. Then fold it to the back and repeat. This works great for me; I set it next to my sewing machine on a small table that I also iron on; I put together two blocks at a time. Sew one, turn board around and do another. Works great for me!
As I was making large blocks (15" from Bonnie Hunter's "Easy Street), I used a large piece of foam board I had, cut it down to 20" x 40" and scored it at 20". Originally, I covered it with Insulbright that I had as after hearing horror stories of it catching fire in the microwave, I wasn't going to use it for the original plan. I used a hot glue gun to adhere it. Unfortunately, I found that my pieces didnt really "stick" to it, it's too smooth. So I peeled that off and used a piece of Warm and Natural I had. When gluing, I run a little glue at the edge of the top, about 8" at a time, first one side, then bottom, other side and top, smoothing as I went. Then fold it to the back and repeat. This works great for me; I set it next to my sewing machine on a small table that I also iron on; I put together two blocks at a time. Sew one, turn board around and do another. Works great for me!

Thread
Thread Starter
Forum
Replies
Last Post
Michellesews
General Chit-Chat (non-quilting talk)
4
09-12-2011 08:24 AM
craftybear
Links and Resources
6
08-22-2011 05:12 PM
craftybear
Links and Resources
1
08-12-2011 06:51 PM


