
Tutorial On Making The Clothesline Baby Quilt
 05-15-2011, 03:35 PM
#1
Super Member
Thread Starter

Join Date: May 2010
Location: Upstate New York
Posts: 1,415
OK, this has taken me a bit but I finally got it done. I wanted to make sure I included pics of each step so that they're more clear for those of you who prefer visual aids. Since no one's had a baby in my family or friends circle recently, I made the tutorial quilts for my two DDs who were born before I started quilting. They had a blast picking out fabrics more to their little girl tastes as opposed to baby pastels.
First, I started with a 28" x 42" piece of sky blue fabric, marking with a silver pencil where the clothesline will be and then using a blanket stitch on white/cream bias tape as the clothesline.
For the cloud, I stitch on the cloud with a blanket stitch and then turn the quilt top over, cut a slit in the blue fabric beneath the cloud and stuff in a piece of batting (trapunto style) to make it stick out more. I also have used fusible fleece, cut 1/4" smaller than the cloud and fused to the back of the cloud. That's how I did this one. Then, I satin stitched the cloud in place.
Because I like to work on the above steps while my embroidery machine stitches the name, dob/tob and birth weight/length, I don't fuss around with lining the embroidery up with the edges of the pieces. I embroider on the fabric first, and then cut out the pieces. Then I press under 1/4" on all edges. I cut out all the accessories for each piece (such as collars, straps and pockets) and press under 1/4" on all of those sides as well. For the overall shorts, there's a hankerchief. For this, I took a 4.5" square of eyelet for girls, or other fabric for boys. I basted the eyelet to white muslin for this one, folded right sides together, corner to corner, and then stitched around, leaving a small area to turn. I turned it right sides out, whip stitched the opening closed and folded somewhat in half and stitched to the overalls. When I finished the pocket, I stitched it overtop the hankie. For the collars, I pinked the edges to make sure the would press under flat. Then I pinned all the outfits to the background and blanket stitch.
Once all the outfits were stitched in place, it was time to start the duckie. I either hand embroider the beak on after the duck is finished or use a piece of cloth. There was no pattern for the beak so I just sketch one on cloth. Then I use a small satin stitch to stitch it down. I stitch the wing to a larger piece of fuzzy yellow fabric with a wide satin stitch and then cut out the body. Then I stitch the duck's body and then head to the background using Stitch And Ditch beneath the background cloth. Once the duck is sewn on, I use embroider floss to embroider an eye for the duck.
Next, to make the clothespins, I use a medium weight fusible interfacing, pressed to the wrongside of the brown fabric and cut out 9 clothespins. The interfacing makes the tinier pieces easier to satin stitch in place, I feel. I normally don't pin the clothespins in place since they're so small that I can hold them in place with my finger while I run a thinner satin stitch around the edges.
I cut ribbons for the robe and satin stitch the centers in place and then tie the ribbons into bows. Then I apply a small dot of Fray Check/Fray Block to keep the ribbons from fraying.
Finally, I measure through the centers of the quilt and add borders. My girls like the look of a night time fabric as the borders so that's what I used here.
Because this is an applique quilt, I did have to square up the edges as applique tends to warp the background fabric a bit. I'll iron out the puckers that occurred around the cloud and duck and when I stipple, it will smooth them out more.
If there's any questions, please just ask. This is my first tutorial so I'm not entirely sure if I answered all the questions or showed all the steps you'll need to see/read in order to make the quilt. I take a lot of liberties with this quilt. I add or take away as I go, depending on who I'm making it for. One boy's parents didn't like the robe so I added an extra t-shirt and make two socks. I also included the time of birth and birth length where the original pattern did not. Have fun with this quilt. Personalize it to your style and how you like it. Make dresses or even use some of your own little one's clothes. Have fun!
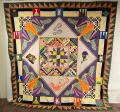
The original quilt pattern.
[ATTACH=CONFIG]197525[/ATTACH]
Marking where to put the clothesline with an erasable silver marking pencil.
[ATTACH=CONFIG]197526[/ATTACH]
Stitching the clothesline down with a blanket stitch.
[ATTACH=CONFIG]197527[/ATTACH]
The cloud piece and batting/fusible fleece.
[ATTACH=CONFIG]197528[/ATTACH]
Embroidering on the fabric before the pattern is cut.
[ATTACH=CONFIG]197529[/ATTACH]
Leveling the pattern on the embroidered fabric,
[ATTACH=CONFIG]197530[/ATTACH]
The cut out pattern piece
[ATTACH=CONFIG]197531[/ATTACH]
The cut pieces of fabric for the hankerchief.
[ATTACH=CONFIG]197532[/ATTACH]
The hankerchief stitched to the overall shorts and the "accessories".
[ATTACH=CONFIG]197533[/ATTACH]
I pinned the straps and stitched them to the background first, and then added the overalls.
[ATTACH=CONFIG]197534[/ATTACH]
The finished overall shorts.
[ATTACH=CONFIG]197535[/ATTACH]
Pinking the edges of the curved pieces.
[ATTACH=CONFIG]197536[/ATTACH]
Pinning all the pieces to the background fabric.
[ATTACH=CONFIG]197537[/ATTACH]
I used basting spray to keep the duck's beak in place as I stitched it on.
[ATTACH=CONFIG]197538[/ATTACH]
The clothespins: Some with the right side up and some with the wrong side up to show the fusible interfacing that I used.
[ATTACH=CONFIG]197539[/ATTACH]
Stitiching the clothespins on.
[ATTACH=CONFIG]197540[/ATTACH]
I used a short satin stitch to tack the ribbobns in place and then tied them into bows.
[ATTACH=CONFIG]197541[/ATTACH]
Stitching the wing to the yellow fabric first.
[ATTACH=CONFIG]197546[/ATTACH]
I stitched the duck's body on first, and added the head last.
[ATTACH=CONFIG]197547[/ATTACH]
I added some borders and this is the finished top. Sometime this week I'll get around to layering and quilting it.
[ATTACH=CONFIG]197548[/ATTACH]


Thread
Thread Starter
Forum
Replies
Last Post
craftybear
Links and Resources
14
09-27-2011 06:46 AM
craftybear
Links and Resources
4
10-08-2010 05:58 AM
