
2 fabric applique - Help!
 05-16-2018, 01:06 PM
#1
Super Member
Thread Starter
Join Date: Nov 2014
Location: Ontario Canada
Posts: 1,869
Hello all!
So I bought the koi garden pattern for 2 fabric applique (Nancy Chong's design) and I'm confused!
I've got the backing, and I've traced the pattern onto my white fabric. I've put my fusible interface onto the back of the white fabric, and now I'm lost.
I've read the instructions, but I'm still confused.
I found this tutorial on line ... Is this what I am supposed to do?
https://www.youtube.com/watch?v=WIlF5j8pKds
I thought it was easier than that? Or am I supposed to cut out the pieces and iron them on afterwards? Because when you look at the design, it is not all one piece (like I thought it would be!)
thanks in advance for your help!
 05-16-2018, 02:37 PM
#2
Super Member
Join Date: Aug 2011
Location: Asheville, previously Lake Vermilion, Tarpon Springs, Duluth, St Paul, Soudan
Posts: 1,651
Yep, that�s how I did mine (the pattern was also from Pacific Rim). That is a good video of the process.
You have 4 layers�backing, batting, and the 2 applique fabrics�the top layer and the one that �peeks through�, also known as the background. Your white that has been marked and has the fusible attached will be the top layer. You need one more fabric for the background that is exposed by cutting away the top layer.
Layer all 4: backing right side down, batting, background and top layer, both right side up.
My pattern said nothing about staystitching all around the outside, but that looks like a fine idea.
When you are doing the cutting, be sure to keep straight:
Which sections are you keeping as the top layer?
Which sections will be cut away and discarded?
It is helpful to actually write something like cut away. Also, be careful to pin in place areas that are �keepers� that have been 100% detached. Your quilting (unless you want to add more) is the stitching used for the raw edge applique. You attach the top layer applique and quilt at the same time.
I looked at the pattern you are making, and it has A LOT of pieces.
Good luck!
Last edited by Krisb; 05-16-2018 at 02:49 PM.
05-16-2018, 03:20 PM
#3
Power Poster

Join Date: Mar 2009
Location: Lake Elsinore, CA
Posts: 15,143
I've done quite a few 2 fabric applique pieces, but I don't use fusible. I copy the design onto the top fabric, baste the top onto the bottom, cut as I go along the design line, and do needle turn applique. I add batting and backing and quilt when all the applique is finished. This is the method Nancy Chong uses.
05-16-2018, 04:17 PM
#4
Super Member
Thread Starter
Join Date: Nov 2014
Location: Ontario Canada
Posts: 1,869
The instructions tell me to use Fusible. So I did. I have cut everything along the line. I have remove the white for my background is showing through. My next question is do I trim the white pieces smaller, or do I move them up, down or left or right to put the spacing in between the white and the background fabric?
thankx
thankx
05-16-2018, 04:48 PM
#5
Power Poster
Join Date: Mar 2009
Location: Lake Elsinore, CA
Posts: 15,143
I got out the instruction sheet for another of Nancy Chong's designs. She includes instructions for hand applique, fusible machine applique, and raw-edge applique.
For the fusible machine applique, the instructions say to "trace the pattern onto the right side of the applique fabric EXCEPT (her caps, not mine) you will trace along the dashed lines, ignoring the solid line. The dashed line will be your cutting line."
When you do hand applique (as I do) you cut on the solid line and turn the top fabric under, toward the dashed line, so it creates an area where the background fabric shows through. When you aren't turning under the edges, as in machine applique or raw-edge applique, you have to cut on the dashed line instead. Be sure not to use a permanent marker, since it may show or rub off.
05-17-2018, 08:47 AM
#7
Senior Member

Join Date: May 2011
Location: Western Washington
Posts: 938
If you go to website for Pacific Rim Quilt Co. there is a tutorial on the blog page on 2 fabric applique - https://pacificrimquilt.com/blog/?po...rns-by-machine and also for handturned applique with pictures. I have always done the handturn and am blessed with having Nancy Chong have classes at my LQS here in Snohomish, even Nancy uses machine applique, her monthly class "Help with Hand Applique" covers any and all subjects from Hawaiian quilting to Celtic quilting and beyond. Hope to see your finished project soon.
05-17-2018, 01:56 PM
#9
Super Member
Thread Starter
Join Date: Nov 2014
Location: Ontario Canada
Posts: 1,869
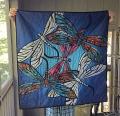
I figured it out! Thanks everyone! Now I know better for the next two!
Here's what it looks like ... i still have to sew it all down, but at least it looks like it's supposed to!
[ATTACH=CONFIG]594557[/ATTACH]
Here's what it looks like ... i still have to sew it all down, but at least it looks like it's supposed to!
[ATTACH=CONFIG]594557[/ATTACH]

Thread
Thread Starter
Forum
Replies
Last Post
craftybear
Links and Resources
1
10-25-2011 03:58 PM
MaryKatherine
Pictures
138
05-10-2011 05:05 AM
craftybear
Main
22
07-06-2010 05:51 PM
quiltingbee12
Main
1
09-01-2009 07:30 AM
