
Joining the ends of the binding strip on a 9 inch square potholder - help please
 12-23-2011, 05:06 AM
#11
Member
Thread Starter
Join Date: Feb 2011
Posts: 62
Havplenty --Wow! Thanks so much for that wonderful tute! It was just what I was looking for. I shall not be defeated on joining my binding ends, thanks to you! Merry Christmas and thanks again. This could possibly be my best Christmas present ever 
 12-23-2011, 05:27 AM
#12
Super Member

Join Date: Oct 2010
Location: Virginia
Posts: 1,355
Thanks for the tutorial. I am making pot holders and wondered how to close the binding. Usually I just stick one end into the other end (which I have folded the edge inside when I started) and stitch 1/4" till it's attached. But I know this is the proper way to close up a binding - just needed pictures to see how to do it. YouTube is great but you don't have it printed out to follow when you need it - you just need to remember - so this is going to be printed out and kept near my sewing machine. Merry Christmas and thanks again!
12-23-2011, 05:33 AM
#14
Senior Member

Join Date: Jan 2011
Location: northern Minnesota
Posts: 430
The explanation and pictures by Havplenty was the same way that I do it. I recently purchased a tool from Sewing with Nancy maybe and it was around $20 and I have used it multiple times already and every time the binding has been perfect. I would highly recommend it if you do many binding projects. I have been quilting for years and always struggled with the binding connection.
12-23-2011, 01:19 PM
#16
Senior Member
Join Date: Apr 2010
Location: Lived in San Diego now retired in Eagar, AZ.
Posts: 887
i don't join at all.... i begin the binding strip with the end (2--3" extra) folded over itself perpendicularly...making a 45 deg fold with the end pointing at the center of the potholder/quilt....stitch all round and when you get back to the fold, move binding strip to the outside about 1/16th of an inch.... so the raw edges are a bit off the edge.... now seam down for about 2", cut off on diagonal (to prevent more bulk) and then fold the first end over, clip off extra and top stitch...looks perfect every time and the tiny 3/8--1/2" diagonal cannot come undone as it is sewn 2" inside... no wrestling, no wrong guesses.... it's easy, fast and looks perfect every time as the original 45 deg fold is all you see...
12-23-2011, 01:47 PM
#17
Super Member

Join Date: Apr 2007
Location: Phoenix, AZ
Posts: 2,943
Leave long enough tails at the ends of the binding. When you put the right sides together at the 90 degree angle just look and see where the outside tails go and that will show you where to sew. Wish I had my camera here to do a pic.
I know there are lots of tutes here on QB and on YouTube.
ali
I know there are lots of tutes here on QB and on YouTube.
ali
12-23-2011, 01:52 PM
#18
Super Member
Join Date: Sep 2010
Location: Keller, TX
Posts: 7,417
The trick to measuring how long is to allow the same amount as the width of your binding. For example, if binding is 2 1/2 inches add that to the length required to go around the object. Hope that helps. Spice is saying the same thing.
12-23-2011, 03:28 PM
#19
Super Member
Join Date: Dec 2010
Location: MO (the Show Me state)
Posts: 2,947
here is another tute excerpt showing how to enclose the tail end into the other tail end without sewing the two together at an angle. looks easy enough. i havent tried this method because i always make a hanging loop. this is how i miter my corners though. i just gave out the 18 pairs of potholders i made for christmas gifts or i could show you mine.
Step 2: Now we need to machine sew the binding to the potholder. You can follow our tutorial or use your own preferred method (be sure to compensate for the extra thickness of the potholder when choosing a binding width).
Trim one end of your binding strip to a 45� angle, place along the edge of the potholder (right side down) and fold over the edge �” (I like to press it with the iron to get a nice crease).
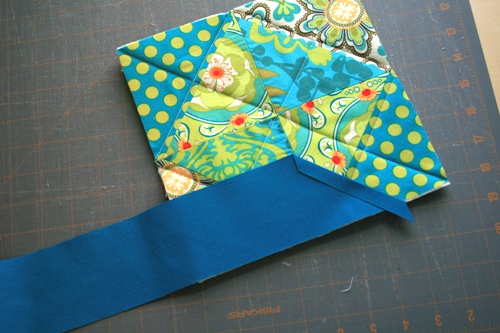
Fold your binding strip in half and pin �” away from the edge.
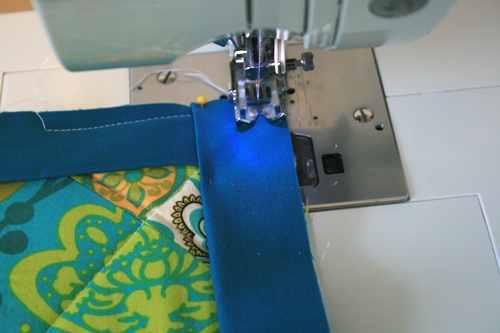
Start sewing at the pin and sew approximately 3/8” away from the side.
Continue until about 3/8” from the end of the potholder. Cut threads and remove from machine.
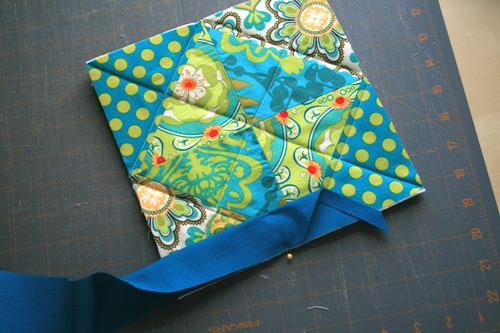
At the corner, pull back the binding perpendicular to the binding you just sewed down:
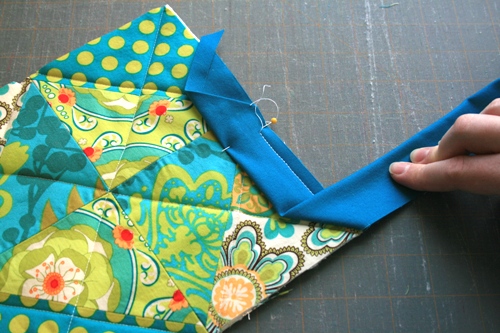
Then, fold the binding strip back over itself at the edge of the potholder. Hold in place:

And pin to secure your fold:
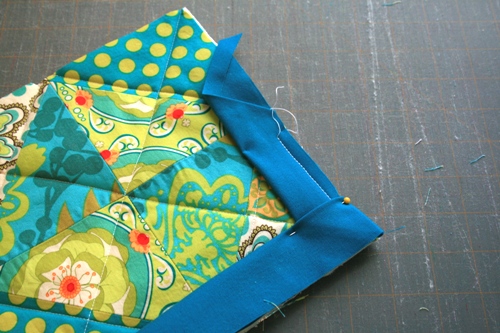
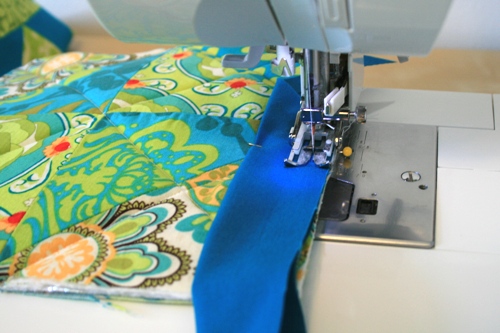
Begin sewing from the edge and keep 3/8” away from the side.
Repeat this process for the next three corners. Before you sew the last corner, trim the binding strip at an angle. Make sure it overlaps the beginning of the strip by about �”.
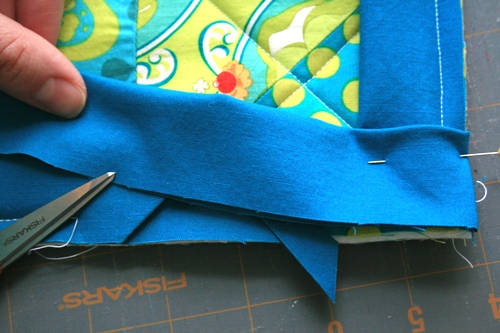
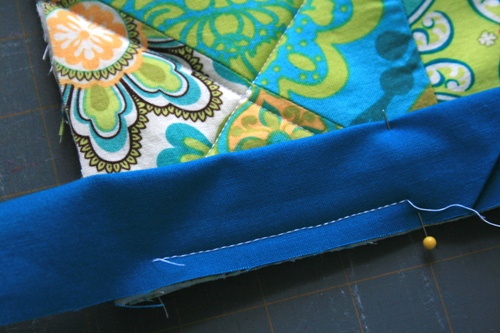
Tuck the edge under the folded edge and pin in place.

Sew until your stitches overlap and trim off the little triangle to reduce bulk:

I like to trim the corners a bit to prevent the binding from getting too bulky. If you want to do this, trim off a sliver of batting…but make sure to do it in exactly the same place I did in the picture. If you trim the other side of the corner, you’ll cut a hole in your binding.
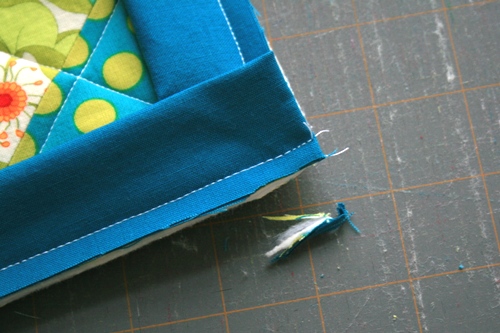
Press your binding away from the center (I use an iron to get a sharp edge)

Step 2: Now we need to machine sew the binding to the potholder. You can follow our tutorial or use your own preferred method (be sure to compensate for the extra thickness of the potholder when choosing a binding width).
Trim one end of your binding strip to a 45� angle, place along the edge of the potholder (right side down) and fold over the edge �” (I like to press it with the iron to get a nice crease).
Fold your binding strip in half and pin �” away from the edge.
Start sewing at the pin and sew approximately 3/8” away from the side.
Continue until about 3/8” from the end of the potholder. Cut threads and remove from machine.
At the corner, pull back the binding perpendicular to the binding you just sewed down:
Then, fold the binding strip back over itself at the edge of the potholder. Hold in place:
And pin to secure your fold:
Begin sewing from the edge and keep 3/8” away from the side.
Repeat this process for the next three corners. Before you sew the last corner, trim the binding strip at an angle. Make sure it overlaps the beginning of the strip by about �”.
Tuck the edge under the folded edge and pin in place.
Sew until your stitches overlap and trim off the little triangle to reduce bulk:
I like to trim the corners a bit to prevent the binding from getting too bulky. If you want to do this, trim off a sliver of batting…but make sure to do it in exactly the same place I did in the picture. If you trim the other side of the corner, you’ll cut a hole in your binding.
Press your binding away from the center (I use an iron to get a sharp edge)
12-23-2011, 04:33 PM
#20
Power Poster
Join Date: Mar 2011
Location: Ontario, Canada
Posts: 41,458
Havplenty, beautiful instructions on doing diagonal binding join! Must be because you're from show me state? On something that small (please don't call the quilt police) I just do a straight join. I make sure the 1/4 seam is well sewed and press the seam allowances open and finish sewing the binding down.

Thread
Thread Starter
Forum
Replies
Last Post
