
My New Design Wall
 08-12-2018, 06:41 AM
#11
Super Member
Join Date: May 2008
Location: Colorado
Posts: 1,184
What a great idea. I “lost” my design wall when my husband decided I needed to remove a wall. Now I lay my project on the bed to work on it. Not as good as a design wall. I will see how I can move my ironing table so accommodate the wall. I hope I can get my husband to accommodate me.....hahahahaha...........What a GREAT idea!!!!! Thanks.

 08-12-2018, 07:47 AM
#13
Super Member
Thread Starter

Join Date: Apr 2010
Location: Wickenburg AZ
Posts: 2,891
Thanks for all your comments.
J50: It is just one set of rails. I bought the Smart Standard 10' set. There is a pillar between the two closets, so I wanted the design wall to be the full width of one closet plus cover most of the pillar. We ended up making it 66". We used 1/2" plywood and had to attach a 2x2" header on the back to screw the rollers into. There is also a 2x2 footer on the bottom that has a groove cut into it that a piece on the floor sits into to keep everything lined up smoothly. Since I wanted it 66" wide and plywood only comes in 48" sheets, we cut two pieces down to 33" each and glued and screwed them together. It is nice and sturdy.
My original intent was to put insulation board on the plywood and then use flannel or batting, but I was concerned about the extra 2" on the front throwing everything off kilter. So for now I just have the batting on the front. I will test it for awhile and see if I need the insulation to be able to pin into. Right now the batting is working fine. The quilt is just there on the batting with no pins. As long as that works, I will leave it like it is. If I need to put the insulation board under it, it will be easy as the batting is just stuck on the wood right now with spray glue and is easily lifted and fixed. I left the batting long enough on all sides to be able to put 2" insulation board in there if necessary.
I am not sure you could use just foam board without the plywood as there would be no good place to attach the rollers.
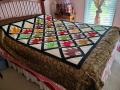
For those who like the quilt, it is called Hanging Gardens by Cozy Quilt Designs. I saw Donna Jordan's video on it and just loved it.
J50: It is just one set of rails. I bought the Smart Standard 10' set. There is a pillar between the two closets, so I wanted the design wall to be the full width of one closet plus cover most of the pillar. We ended up making it 66". We used 1/2" plywood and had to attach a 2x2" header on the back to screw the rollers into. There is also a 2x2 footer on the bottom that has a groove cut into it that a piece on the floor sits into to keep everything lined up smoothly. Since I wanted it 66" wide and plywood only comes in 48" sheets, we cut two pieces down to 33" each and glued and screwed them together. It is nice and sturdy.
My original intent was to put insulation board on the plywood and then use flannel or batting, but I was concerned about the extra 2" on the front throwing everything off kilter. So for now I just have the batting on the front. I will test it for awhile and see if I need the insulation to be able to pin into. Right now the batting is working fine. The quilt is just there on the batting with no pins. As long as that works, I will leave it like it is. If I need to put the insulation board under it, it will be easy as the batting is just stuck on the wood right now with spray glue and is easily lifted and fixed. I left the batting long enough on all sides to be able to put 2" insulation board in there if necessary.
I am not sure you could use just foam board without the plywood as there would be no good place to attach the rollers.
For those who like the quilt, it is called Hanging Gardens by Cozy Quilt Designs. I saw Donna Jordan's video on it and just loved it.
 08-12-2018, 08:25 AM
#16
Junior Member
Join Date: May 2017
Location: florida,
Posts: 262
Thanks for the explanation of how it was put together.
j50
j50
Originally Posted by JudyG

Thanks for all your comments.
J50: It is just one set of rails. I bought the Smart Standard 10' set. There is a pillar between the two closets, so I wanted the design wall to be the full width of one closet plus cover most of the pillar. We ended up making it 66". We used 1/2" plywood and had to attach a 2x2" header on the back to screw the rollers into. There is also a 2x2 footer on the bottom that has a groove cut into it that a piece on the floor sits into to keep everything lined up smoothly. Since I wanted it 66" wide and plywood only comes in 48" sheets, we cut two pieces down to 33" each and glued and screwed them together. It is nice and sturdy.
My original intent was to put insulation board on the plywood and then use flannel or batting, but I was concerned about the extra 2" on the front throwing everything off kilter. So for now I just have the batting on the front. I will test it for awhile and see if I need the insulation to be able to pin into. Right now the batting is working fine. The quilt is just there on the batting with no pins. As long as that works, I will leave it like it is. If I need to put the insulation board under it, it will be easy as the batting is just stuck on the wood right now with spray glue and is easily lifted and fixed. I left the batting long enough on all sides to be able to put 2" insulation board in there if necessary.
I am not sure you could use just foam board without the plywood as there would be no good place to attach the rollers.
For those who like the quilt, it is called Hanging Gardens by Cozy Quilt Designs. I saw Donna Jordan's video on it and just loved it.
08-12-2018, 11:16 AM
#17
Super Member
Join Date: Feb 2011
Location: Houston, TX
Posts: 7,312
Love, love, love this! I am planning on a move sometime next year and this would be great to do in my "new" house (which I haven't found yet). I am gathering ideas now for my sewing room and this is definitely on the list.


Thread
Thread Starter
Forum
Replies
Last Post
Chester the bunny
Main
10
10-28-2011 03:13 PM
craftybear
Links and Resources
6
08-22-2011 05:12 PM
craftybear
Main
35
05-20-2011 01:45 PM
craftybear
Links and Resources
5
05-18-2011 07:04 AM
