Unfamiliar-to-me Border
 07-08-2022, 09:33 AM
#1
Super Member
Thread Starter

Join Date: Jul 2018
Location: Southern USA
Posts: 1,976
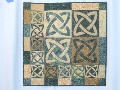
Hello Quilters! A Patriotic panel picture was sent to me by a fellow member here on Quilting Board. Sue suggested I make one of my QOV panels with this border. I wasn’t familiar with this border but I could distinguish it was a quarter square triangle so I started making them. Boy how I made them! I had just laid a few out to make sure I was on track. So I continued. I knew by the photo, the corners were half square triangles. However, when I got them all laid out, the top and bottom rows were all wrong. Everything needed to be mirrored. So then my companion ( my ripper-lol) and I ripped out about 44 QST’s and resewed them all.
I’m sure many of you have made this border before but I only made 2 queen quilts and a few baby quilts before asked to join QOV group in 2019 and I was making this from a picture. I cut my fabrics 5 1/2 inches and the red I cut in half from corner to corner, making two pieces. The navy and white 5 1/2 inch squares I cut from corner to corner twice making an X cut for 4 pieces to make my QST. I then trimmed to square to 4 1/2 inch QST.
That night my bell rang DING, DING, DING or some might say my light bulb came on!
I went to YouTube ( why didn’t I remember what my grown kids/grandkids say. If you want to know ANYTHING google it or look up on YouTube)
I found out the border is called Twisted Ribbon or Curling Ribbon. I watched the exact lady with the eagle photo Sue sent make her border and tell you to MIRROR the sides from the top and bottom. If I had thought to look this up the day before it would have saved me a lot of ripping. Sue said she’s glad to know I make mistakes!-lol
On youtube the border she demonstrated is one row but on her eagle picture it’s 2 QST rows.
Thanks Sue for giving me a new to me idea and realizing I’m far from perfect. ( I thought that was obvious-lol)
Ps. By the way my panel was squared down to 19x29 and I started adding the red borders & building from there. The original panel may have been the last on the bolt as it was off a lot.
I hope you all have a nice day and maybe get time to quilt today-Toogie

 07-08-2022, 10:29 AM
#3
Super Member
Thread Starter
Join Date: Jul 2018
Location: Southern USA
Posts: 1,976
Originally Posted by tallchick

Another beauty Toogie! I love this border and if you don’t mind, I can see it incorporated into a few quilts I have in mind. Someone is going to be so thrilled with this.
On YouTube she has you sew fabrics in strips then cutting across at an angle. You would need to be very exact but it could be quicker if you were. I had all my QST’s made but I think I’d still be hesitant to try her way.
This is the picture Sue sent. You can see the QST rows.
07-08-2022, 12:22 PM
#6
Power Poster

Join Date: Mar 2009
Location: Lake Elsinore, CA
Posts: 15,143
Your quilt came out beautiful. It's funny how we can look at things differently and come up with the same result. I see the border as dark-white-dark squares set on point with side setting triangles, separated by a red strip that is cut at an angle on both ends. Making it this way would be much easier for me, but perhaps not for everyone.