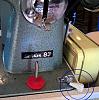
Are you just trying to get to the bottom to oil or do you want to take it out completely? What kind of machine is it? Here is a picture of the lever (double blue circles) of a plastic case that needs to twisted to be able to tip it back to get to the bottom of the machine.
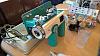
and here is a picture of my Miracle tipped back - please note that I have a couple of sturdy pool noodles to support the back of the machine while working on the bottom.
If it is a White or a National, those will sometime have a screw or push button that latches it into a case. Many of the Japanese machines have a similar lever as the plastic cases, but it is a little further back toward the handwheel that just needs twisted off the machine to be able to tilt the machine back.
If you want to remove the machine completely, there are instruction on the location of the set screws after the machine is tilted back at
http://mysewingmachineobsession.blog...head-from.html
We like pictures. In order to post pictures on Quilting Board, you will probably need to reduce or compress the picture to a
file size that is smaller than 2MB. How to post images can be found at
https://www.quiltingboard.com/attach...020-01-17-.pdf
Don't forget to scroll over to the far right to find and click on the "
Upload" button.
I have found that only the big red "Reply" button or "Quote" work to give me the paper clip icon to work for adding pictures.
https://www.quiltingboard.com/attach...p-location.jpg
Some additional info regarding reducing images at post #4 and images for the scroll and upload button can be found at #5 of
quilt block ID?
Or simply - Make sure pictures are smaller than 2MB
Click on red "Reply" button
Click on the paper clip icon
Click browse - choose picture/s. (only 5 allowed per post)
Once they show up as being loaded, Scroll over to the right side and click on "Upload"
After the pictures show up as being attached, you can close that window and go back to the screen to finish posting your post.
Janey - Neat people never make the exciting discoveries I do.
Not affiliated with off-site link(s)