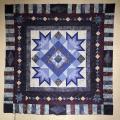
QB Block-of-the-Month, March 2013 - Lucky Clover Directions & Discussion
#11
i don't use the templates to cut one piece at a time. i use the templates as guides. i print them out, lay them on the strips of fabric to see how i can squeeze out as many pieces as possible, then start cutting.
if you are using the same fabric for the whole background, just fold your strips in half.
that way you cut pieces B and C at the same time.
where B and C are made using different colors/fabrics, just layer the fabrics so that one is face up and the other is face down. this will also result in having cut B and C at the same time.

the photos below show pieces cut for the January block, but the principal is the same.
i didn't do it on this occasion, but the templates are even easier to use if you iron freezer paper to some muslin (or - better yet - from a fabric in your stash you don't like any more or have left over.) then print the templates on that. when you cut them out, the fabric on the back will keep them from slipping as you lay them down to use as cutting guides.
if you're going scrappy, just stack your fabrics so you don't have to cut one piece at a time.

[ATTACH=CONFIG]399153[/ATTACH]
[ATTACH=CONFIG]399154[/ATTACH]
__________________
- necessity is the mother of invention. lazy is the crazy aunt.

- for issues regarding the reminder emails, please contact [email protected]
#12
Super Member
Join Date: Apr 2010
Location: Snellville, Ga & Hiawassee
Posts: 1,994
Thank you so much Patrice for the detailed instructions. I'm back home now & have decided to go ahead with your instructions & now with the further details I'm excited to play in my stash. Going the scrappy route- so far not even the slightest impression in my stash. May take a year to make a dent!
#13
i think this block will look faaaaaaaaaaabulous done scrappy. good choice! 

__________________
- necessity is the mother of invention. lazy is the crazy aunt.

- for issues regarding the reminder emails, please contact [email protected]
#14
Junior Member
Join Date: Sep 2012
Location: Ann Arbor, MI
Posts: 105
[ATTACH=CONFIG]398854[/ATTACH] [ATTACH=CONFIG]398855[/ATTACH]
This block takes us back to practice with Y-Seams.
This is also a good block for practice working with seams pressed open.
I found that it was easier to assemble and looked better that way.
You can find instructions for one 18" version here, at the Quilter's Cache:
http://www.quilterscache.com/L/LuckyCloverBlock.html
I made mine as a 12" block and pieced it together in a different order.
The attached file includes templates (my preferred cutting method), rotary cutting instructions, and piecing diagrams for my 12" version.
For those who simply cannot bear the though of another Y-Seam, there is a brief example of assembly using squares and half-square triangles.
This block is not a good candidate for paper/foundation piecing. It wouldn't be impossible, but it would not be a practical approach.
I can't read the instructions that are over the borders. I have looked online and can't find another one like it. Any suggestions?
#17
Junior Member
Join Date: Sep 2012
Location: Ann Arbor, MI
Posts: 105
#18
Junior Member
Join Date: Sep 2012
Location: Ann Arbor, MI
Posts: 105
I have a question about the template for the 18" size. When printed at 100% mine is bigger than the one on the screen. I know this is probably a dumb question but I am new at quilting and have printed only one template. The one I used was scaled to size to the one on the screen.
#19
Super Member
Join Date: Jan 2011
Location: Wyoming in the summer, Florida in the winter
Posts: 7,583
I didn't get it done yesterday but I did today. These Y seams were a little trickier for me but it is laying nice and flat. Only 1 complaint, we need these blocks every 2 weeks so I can see more progress on my new quilt LOL. Here's all of mine ladies.....[ATTACH=CONFIG]399284[/ATTACH]
#20
Junior Member
Join Date: Jan 2013
Location: Kansas City, MO
Posts: 255
I really like this block but I'm struggling on the block that has the 4" square in the center. I have some fabric I'd love to fussy cut but am trying to wrap my brain around how to make it work with the one big center square. Any advice? Beautiful choice, maybe my favorite yet, even with y-seams.
Thread
Thread Starter
Forum
Replies
Last Post
patricej
Blocks of the Month and Week
9
03-19-2015 06:46 AM
patricej
Blocks of the Month and Week
18
10-04-2013 06:01 AM
patricej
Blocks of the Month and Week
15
07-30-2013 10:29 AM
patricej
Blocks of the Month and Week
104
07-24-2013 03:58 AM
patricej
Blocks of the Month and Week
48
03-04-2013 02:39 AM


