Go Back  Quiltingboard Forums > Pictures
First Rug >

First Rug

First Rug

Thread Tools
 
Old 02-12-2020, 04:38 PM
  #11  
Super Member
 
Quiltah Mama's Avatar
 
Join Date: Nov 2018
Location: Maine
Posts: 1,223
Default

Great rug, love your colors. Love your title, "First Rug". By the name of the title, I take it, you enjoyed the process and plan on doing it again.
Quiltah Mama is offline  
Old 02-13-2020, 06:10 AM
  #12  
Super Member
 
Join Date: Oct 2015
Location: Va.
Posts: 5,752
Default

Cool fabric choices- good job!
rryder is offline  
Old 02-13-2020, 09:59 AM
  #13  
Super Member
 
osewme's Avatar
 
Join Date: Apr 2011
Location: Texas
Posts: 5,546
Default

That rug turned out fantastic. I love the colors you used. Sounds like you might be making another one & would love to see how the indoor/outdoor fabric works for it.
osewme is offline  
Old 02-14-2020, 07:53 AM
  #14  
Junior Member
 
Join Date: Feb 2018
Location: Tennessee
Posts: 193
Default My First Rug

I too completed my first rug a couple of weeks ago. I also watched the YouTube video; it was really helpful. I think the key is to make sure you have the rug completely flat at all times as you sew - I used an extension table and then had plastic storage boxes and books all around that so when the rug got bigger, it all stayed completely flat. I also think it is important to not only to press every 2-3 rows; but when you press, make sure it cools completely flat before taking it back to sew. I have had no problem. I hope this helps.
https://www.youtube.com/watch?v=Y8xblarkuBg


Attached Thumbnails Click image for larger version

Name:	Jelly Roll RugJPG.JPG
Views:	25
Size:	42.9 KB
ID:	622561  
Little Lulu is offline  
Old 02-23-2020, 04:50 PM
  #15  
Super Member
Thread Starter
 
aashley333's Avatar
 
Join Date: Oct 2019
Location: Corpus Christi, Texas
Posts: 1,809
Default Update: Rug Backing

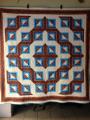
The utility fabric that was donated to me (thanks again, Osewme) works like a charm!
I zigzagged around the rug with a heavy needle and trimmed. I placed newsprint underneath to reduce friction.
Attached Thumbnails Click image for larger version

Name:	backing1 - Copy.jpg
Views:	23
Size:	256.3 KB
ID:	622811   Click image for larger version

Name:	backing2.jpg
Views:	26
Size:	1.09 MB
ID:	622812  
aashley333 is offline  
Old 02-23-2020, 05:44 PM
  #16  
Senior Member
 
SewingSenior's Avatar
 
Join Date: Mar 2018
Location: Carrollton, TX
Posts: 470
Default

Your rug is beautiful. I grew up with what we called scrap rugs and loved them then and still do. When my DD was making one she ran across an article that said to keep the cloth rugs from sliding across the floor you can use clear silicone caulking from Home Depot on the backing. Just run a bead of caulking around the rug and then spread it out a little with a piece of cardboard or your finger. This is what I use on my dollar store gloves instead of buying quilting gloves from the fabric stores, much cheaper. Anyway I love your rug.
SewingSenior is offline  
Old 02-24-2020, 06:58 AM
  #17  
Senior Member
 
Join Date: Jun 2013
Location: Oviedo,FL
Posts: 885
Default

You did a great job!
Sallybear6 is offline  
Old 02-25-2020, 06:25 PM
  #18  
Super Member
 
osewme's Avatar
 
Join Date: Apr 2011
Location: Texas
Posts: 5,546
Default

Looks like the utility fabric worked out great for your rug. I was afraid it wouldn't be enough to fit but it looks great! So glad I could help you with your quilt.
osewme is offline  
Old 02-26-2020, 10:53 AM
  #19  
Super Member
 
Join Date: Sep 2009
Location: Utah
Posts: 5,496
Default

It looks great! I have been thinking about trying one. I worry about it curling also. I will try to do what you did and go slow and iron frequently. Thanks for the tips.
javin22 is offline  

Posting Rules
You may not post new threads
You may not post replies
You may not post attachments
You may not edit your posts

BB code is On
Smilies are On
[IMG] code is On
HTML code is On
Trackbacks are Off
Pingbacks are Off
Refbacks are Off


FREE Quilting Newsletter