
Colorado get-together?
 06-29-2022, 05:57 AM
#321
Super Member

Join Date: Mar 2015
Location: Denver, CO
Posts: 4,254
We're having our mid-summer Colorado get together. We've had a mix of dry sunny days and several cloudy days with rain. Summer is a truly great time to be in Colorado.
We have submissions from a few of our members. We'll start off with Leon.
Leon
Leon, who we call our member-at-large from Kansas, sends us these notes about his activities:
It has been a busy month in Kansas. We have been busy doing demos. We had a weekend at a folk life festival. We spent two Mondays with a kids Pioneer camp and had bunches of kids trying out our Singer 99 hand cranks. We spent a Friday morning with about 20 kids at a local library with other helpers. We had 4 99s and a VS 28. Whew. Next month will be much calmer.
At the folk life festival the potter had a Singer 99 that was gummy. 2 hours later I had it stitching for her. The Pioneer camp was in Abilene. A new VSM friend met us after our gig and had me check out a plastic WHITE for her. I looked it over and made a list of pieces she needed. Then we took one of our hand cranks into the restaurant. (hmm, sounds familiar). She loved using it and asked all sorts of questions. She had said she had found a black Singer along the road and was going to give it to us as a thank you. OK, we went outside and looked into her hatchback.
Nice cabinet. We opened the lid and looked through the dust. Oh could it be? Yes! It was another 99 in a 3/4 cabinet. We told her that she needed to keep it and to bring it back to life. Such a delight. She is well on her way to having her own hand crank now.
If you go to the Facebook page "Merry Cranks" you can see photos and videos of the our events.
James
James sends us these notes about his fairly active month:
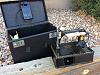
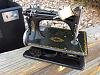
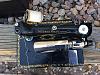
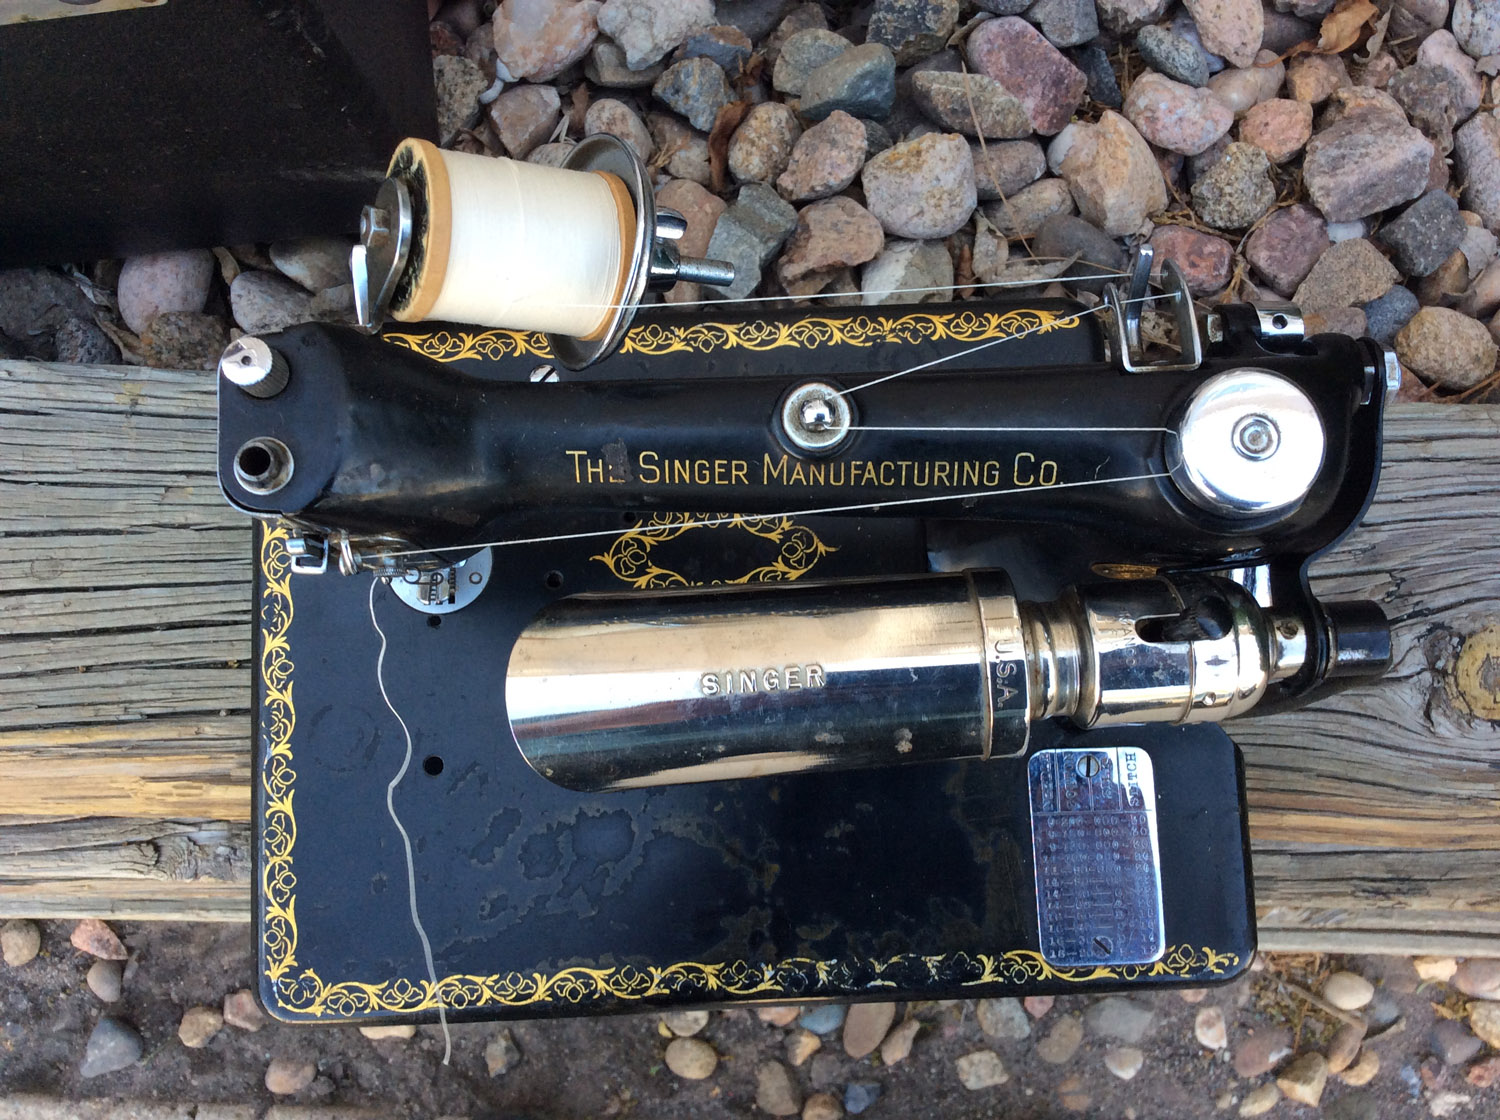
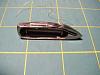
I have has quite a month with sewing related collecting. The big catch of course is my Singer 24-80 sewing machine from 1921. It is fully running with some shellac loss but decals are in good shape and the wiring looks safe. The pedal was only made in 1936 and the case appears to be a type 5 featherweight style. It is missing the little cap on top of the needle bar but that does not affect the sewing.
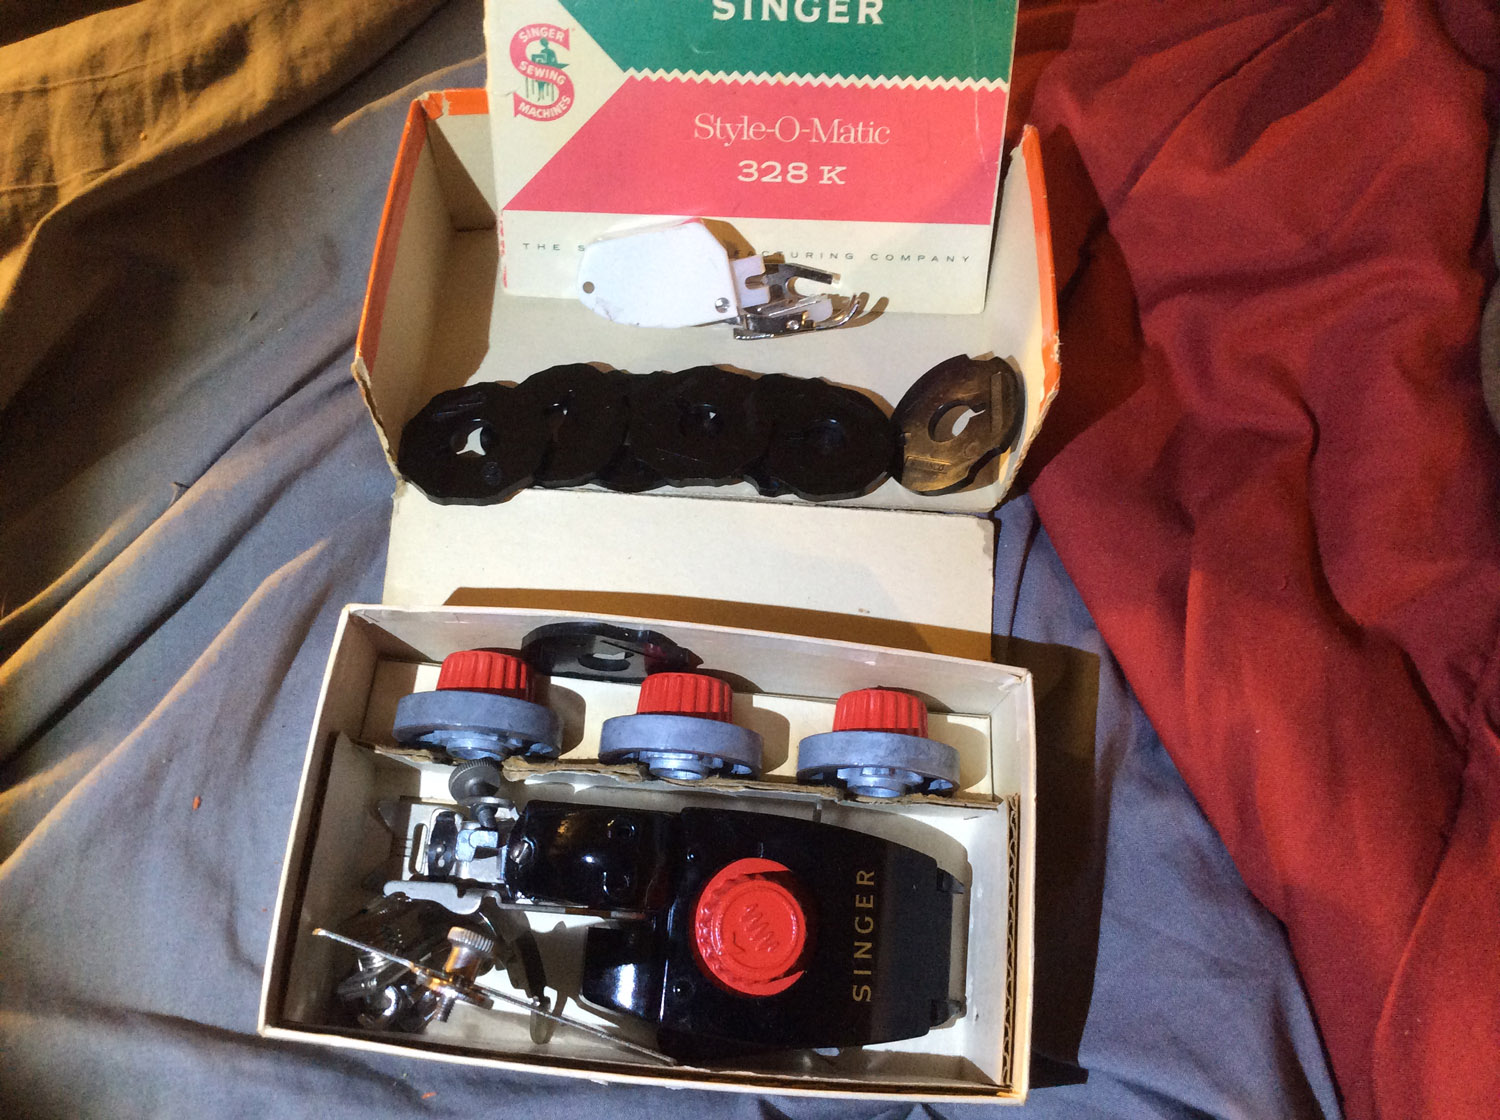
I also collected a Singer Automatic Zigzagger box with four red top cams. The box was marked 301 so it was probably sold along with a Singer 301. It also came with 7 flat cams and a manual for the Singer 328k and 3 different presser feet. A much more modern walking short shank foot was included as well.
I am joining in a shirt sew along so I am sure I will learn a lot about reading patterns, tracing patterns, making adjustments for fitting. I have selected the Men's All Day shirt pattern from Liesl and Co. I have not selected the final fabric yet but have already gathered some muslin for fitting and alteration adjustments as well as sewing thread and tools needed.
James

to be continued...
We have submissions from a few of our members. We'll start off with Leon.
Leon
Leon, who we call our member-at-large from Kansas, sends us these notes about his activities:
It has been a busy month in Kansas. We have been busy doing demos. We had a weekend at a folk life festival. We spent two Mondays with a kids Pioneer camp and had bunches of kids trying out our Singer 99 hand cranks. We spent a Friday morning with about 20 kids at a local library with other helpers. We had 4 99s and a VS 28. Whew. Next month will be much calmer.
At the folk life festival the potter had a Singer 99 that was gummy. 2 hours later I had it stitching for her. The Pioneer camp was in Abilene. A new VSM friend met us after our gig and had me check out a plastic WHITE for her. I looked it over and made a list of pieces she needed. Then we took one of our hand cranks into the restaurant. (hmm, sounds familiar). She loved using it and asked all sorts of questions. She had said she had found a black Singer along the road and was going to give it to us as a thank you. OK, we went outside and looked into her hatchback.
Nice cabinet. We opened the lid and looked through the dust. Oh could it be? Yes! It was another 99 in a 3/4 cabinet. We told her that she needed to keep it and to bring it back to life. Such a delight. She is well on her way to having her own hand crank now.
If you go to the Facebook page "Merry Cranks" you can see photos and videos of the our events.
James
James sends us these notes about his fairly active month:
I have has quite a month with sewing related collecting. The big catch of course is my Singer 24-80 sewing machine from 1921. It is fully running with some shellac loss but decals are in good shape and the wiring looks safe. The pedal was only made in 1936 and the case appears to be a type 5 featherweight style. It is missing the little cap on top of the needle bar but that does not affect the sewing.
I also collected a Singer Automatic Zigzagger box with four red top cams. The box was marked 301 so it was probably sold along with a Singer 301. It also came with 7 flat cams and a manual for the Singer 328k and 3 different presser feet. A much more modern walking short shank foot was included as well.
I am joining in a shirt sew along so I am sure I will learn a lot about reading patterns, tracing patterns, making adjustments for fitting. I have selected the Men's All Day shirt pattern from Liesl and Co. I have not selected the final fabric yet but have already gathered some muslin for fitting and alteration adjustments as well as sewing thread and tools needed.
James


to be continued...
 06-29-2022, 06:04 AM
#322
Super Member
Join Date: Mar 2015
Location: Denver, CO
Posts: 4,254
Courtney
Earlier in the month Courtney sent this:
Dear All,
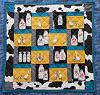
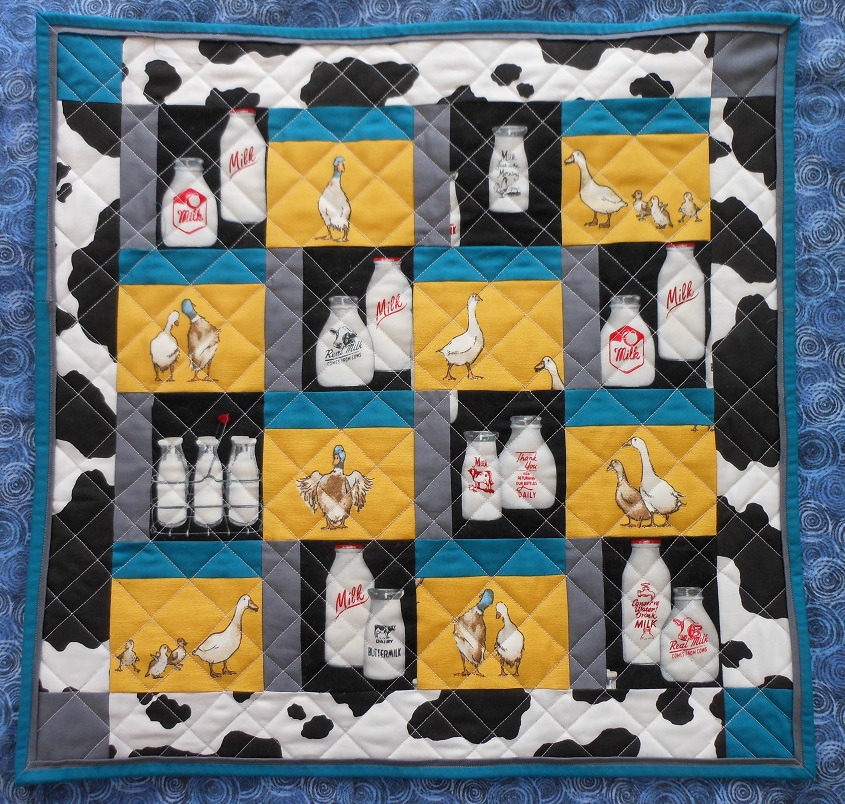
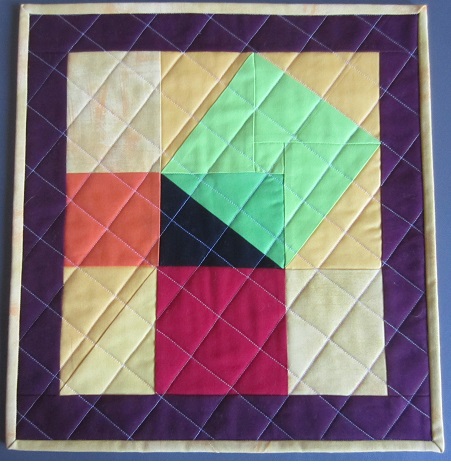
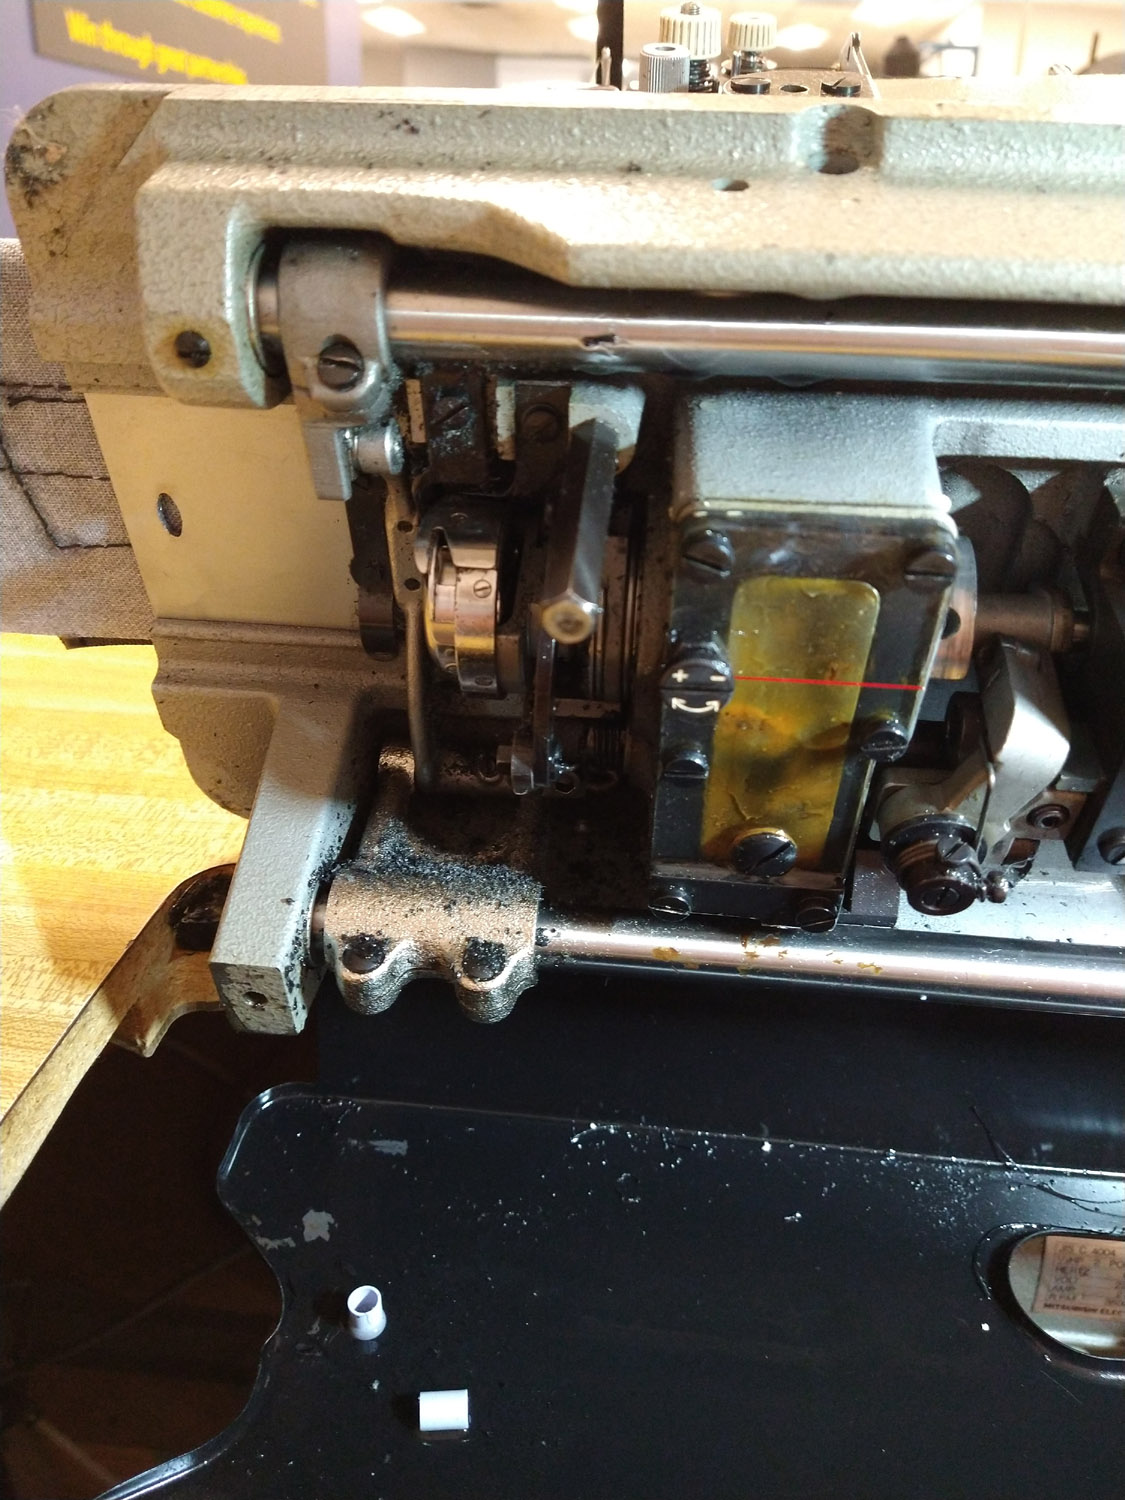
I mentioned my library quilts and have attached pictures. The first is my honorable mention called "Milk and Quakers." The second is my "Crayola 4X4X4." I made both of these on my Willcox and Gibbs, piecing, quilting and binding. They are about 19-20" square. The last is my "Pythagorean Proof" quilt.
Proof
The green square is inscribed in a larger square with four triangles. The red and orange squares are inside a larger square with four triangles. The large squares are the same size (each side is equal to the short leg plus the long leg of the triangles) so they have the same area. Since each large square has four of the original triangles whatever is left must be equal, thus the green square is equal to the red and orange squares.
Courtney


to be continued...
Earlier in the month Courtney sent this:
Dear All,
I mentioned my library quilts and have attached pictures. The first is my honorable mention called "Milk and Quakers." The second is my "Crayola 4X4X4." I made both of these on my Willcox and Gibbs, piecing, quilting and binding. They are about 19-20" square. The last is my "Pythagorean Proof" quilt.
Proof
The green square is inscribed in a larger square with four triangles. The red and orange squares are inside a larger square with four triangles. The large squares are the same size (each side is equal to the short leg plus the long leg of the triangles) so they have the same area. Since each large square has four of the original triangles whatever is left must be equal, thus the green square is equal to the red and orange squares.
Courtney

to be continued...
06-29-2022, 06:10 AM
#323
Super Member
Join Date: Mar 2015
Location: Denver, CO
Posts: 4,254
Later in the month, Courtney followed with these notes:
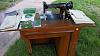
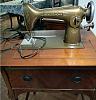
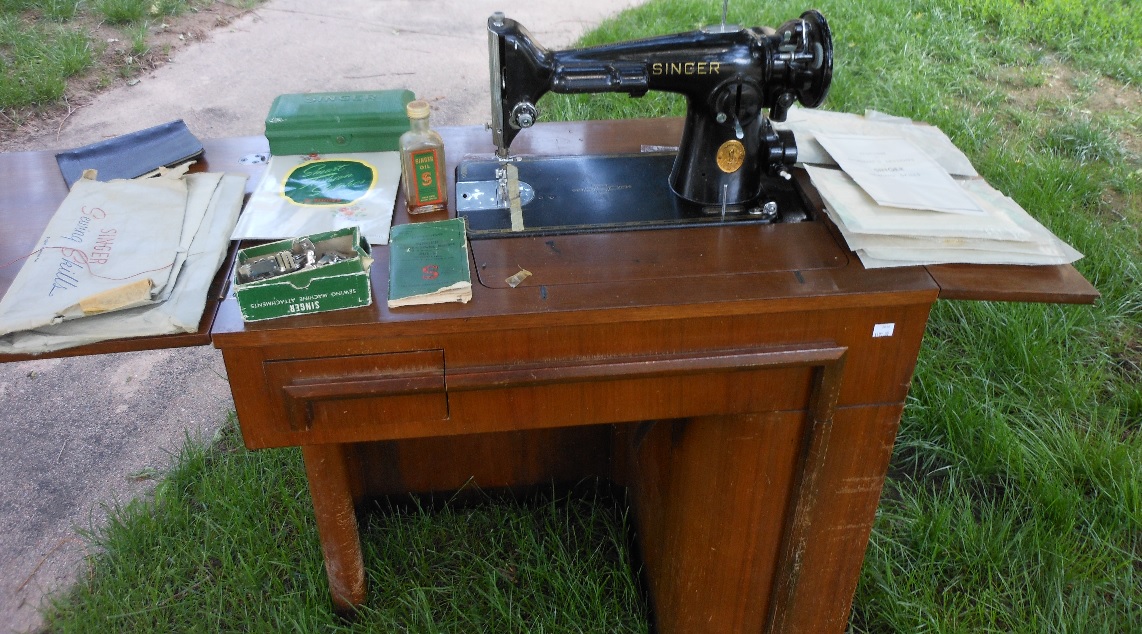
My experience with sewing machines has been quite varied this month. It started about three weeks ago. It was a HOT (102) Saturday, and my wife and I had gone out for a fast-food lunch. On our way home we stopped at a garage sale. (always dangerous!) They had a 1948 Singer 201 in a no. 42 Art Deco cabinet. They wanted $100 so I kept looking. When I came back, I realized that they were selling everything at half price, so I spent my $50. It is in good shape although I will have to rewire the potted motor. The drawers were full of things:
1) all the attachments and screwdrivers
2) a buttonholer, an additional set of templates and a pair of buttonhole scissors
3) a number of old bobbins, binding tape, safety pins, etc.
4) a large envelope with all the materials for a Singer Sewing Skills class (6 lessons)
5) an old bottle of Singer sewing machine oil. The oil is oxidized but the bottle is in great shape.
6) 12 measure-clip hemmers (new in package) which I think will be useful in quilting.
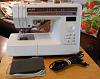
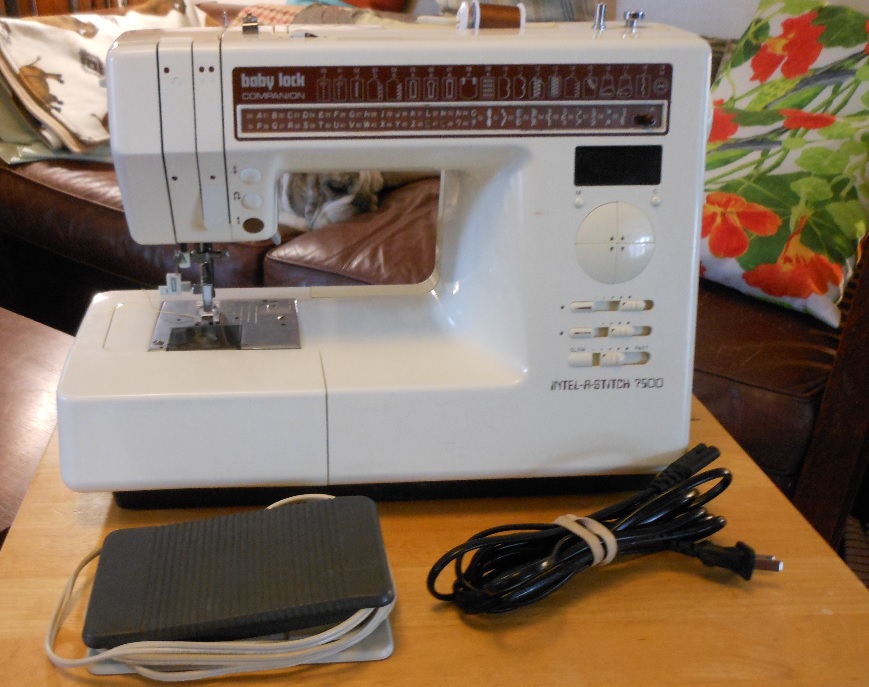
Next came a Baby Lock Companion 7500 Intel-A-Stitch. It is a computer machine which I usually try to avoid. However, a friend who regularly uses a Singer 237 Fashion Mate which she loves because it just always works, was daydreaming once about the new machines which do automatic buttonholes, fancy stitches and even alphabets at just a touch of a button. This described the Baby Lock 7500 exactly. So, when I found it for only $16, I thought I had to buy it for her. It seems to be working well and I have to admit that making little flowers or spelling my name with just a push of the button is lots of fun. The machine is 30 years old, and I am sure replacement parts are impossible to find but for $16 dollars she can just pitch it when it dies. Finding a manual online was just about impossible but I finally found one for a Brother Compal Opus 845 which is basically the exact same machine.
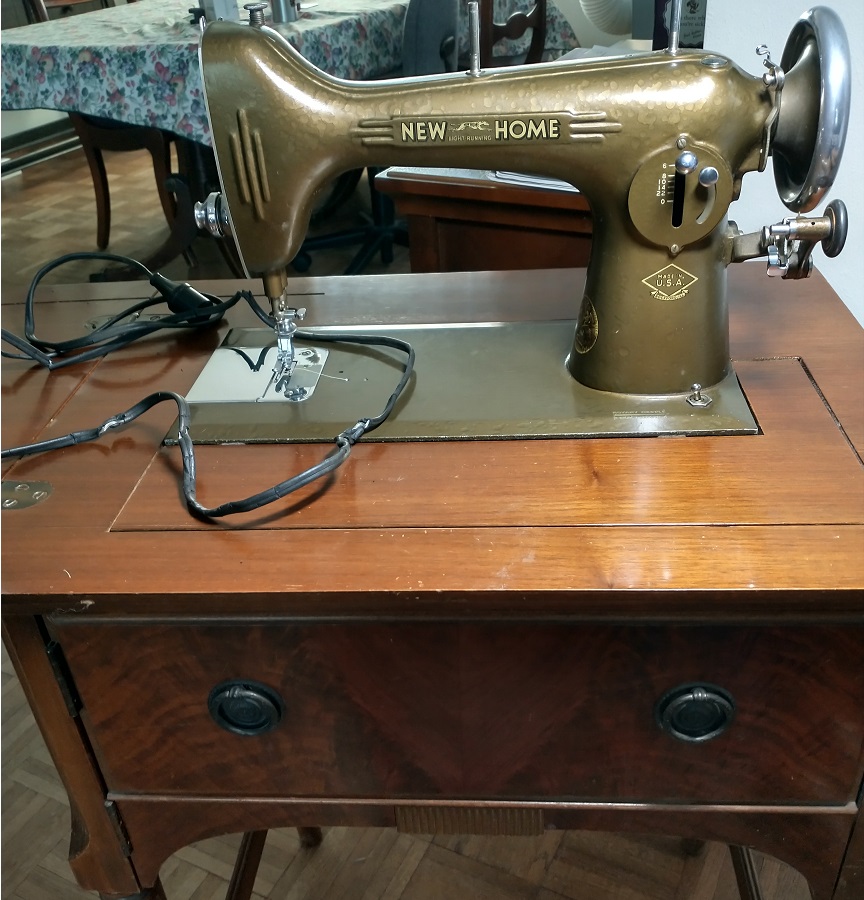
Finally, an old librarian friend contacted me a year ago to see if I could help her with her mother's machine, a 1949 New Home NLB. I said that we could probably get is going again but did not hear from her until a couple of weeks ago. I was afraid that it would take a complete re-wiring but most of the wiring seemed to be in acceptable condition except the power cord. The power cord had rotted away and become stiff and brittle. Bare wire was showing in a number of places. Unfortunately, the female end was proprietary and is no longer available. I took the old cord home and cut the end off with a couple of inches of the original cord on it and then spliced a new cord on. I should work safely for a time. While I was working on the cord, I noticed I had some newer electrical connectors, which did not look like the original, looked like it might fit. I made up a second cord with the new connector. Since the New Home was a friction drive, I also ordered her a new drive pulley to replace the old flattened one. Now I will have to find a time I can get back down to Castle Rock (93 miles away) to see if my work will bring her mother's old machine back to life.
Hope everyone is having a great summer.
Courtney
 )
)
Lastly, Courtney sent this:
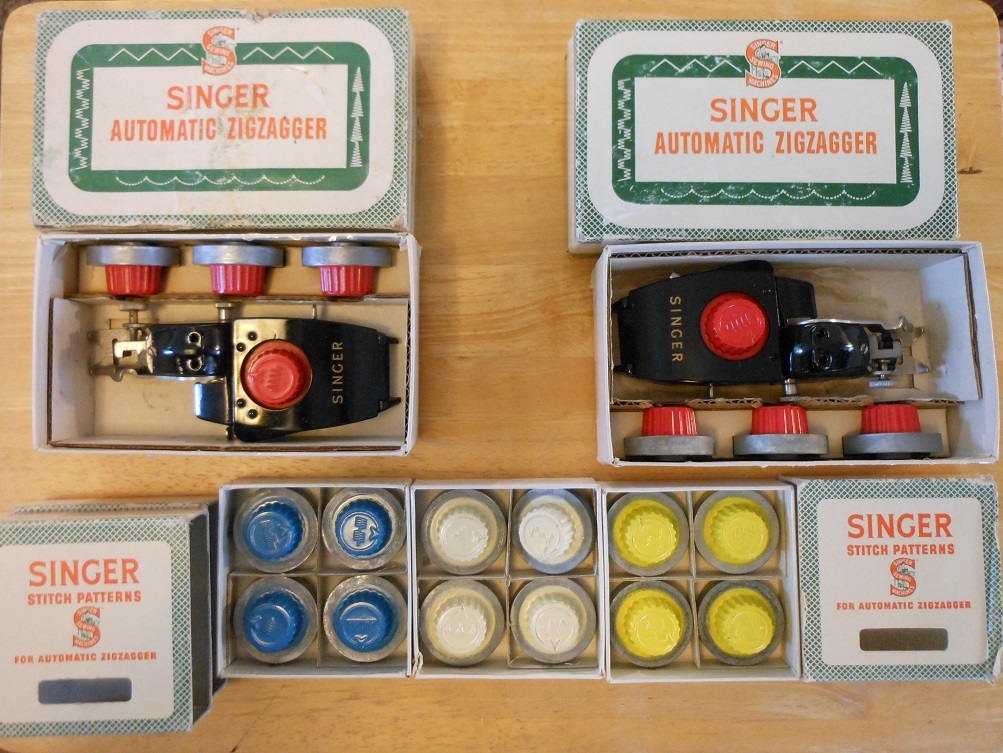
I almost forgot. I dropped by the local ARC thrift store Thursday and found two Singer Automatic Zigzaggers and 3 additional sets of cams, all for $15. Both zigzaggers were low shank and will fit my new 201 and my featherweights. I think the additional cams were worth much more than I paid for everything.
Once again, hope you are all enjoying the summer.
Courtney

John
John got a bit of a surprise while looking at a tech site on the web, which he tells about:
I frequently look over a site called 'The Verge' to follow developments in the tech industry. Being a little youth-challenged, I like to try to keep up with the latest smart phones, computers and processors, gaming and audio/video equipment. I was surprised to see, as I scrolled down the page, an article about sewing patterns. I had to blink and look at whether something had jumped off of Janey's screen and onto mine.
The article described a collection and database of archived sewing patterns, being treated as a reflection of these past technologies. I shared it with Janey and I will here, too. Some may find the collection interesting. It is called the COPA Pattern Archive. This site has been noted before elsewhere on the forum, but I'm mentioning it for those who might not yet have seen it. The web link is:
https://copa.apps.uri.edu/index.php
In Closing
We hope that everyone is having the same good summer that we are having here in Colorado. We will post here again next month. Thanks to our contributing members and to all who read.
My experience with sewing machines has been quite varied this month. It started about three weeks ago. It was a HOT (102) Saturday, and my wife and I had gone out for a fast-food lunch. On our way home we stopped at a garage sale. (always dangerous!) They had a 1948 Singer 201 in a no. 42 Art Deco cabinet. They wanted $100 so I kept looking. When I came back, I realized that they were selling everything at half price, so I spent my $50. It is in good shape although I will have to rewire the potted motor. The drawers were full of things:
1) all the attachments and screwdrivers
2) a buttonholer, an additional set of templates and a pair of buttonhole scissors
3) a number of old bobbins, binding tape, safety pins, etc.
4) a large envelope with all the materials for a Singer Sewing Skills class (6 lessons)
5) an old bottle of Singer sewing machine oil. The oil is oxidized but the bottle is in great shape.
6) 12 measure-clip hemmers (new in package) which I think will be useful in quilting.
Next came a Baby Lock Companion 7500 Intel-A-Stitch. It is a computer machine which I usually try to avoid. However, a friend who regularly uses a Singer 237 Fashion Mate which she loves because it just always works, was daydreaming once about the new machines which do automatic buttonholes, fancy stitches and even alphabets at just a touch of a button. This described the Baby Lock 7500 exactly. So, when I found it for only $16, I thought I had to buy it for her. It seems to be working well and I have to admit that making little flowers or spelling my name with just a push of the button is lots of fun. The machine is 30 years old, and I am sure replacement parts are impossible to find but for $16 dollars she can just pitch it when it dies. Finding a manual online was just about impossible but I finally found one for a Brother Compal Opus 845 which is basically the exact same machine.
Finally, an old librarian friend contacted me a year ago to see if I could help her with her mother's machine, a 1949 New Home NLB. I said that we could probably get is going again but did not hear from her until a couple of weeks ago. I was afraid that it would take a complete re-wiring but most of the wiring seemed to be in acceptable condition except the power cord. The power cord had rotted away and become stiff and brittle. Bare wire was showing in a number of places. Unfortunately, the female end was proprietary and is no longer available. I took the old cord home and cut the end off with a couple of inches of the original cord on it and then spliced a new cord on. I should work safely for a time. While I was working on the cord, I noticed I had some newer electrical connectors, which did not look like the original, looked like it might fit. I made up a second cord with the new connector. Since the New Home was a friction drive, I also ordered her a new drive pulley to replace the old flattened one. Now I will have to find a time I can get back down to Castle Rock (93 miles away) to see if my work will bring her mother's old machine back to life.
Hope everyone is having a great summer.
Courtney
 )
)
Lastly, Courtney sent this:
I almost forgot. I dropped by the local ARC thrift store Thursday and found two Singer Automatic Zigzaggers and 3 additional sets of cams, all for $15. Both zigzaggers were low shank and will fit my new 201 and my featherweights. I think the additional cams were worth much more than I paid for everything.
Once again, hope you are all enjoying the summer.
Courtney
John
John got a bit of a surprise while looking at a tech site on the web, which he tells about:
I frequently look over a site called 'The Verge' to follow developments in the tech industry. Being a little youth-challenged, I like to try to keep up with the latest smart phones, computers and processors, gaming and audio/video equipment. I was surprised to see, as I scrolled down the page, an article about sewing patterns. I had to blink and look at whether something had jumped off of Janey's screen and onto mine.
The article described a collection and database of archived sewing patterns, being treated as a reflection of these past technologies. I shared it with Janey and I will here, too. Some may find the collection interesting. It is called the COPA Pattern Archive. This site has been noted before elsewhere on the forum, but I'm mentioning it for those who might not yet have seen it. The web link is:
https://copa.apps.uri.edu/index.php
In Closing
We hope that everyone is having the same good summer that we are having here in Colorado. We will post here again next month. Thanks to our contributing members and to all who read.
08-03-2022, 06:58 AM
#324
Super Member
Join Date: Mar 2015
Location: Denver, CO
Posts: 4,254
It's August and time for the final summer posting of the Colorado get together. We have fewer submissions this month, perhaps due to peoples' vacations and late summer activities. Nonetheless, we have a few pictures and notes to post, so we'll start with Dorothy.
Dorothy
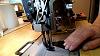
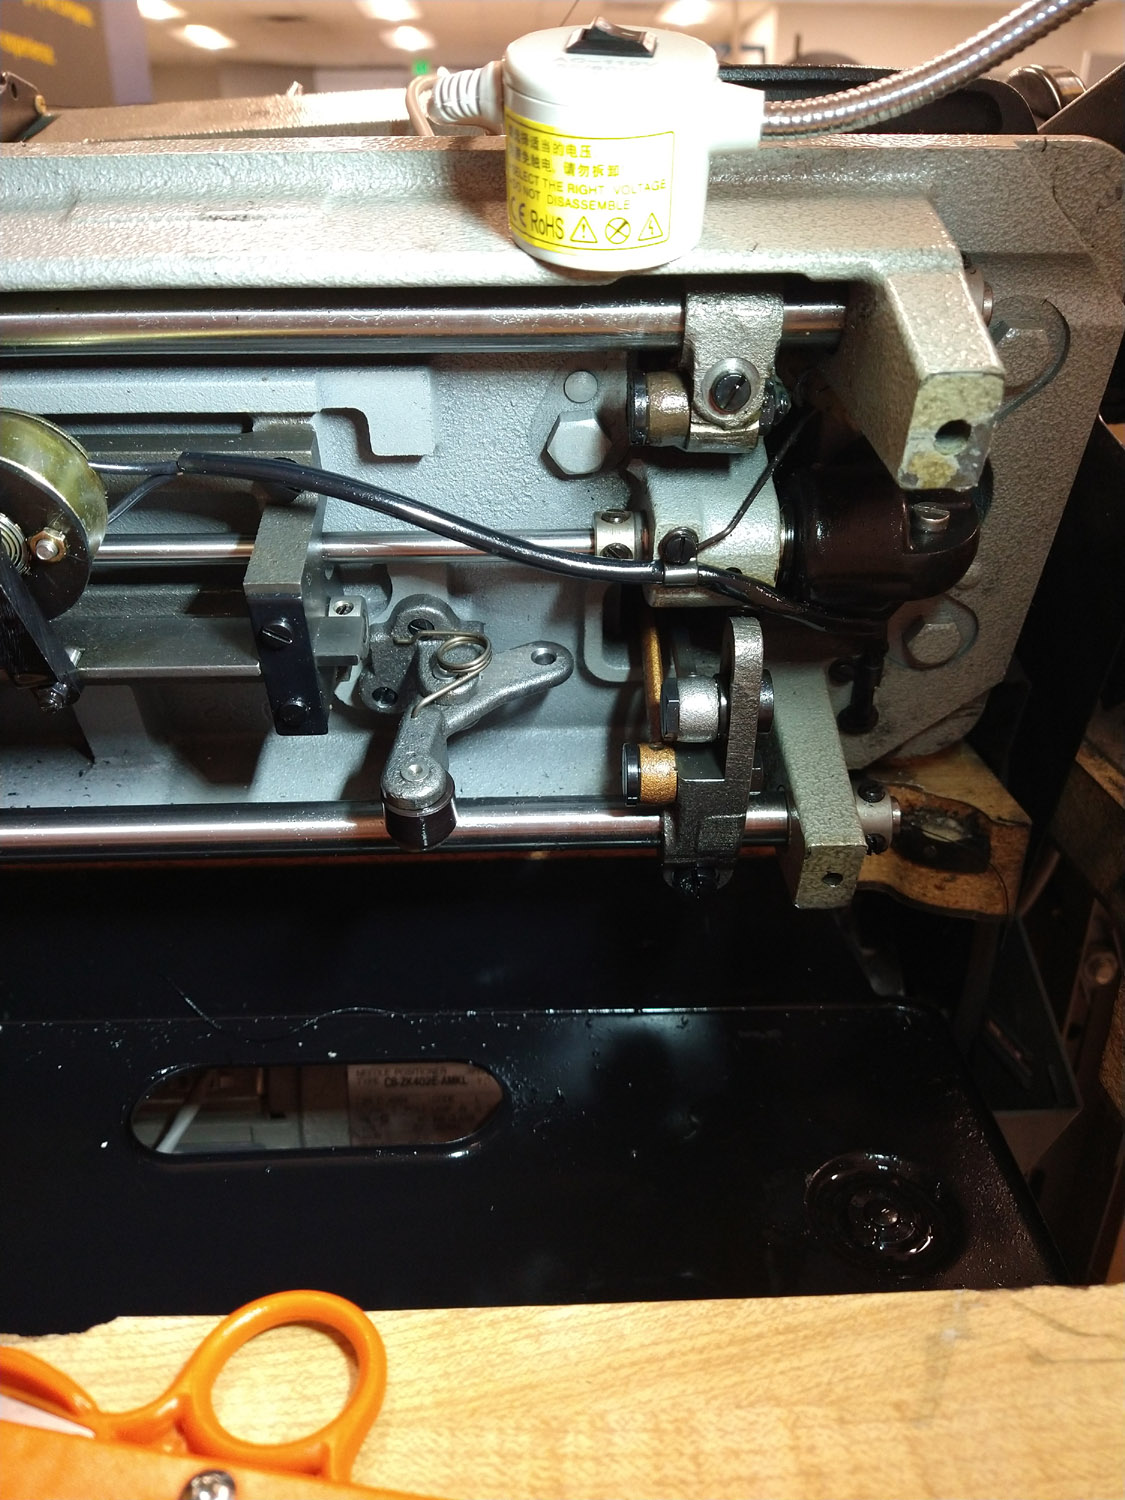
At the last meeting, we discussed the various categories of feed mechanisms. While with few exceptions, these are limited to industrial machines, they are still interesting to study and understand. As we've mentioned before, Dorothy sews professionally and has regular availability of several industrial machines that she can tell us about.
Dorothy also took a short video of the walking foot mechanism, but we're not sure how to post the video here directly.
Dorothy writes:
Photos below of Juki with vertical bobbin with dry oil bath.

Courtney
At our last get together, Courtney had developed a needle plate measuring sticker. He uses clear tape over a printed paper copy. He then wets and removes the paper, leaving the printing on the back of the transparent tape. It can then be applied to the surface of the needle plate. Neat!
Here are Instructions for my needle plate markers and a pdf of the markers I did on a CAD program. I wrote the instructions rather quickly; hope they make sense. I think both attachments will come through. If you have problems let me know.
We are not posting the files here. Any who might have interest in this may contact Courtney or our group directly.
... to be continued
Dorothy
At the last meeting, we discussed the various categories of feed mechanisms. While with few exceptions, these are limited to industrial machines, they are still interesting to study and understand. As we've mentioned before, Dorothy sews professionally and has regular availability of several industrial machines that she can tell us about.
Dorothy also took a short video of the walking foot mechanism, but we're not sure how to post the video here directly.
Dorothy writes:
Photos below of Juki with vertical bobbin with dry oil bath.

Courtney
At our last get together, Courtney had developed a needle plate measuring sticker. He uses clear tape over a printed paper copy. He then wets and removes the paper, leaving the printing on the back of the transparent tape. It can then be applied to the surface of the needle plate. Neat!
Here are Instructions for my needle plate markers and a pdf of the markers I did on a CAD program. I wrote the instructions rather quickly; hope they make sense. I think both attachments will come through. If you have problems let me know.
We are not posting the files here. Any who might have interest in this may contact Courtney or our group directly.
... to be continued
08-03-2022, 07:04 AM
#325
Super Member
Join Date: Mar 2015
Location: Denver, CO
Posts: 4,254
Dianne
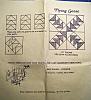
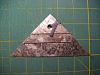
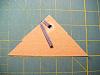
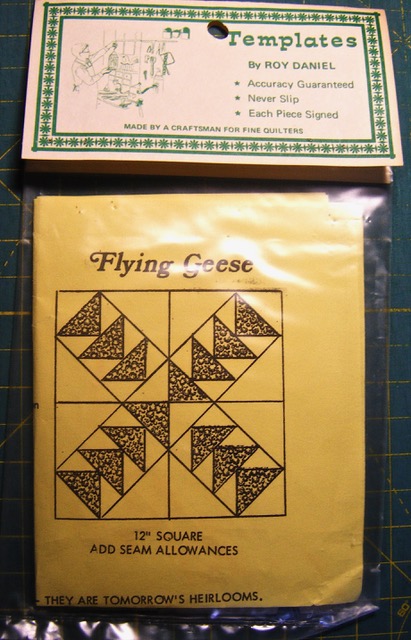
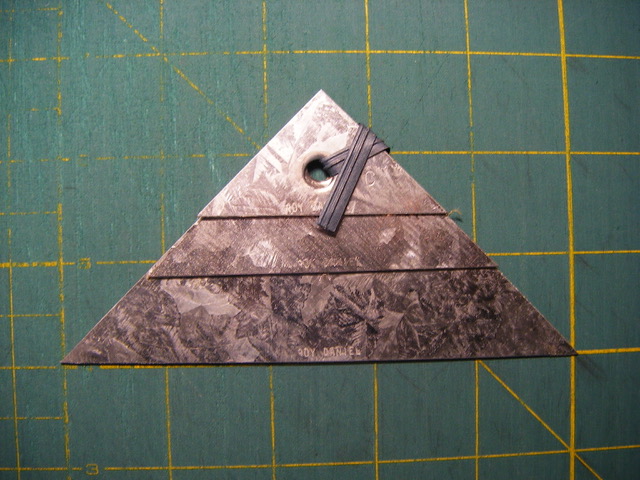
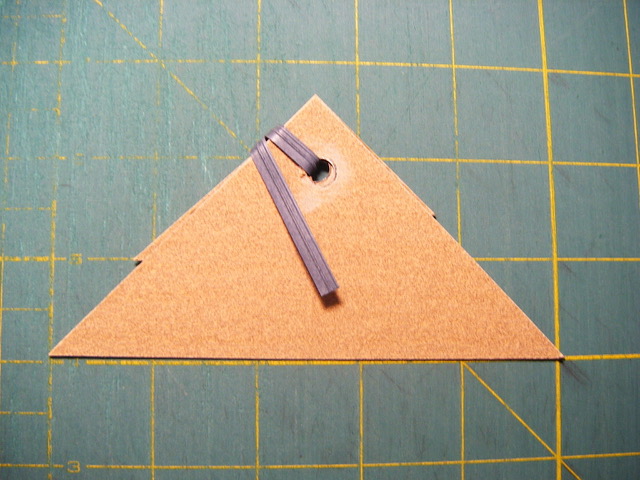
Dianne has been doing a bit of quilting and also tells us about some interesting templates used for cutting pieces. She writes:
The Hamilton Ross machine got a workout last week, piecing two small 38"� square quilts. They are a simple design of four scrappy 16-patch blocks, framed, then with sashing and border. Nothing at all fancy, but a test for this machine to see how it would manage. It did well, making a neat chain stitch with some occasional slight variation in tension, hardly visible but I was looking closely. The little motor mounted on the back showed no signs of distress, even when punching through several layers of fabric. These were quilted on my Singer 15-91, SID and FM both. A fun project.
A small backroad in the history of quilting is metal templates. My grandmother used to cut cardboard templates, which wore down and after a bit were not true to size and needed to be replaced. I'm sure that was annoying. One of my sisters relates that someone made her linoleum templates for one pattern, and she enjoyed those. So on eBay and Etsy some metal (galvanized steel) templates showed up and I purchased a set for making a flying geese block. They were made by Roy Daniel, of Camden, Maine. The exact time frame is unknown to me, but a note on QB relates contact with Mr. Daniel's grandson, who helped with the project in 1982 - 1984, so 1980s vintage will suffice. These are neatly made templates, intended to be drawn around and then have a seam allowance added. They are backed with sandpaper so they won't slip. I opened and photographed the contents of the package, and then neatly restapled it, having no intention to use the templates, although one certainly could.
Dianne
John
Last month John had a curiosity about the types of fabric feed mechanisms.
Thank you to all, especially Dorothy, for adding to the knowledge of feed mechanisms. Much appreciated.
In Closing
Thank you to all for reading. We will post here again next month. Wishing everyone a good last month of summer!
Dianne has been doing a bit of quilting and also tells us about some interesting templates used for cutting pieces. She writes:
The Hamilton Ross machine got a workout last week, piecing two small 38"� square quilts. They are a simple design of four scrappy 16-patch blocks, framed, then with sashing and border. Nothing at all fancy, but a test for this machine to see how it would manage. It did well, making a neat chain stitch with some occasional slight variation in tension, hardly visible but I was looking closely. The little motor mounted on the back showed no signs of distress, even when punching through several layers of fabric. These were quilted on my Singer 15-91, SID and FM both. A fun project.
A small backroad in the history of quilting is metal templates. My grandmother used to cut cardboard templates, which wore down and after a bit were not true to size and needed to be replaced. I'm sure that was annoying. One of my sisters relates that someone made her linoleum templates for one pattern, and she enjoyed those. So on eBay and Etsy some metal (galvanized steel) templates showed up and I purchased a set for making a flying geese block. They were made by Roy Daniel, of Camden, Maine. The exact time frame is unknown to me, but a note on QB relates contact with Mr. Daniel's grandson, who helped with the project in 1982 - 1984, so 1980s vintage will suffice. These are neatly made templates, intended to be drawn around and then have a seam allowance added. They are backed with sandpaper so they won't slip. I opened and photographed the contents of the package, and then neatly restapled it, having no intention to use the templates, although one certainly could.
Dianne

John
Last month John had a curiosity about the types of fabric feed mechanisms.
Thank you to all, especially Dorothy, for adding to the knowledge of feed mechanisms. Much appreciated.
In Closing
Thank you to all for reading. We will post here again next month. Wishing everyone a good last month of summer!
08-31-2022, 05:16 AM
#326
Super Member
Join Date: Mar 2015
Location: Denver, CO
Posts: 4,254
Time flies- it's time for our first fall posting already.
In Colorado, the heat of July has given way to more moderate temperatures, usually in the eighties. Many afternoons, clouds gather for a while, but we've only had occasional rain, which we need here.
It's back-to-school time and people are returning from vacations. This month we are featuring Courtney, who has had more than one project going.
Courtney
Courtney had a trip to the southern part of our state, to do some teaching about sewing machines. He tells us about this and other things he's been doing over the last month.
My sewing machine adventures this month started with the Scrappy Ladies Quilting Guild in Colorado City. I talked about the history of Featherweight sewing machines. Several of the ladies had Featherweights and I tried to answer their questions as best as possible. I arrived about 9:40 and everything was finished up shortly before Noon. I had a great time and I think the Scrappy Ladies also enjoyed themselves. After lunch, I started home and arrived about 5 PM. Colorado City is a bit over 200 miles from Greeley and on the way home I had forgotten to fill the car and almost ran out of gas! Ah, adventures. I had driven down to Colorado Springs the afternoon before and stayed with some good friends so I didn't have to leave Greeley at 5:30 AM and make the entire trip in one day.
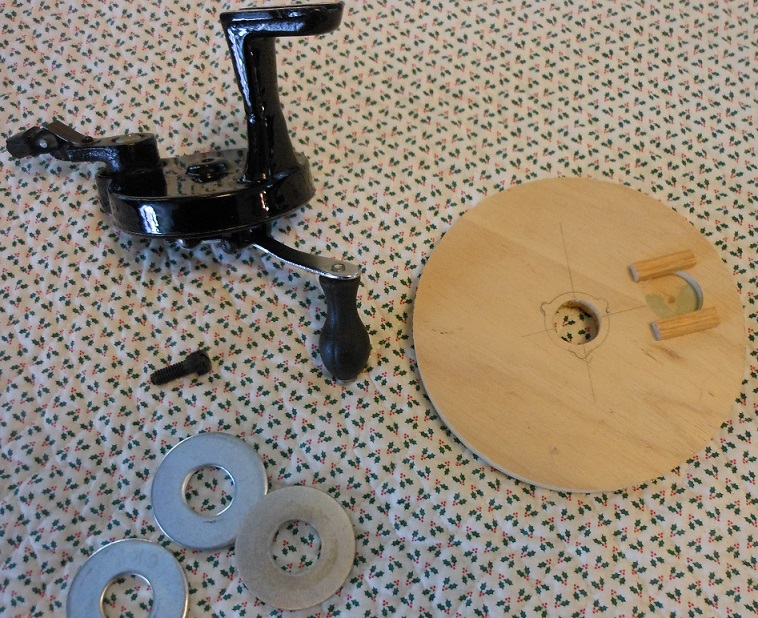
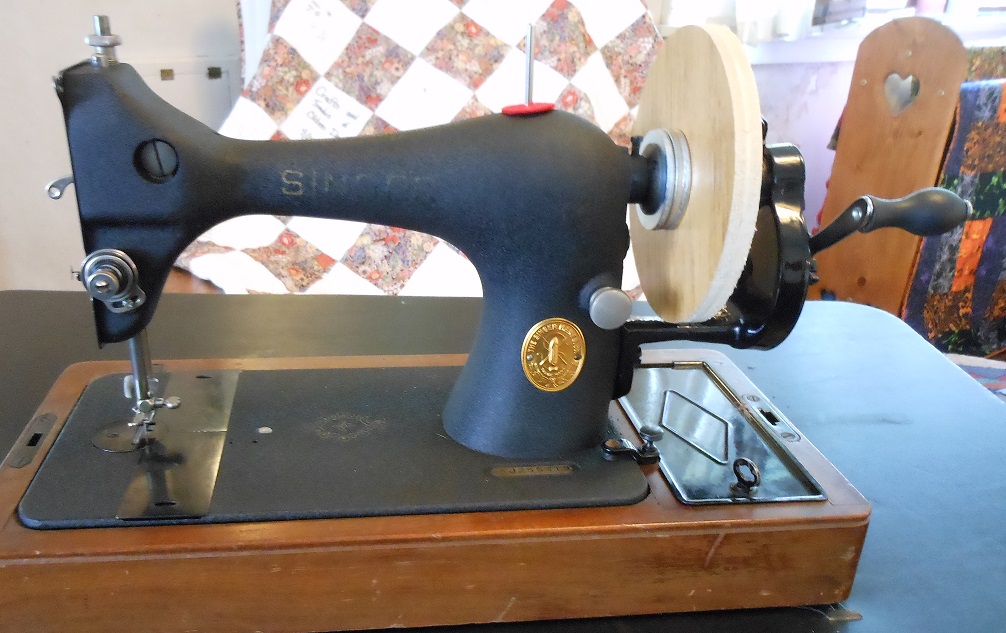
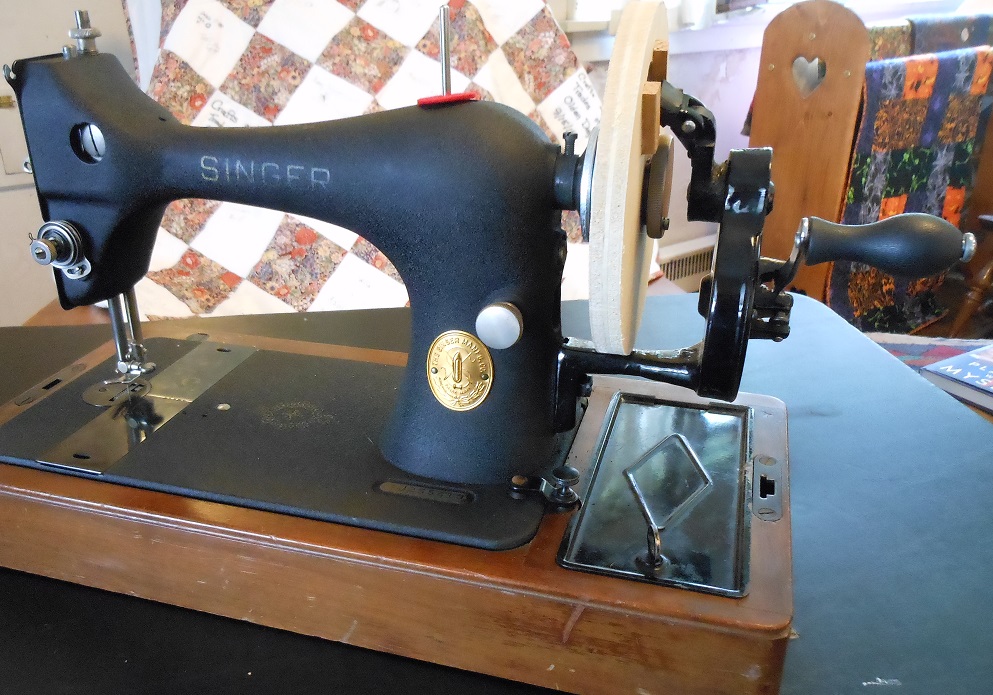
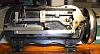
For my talk to the Scrappy Ladies, I had also taken a Willcox and Gibbs hand crank machine. After my presentation, a number of the ladies came up and were fascinated with the idea of a hand crank sewing machine. They had never seen one before. This got me thinking that an interesting future presentation might be on how to use a hand crank sewing machine. I do have two hand cranks, a Singer 201 and a Dutch EFKU. I have bought a couple of cheap hand cranks for little model 99s. They can be had for under $20. Unfortunately, for most machines besides a hand crank you also need a spoked hand wheel which can easily add another $20 to the project. I have a few machines that do have the required spoked wheels but I hate to borrow from them to put on another machine because that is how things get lost. Then the idea that I could perhaps make a required hand wheel out of wood. I had a small piece of 1/2 inch plywood so I cut out 3 circles about 6"� in diameter. (Six inches is about the largest diameter you can use, 5-3/4 inches would give a bit more clearance.) Then I drilled a 13/16 inch center hole. I found that three 3/4" washers would bring the thickness up to about 1" which is just what I needed. When I gave it a try, I found that the bobbin winders on the vintage Singers tended to get in the way. Rather than try to remove the bobbin winders I found that it was easier to remove the belt guard and the bobbin winders together (just one screw). To catch the hand crank tab I drilled a one inch hole about 1/4" deep in the wheel. Unfortunately, the tab did not quite catch the wheel at all times so I glued on a couple of small straight pieces of wood to make a good connection between the crank and wheel. Finally, I traced the lock motion washer on the wooden wheel and drove a small brad so that it would catch on the lock motion washer. I think you can barely see it in the first photo. When I put it all together it worked like a charm. (see attached photos)
Now that I know what I am doing I am going to make some wheels out of 3/4"�� MDF and a spacer out of 1/4" MDF. I can then forget about the washers. The 3/4" MDF is denser and thicker than the plywood I used which will give the wheel more inertia. If I sand the wheels and paint them black I think they will look respectable and work quite well. I think I can make 5 or 6 wheels in a couple of hours in the shop and save myself over $100. The beauty of all of this is that it is quick to set up. All I have to do is remove the motor (one screw) and belt guard (one screw) and replace the original wheel with my homemade one. To turn the machines back into electrics I simply remove the hand crank, replace the original wheel, then replace the belt guard and motor.


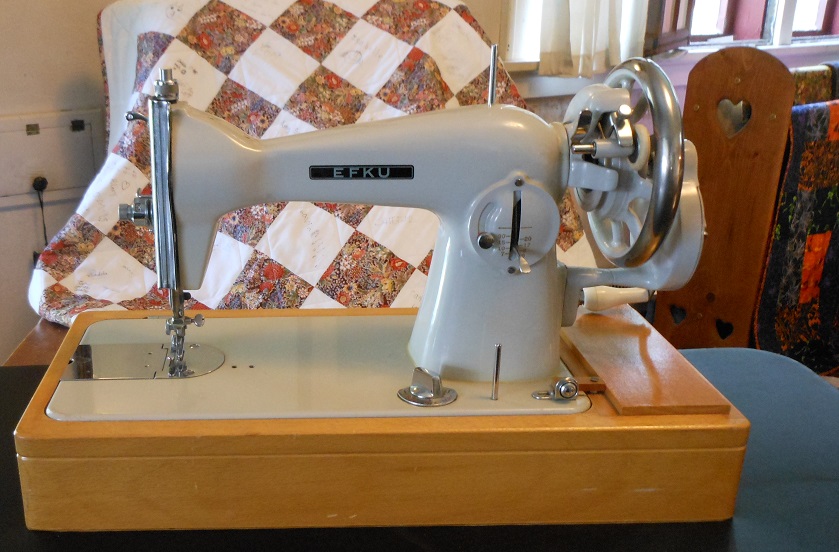
The local Lutheran Church a couple of blocks from my house had their annual garage sale and I found about 4 yards of quilted fabric which I am planning on making some carrying cases for some of my Featherweights. This got me thinking about making a cover for the EFKU hand crank machine that Chris and Cheryl gave me for my talks to 4th graders at History Fest. The machine is quite nice and had a pretty base but no cover. I have been worried that I will get really dusty while waiting for the next history fest. I found an old piece of upholstery fabric, just the right size. I quickly made up a simple cover. It's not fancy but it does seem to work quite well and I am sure my dust worries are over. I have enclosed a couple of pictures.

Courtney
In Closing
We will post here again next month. Until then please be well and thank you for reading.
In Colorado, the heat of July has given way to more moderate temperatures, usually in the eighties. Many afternoons, clouds gather for a while, but we've only had occasional rain, which we need here.
It's back-to-school time and people are returning from vacations. This month we are featuring Courtney, who has had more than one project going.
Courtney
Courtney had a trip to the southern part of our state, to do some teaching about sewing machines. He tells us about this and other things he's been doing over the last month.
My sewing machine adventures this month started with the Scrappy Ladies Quilting Guild in Colorado City. I talked about the history of Featherweight sewing machines. Several of the ladies had Featherweights and I tried to answer their questions as best as possible. I arrived about 9:40 and everything was finished up shortly before Noon. I had a great time and I think the Scrappy Ladies also enjoyed themselves. After lunch, I started home and arrived about 5 PM. Colorado City is a bit over 200 miles from Greeley and on the way home I had forgotten to fill the car and almost ran out of gas! Ah, adventures. I had driven down to Colorado Springs the afternoon before and stayed with some good friends so I didn't have to leave Greeley at 5:30 AM and make the entire trip in one day.
For my talk to the Scrappy Ladies, I had also taken a Willcox and Gibbs hand crank machine. After my presentation, a number of the ladies came up and were fascinated with the idea of a hand crank sewing machine. They had never seen one before. This got me thinking that an interesting future presentation might be on how to use a hand crank sewing machine. I do have two hand cranks, a Singer 201 and a Dutch EFKU. I have bought a couple of cheap hand cranks for little model 99s. They can be had for under $20. Unfortunately, for most machines besides a hand crank you also need a spoked hand wheel which can easily add another $20 to the project. I have a few machines that do have the required spoked wheels but I hate to borrow from them to put on another machine because that is how things get lost. Then the idea that I could perhaps make a required hand wheel out of wood. I had a small piece of 1/2 inch plywood so I cut out 3 circles about 6"� in diameter. (Six inches is about the largest diameter you can use, 5-3/4 inches would give a bit more clearance.) Then I drilled a 13/16 inch center hole. I found that three 3/4" washers would bring the thickness up to about 1" which is just what I needed. When I gave it a try, I found that the bobbin winders on the vintage Singers tended to get in the way. Rather than try to remove the bobbin winders I found that it was easier to remove the belt guard and the bobbin winders together (just one screw). To catch the hand crank tab I drilled a one inch hole about 1/4" deep in the wheel. Unfortunately, the tab did not quite catch the wheel at all times so I glued on a couple of small straight pieces of wood to make a good connection between the crank and wheel. Finally, I traced the lock motion washer on the wooden wheel and drove a small brad so that it would catch on the lock motion washer. I think you can barely see it in the first photo. When I put it all together it worked like a charm. (see attached photos)
Now that I know what I am doing I am going to make some wheels out of 3/4"�� MDF and a spacer out of 1/4" MDF. I can then forget about the washers. The 3/4" MDF is denser and thicker than the plywood I used which will give the wheel more inertia. If I sand the wheels and paint them black I think they will look respectable and work quite well. I think I can make 5 or 6 wheels in a couple of hours in the shop and save myself over $100. The beauty of all of this is that it is quick to set up. All I have to do is remove the motor (one screw) and belt guard (one screw) and replace the original wheel with my homemade one. To turn the machines back into electrics I simply remove the hand crank, replace the original wheel, then replace the belt guard and motor.
The local Lutheran Church a couple of blocks from my house had their annual garage sale and I found about 4 yards of quilted fabric which I am planning on making some carrying cases for some of my Featherweights. This got me thinking about making a cover for the EFKU hand crank machine that Chris and Cheryl gave me for my talks to 4th graders at History Fest. The machine is quite nice and had a pretty base but no cover. I have been worried that I will get really dusty while waiting for the next history fest. I found an old piece of upholstery fabric, just the right size. I quickly made up a simple cover. It's not fancy but it does seem to work quite well and I am sure my dust worries are over. I have enclosed a couple of pictures.

Courtney
In Closing
We will post here again next month. Until then please be well and thank you for reading.
09-28-2022, 07:44 AM
#327
Super Member
Join Date: Mar 2015
Location: Denver, CO
Posts: 4,254
It's almost October and there is an air of fall here in Colorado. Overnight temperatures are in the forties with day time temperatures in the eighties. Leaves are beginning to turn and many moms are thinking about sewing Halloween costumes for their kids.
We have a few things to present this month, so let's get started.
Dianne
Dianne sends a nice write-up about a Titan machine that she has:
During the last two weeks, this small fiddlebase transverse shuttle Titan machine manufactured by Winselmann in Germany sometime around 1900, was used to sew 36 paper-pieced Economy blocks, 6 inches in size. The top threading was done with old straight-off spools of Dual Duty thread, while the bobbin was threaded with Aurifil to increase its capacity. The machine uses 12x1 needles. Only one foot and one bobbin came with this machine, purchased about a decade ago.
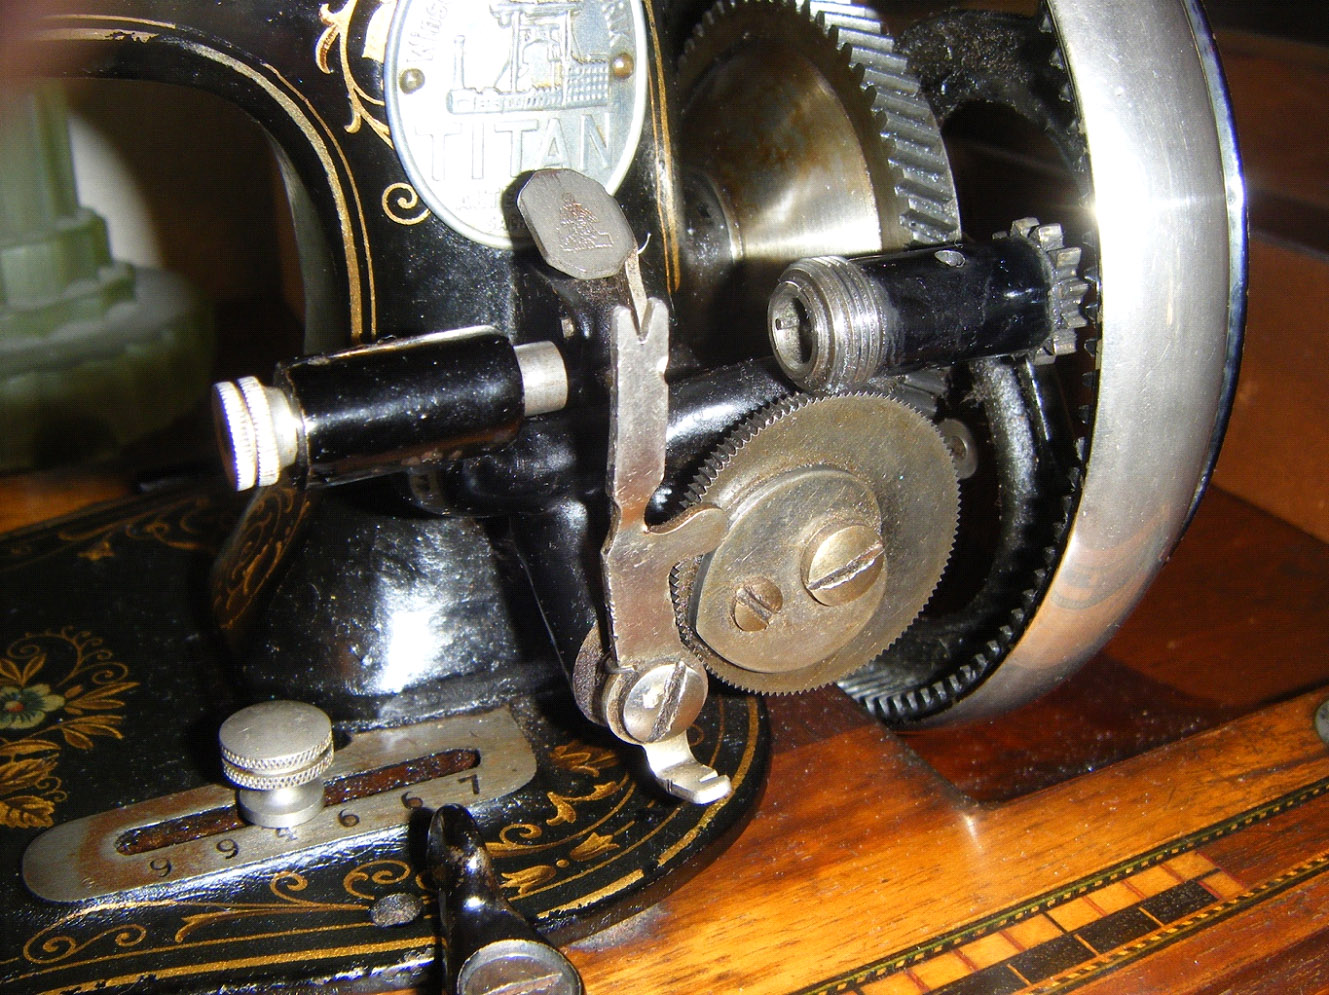
Bobbin winding was a challenge. The bobbin has a hole which must fit on a small pin to get the correct position in the bobbin winder. You seem to need three hands to keep the thread spool steady at starting, keep the thread in the proper guides, and push down to fully engage the small bobbin gear. A small sprung square of metal, enhanced with the titan symbol lifting a treadle, is apparently intended to be held during bobbin winding, as it does push the small gear mostly into contact with the large one. Maybe it is supposed to engage and release when the bobbin is full, which would have been helpful. Actually, without a manual, maybe that is not how it is supposed to work. So holding the area just to the right of where the bobbin is placed on the winder proved to work OK. Once started, the bobbin winds without issues. Threading the shuttle is easy and the shuttle works well except ending a seam with the thread at either end of the bobbin, far away from where the thread is pulled out. Then it sticks a bit and vibrates when pulling the fabric back to cut the threads, and occasionally the thread breaks. Keeping the bobbin tips oiled, and being sure to pull the fabric straight to the back solved this problem.
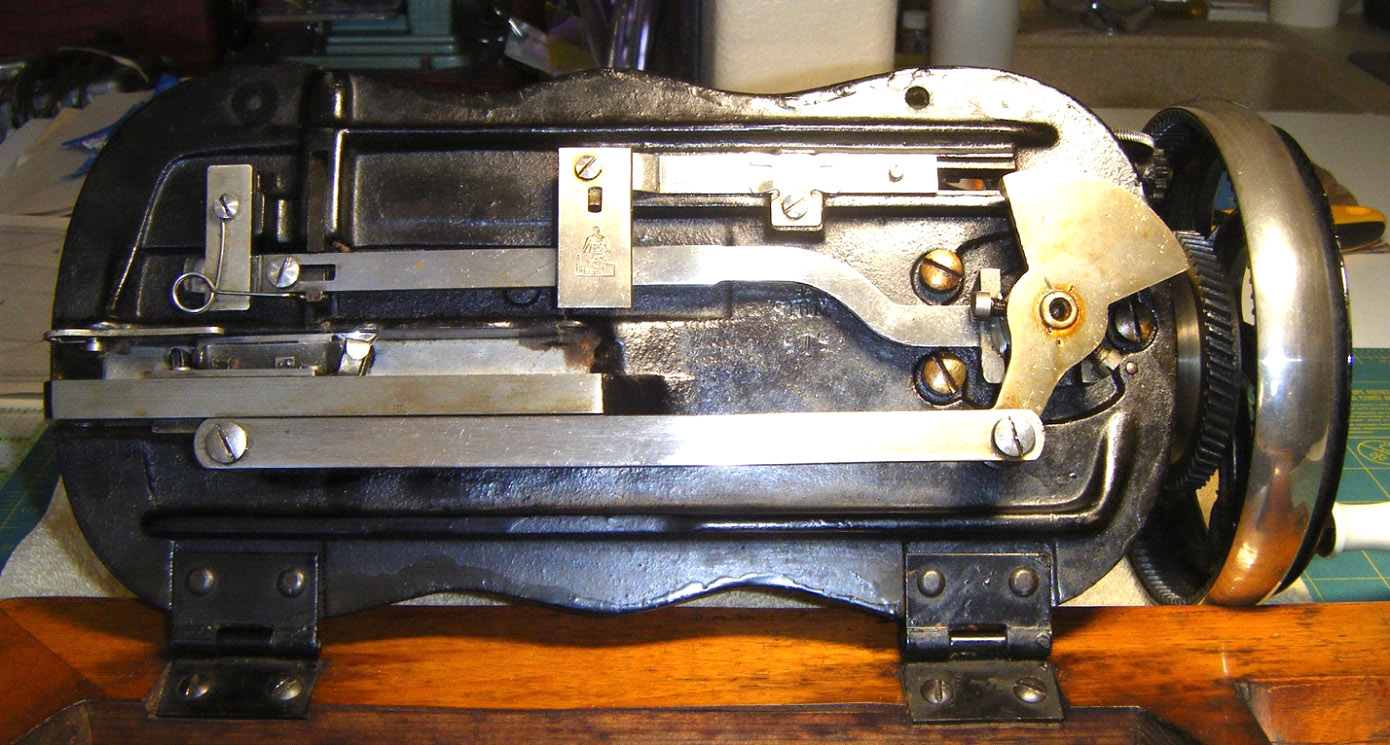
The machine likes oil, especially on the long glides underneath and on the flywheel. Note there are two oiling holes on the wheel, one toward the machine and one away from it. The lowered, large handwheel is sometimes called Saxony style.
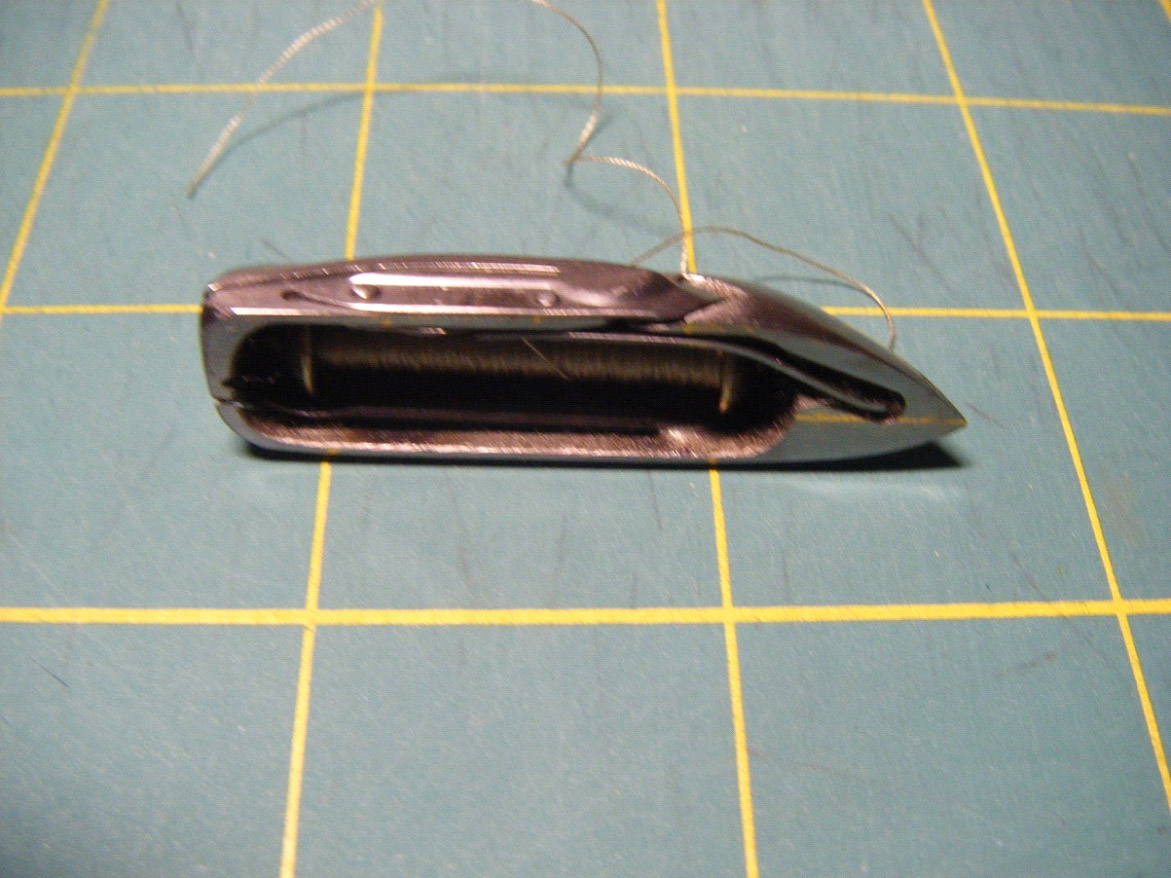
This is a nice little machine. The "boat shuttle" is advanced, compared to the early versions by other makers which just had multiple holes for threading. A metal leaf or flange on the inside towards the tip accepts the thread and guides it to the outside. I did not spot a way to adjust the bobbin thread tension on the shuttle. Adjusting the top thread tension worked fine to obtain a balanced stitch. Using a tweezers makes inserting the bobbin into the shuttle much easier, the bobbin holder on the flat end having a spring. The shuttle drops neatly into place. The bottom thread is captured and pulled up without issues after the shuttle is reinserted. It works best to stop sewing with the takeup lever at its highest point, whence you can start again without needing to hold the threads and there will be no tangled or lumpy threads. This is handy for inside seams in paper piecing, and almost any sewing situation. Nearly all machines seem to work this way. Sometimes removing the shuttle requires a bit of finesse getting it into full left position. A quick pull to the left will then pop it up to be easily removed. The stitch length adjusts appropriately.
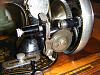
The wood base with lovely inset inch and centimeter grids, is about 9" x 16".
Note the little titan on the center underside of this machine. Apparently Winselmann called several of their models Titan, making it difficult to find correct manuals and dating information.
The plan is to use and report on one machine each month. It will take several years to make my way through the herd.
Dorothy
Dorothy sent a note about a machine that she has at home. She writes:
Hello!
A month of nothing and the last 3 days!
I may have found the Griest model 10 buttonholer for high shank Necchi which might work on my Juki2010Q shirt maker! Seems to be a rare model as 6 months looking and this the first seen!
I am also trying to identify a Singer Treadle stand I might procure. I can find nothing in Ismacs. It is the one which has Prairie Styling aka Frank Wright. Metal legs. It will live in the shed.
Thanks so much! I will write up next month what I do find out on these subjects.
Dorothy
In a second, later note Dorothy wrote:
Hello!
I retire at the end of this week after 28 years designing for automotive. I look forward to it.
What to do now?
Organize! There is so much in my sewing room that is duplicated (not just sewing machines) and sorting should allow more room to set up and sew. I have been looking at drafting information with enthusiasm as I have not been designing clothing in maybe 10 years.
First up is a costume for my Son for Halloween which is his Birthday. He has requested a character from an Anime that is wearing rather traditional Japanese Hakima and Robes. There will be a white underlayer with a longer Kimono over the top.
I look forward to the meeting!
Dorothy
Courtney
Courtney has been busy with a History Fest. He sends the following notes about his activities over the last month:
I was hoping that I could get a picture of History Fest today but I was just too busy, Sorry! Here is my monthly report:
At last month's Zoom meeting I mentioned I had some veneer that Chris might be able to use. The next weekend Chris and Cheryl were up this way and so they dropped by. We spent most of a Saturday afternoon just talking and solving the World's problems. Great day!
My sewing machine time this month has been spent mostly on getting ready for History Fest. For a week in the spring and a week in the fall the Greeley Museums host History Fest at Centennial Village. It is mostly for 4th graders. They get to see a blacksmith forge a nail, get to scrub clothes on a washboard, and attend a one room schoolhouse. I take a number of vintage and antique sewing machines and talk about how the sewing machine has changed our daily lives. After teaching high school and college for over 50 years, it is fun to talk to real kids again. I have a great time although my voice gets a bit raspy because I am not used to talking all day long like I once was.
A couple of months ago I reported that I had bought a Singer 201-2. I am now working on changing it to a 201-3 so that I can use it with an exterior motor, a treadle or a hand crank. I have a belt guard and bobbin winder from an old Japanese model 15 clone that works fine. I have also found another Japanese zig-zag machine that I think will work. I will give it a try when I get a chance. Perhaps while I have it converted, I will have a chance to work on the potted motor and get it working safely again. I am rather wary to try it without rewiring.
Til next month,
Courtney
Janey was able to find the webpage for the High Plains History Festival at https://greeleymuseums.com/historyfestival/ and probably an older picture of Courtney at https://greeleymuseums.com/wp-conten...t1609-1028.jpg
John
Lastly, John describes a project that he worked on some time ago. He writes:
I thought I might take this opportunity to mention something I did several years ago.
I should begin by saying that I don't sew very much. Janey does that for both of us. With years of experience, she is very accomplished. But I do observe, watch others and read. Sometimes I think I can contribute a gizmo or gadget that will help, sort of in a support role.
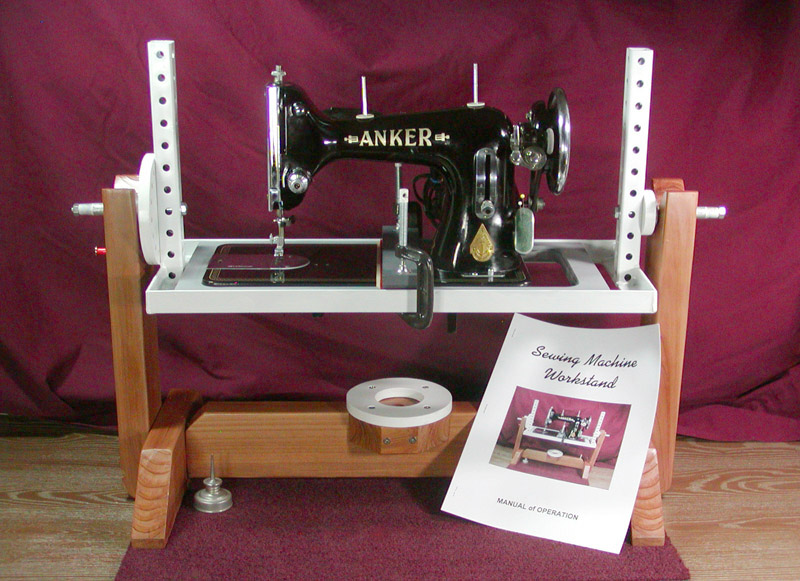
Several years ago, I thought to myself that there had to be a better way to hold and work on old sewing machines. Machine heads are heavy, they're unwieldy and are hinged from the bottom, making them very top heavy. Many parts of a sewing machine are very fragile. I've seen bent spool pins. I've seen machines rolled around and propped up. I've seen machines placed on their front or back, in order to access something on the underside.
I thought that an extremely sturdy frame, that the machine could be attached to, might be rotated from a point closer to its center of gravity. I built a workstand for doing just that. As the project progressed, I made interchangeable baseboards to accommodate a wide variety of sewing machines with their different footprints.
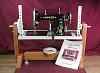
A few other people saw it and wanted one. So I made a few for others, as well. That was a long time ago and I am not intending on making any more of them. But the old thread offers pretty good instructions for anyone wanting to make their own.
The thread is a bit lengthy, since I wrote it step-by-step as things progressed. Anyone with an eye toward being easy on themselves, as well as giving safe and gentle care to these delicate old sewing machines, might find interest in the idea.
The thread may be found at:
Sewing Machine Work Stand
I hope that it's interesting and useful.
John
In Closing
We hope that everyone has a good October. We will post here again next month. Until then, thank you for reading.
We have a few things to present this month, so let's get started.
Dianne
Dianne sends a nice write-up about a Titan machine that she has:
During the last two weeks, this small fiddlebase transverse shuttle Titan machine manufactured by Winselmann in Germany sometime around 1900, was used to sew 36 paper-pieced Economy blocks, 6 inches in size. The top threading was done with old straight-off spools of Dual Duty thread, while the bobbin was threaded with Aurifil to increase its capacity. The machine uses 12x1 needles. Only one foot and one bobbin came with this machine, purchased about a decade ago.
Bobbin winding was a challenge. The bobbin has a hole which must fit on a small pin to get the correct position in the bobbin winder. You seem to need three hands to keep the thread spool steady at starting, keep the thread in the proper guides, and push down to fully engage the small bobbin gear. A small sprung square of metal, enhanced with the titan symbol lifting a treadle, is apparently intended to be held during bobbin winding, as it does push the small gear mostly into contact with the large one. Maybe it is supposed to engage and release when the bobbin is full, which would have been helpful. Actually, without a manual, maybe that is not how it is supposed to work. So holding the area just to the right of where the bobbin is placed on the winder proved to work OK. Once started, the bobbin winds without issues. Threading the shuttle is easy and the shuttle works well except ending a seam with the thread at either end of the bobbin, far away from where the thread is pulled out. Then it sticks a bit and vibrates when pulling the fabric back to cut the threads, and occasionally the thread breaks. Keeping the bobbin tips oiled, and being sure to pull the fabric straight to the back solved this problem.
The machine likes oil, especially on the long glides underneath and on the flywheel. Note there are two oiling holes on the wheel, one toward the machine and one away from it. The lowered, large handwheel is sometimes called Saxony style.
This is a nice little machine. The "boat shuttle" is advanced, compared to the early versions by other makers which just had multiple holes for threading. A metal leaf or flange on the inside towards the tip accepts the thread and guides it to the outside. I did not spot a way to adjust the bobbin thread tension on the shuttle. Adjusting the top thread tension worked fine to obtain a balanced stitch. Using a tweezers makes inserting the bobbin into the shuttle much easier, the bobbin holder on the flat end having a spring. The shuttle drops neatly into place. The bottom thread is captured and pulled up without issues after the shuttle is reinserted. It works best to stop sewing with the takeup lever at its highest point, whence you can start again without needing to hold the threads and there will be no tangled or lumpy threads. This is handy for inside seams in paper piecing, and almost any sewing situation. Nearly all machines seem to work this way. Sometimes removing the shuttle requires a bit of finesse getting it into full left position. A quick pull to the left will then pop it up to be easily removed. The stitch length adjusts appropriately.

The wood base with lovely inset inch and centimeter grids, is about 9" x 16".
Note the little titan on the center underside of this machine. Apparently Winselmann called several of their models Titan, making it difficult to find correct manuals and dating information.
The plan is to use and report on one machine each month. It will take several years to make my way through the herd.
Dorothy
Dorothy sent a note about a machine that she has at home. She writes:
Hello!
A month of nothing and the last 3 days!
I may have found the Griest model 10 buttonholer for high shank Necchi which might work on my Juki2010Q shirt maker! Seems to be a rare model as 6 months looking and this the first seen!
I am also trying to identify a Singer Treadle stand I might procure. I can find nothing in Ismacs. It is the one which has Prairie Styling aka Frank Wright. Metal legs. It will live in the shed.
Thanks so much! I will write up next month what I do find out on these subjects.
Dorothy
In a second, later note Dorothy wrote:
Hello!
I retire at the end of this week after 28 years designing for automotive. I look forward to it.
What to do now?
Organize! There is so much in my sewing room that is duplicated (not just sewing machines) and sorting should allow more room to set up and sew. I have been looking at drafting information with enthusiasm as I have not been designing clothing in maybe 10 years.
First up is a costume for my Son for Halloween which is his Birthday. He has requested a character from an Anime that is wearing rather traditional Japanese Hakima and Robes. There will be a white underlayer with a longer Kimono over the top.
I look forward to the meeting!
Dorothy
Courtney
Courtney has been busy with a History Fest. He sends the following notes about his activities over the last month:
I was hoping that I could get a picture of History Fest today but I was just too busy, Sorry! Here is my monthly report:
At last month's Zoom meeting I mentioned I had some veneer that Chris might be able to use. The next weekend Chris and Cheryl were up this way and so they dropped by. We spent most of a Saturday afternoon just talking and solving the World's problems. Great day!
My sewing machine time this month has been spent mostly on getting ready for History Fest. For a week in the spring and a week in the fall the Greeley Museums host History Fest at Centennial Village. It is mostly for 4th graders. They get to see a blacksmith forge a nail, get to scrub clothes on a washboard, and attend a one room schoolhouse. I take a number of vintage and antique sewing machines and talk about how the sewing machine has changed our daily lives. After teaching high school and college for over 50 years, it is fun to talk to real kids again. I have a great time although my voice gets a bit raspy because I am not used to talking all day long like I once was.
A couple of months ago I reported that I had bought a Singer 201-2. I am now working on changing it to a 201-3 so that I can use it with an exterior motor, a treadle or a hand crank. I have a belt guard and bobbin winder from an old Japanese model 15 clone that works fine. I have also found another Japanese zig-zag machine that I think will work. I will give it a try when I get a chance. Perhaps while I have it converted, I will have a chance to work on the potted motor and get it working safely again. I am rather wary to try it without rewiring.
Til next month,
Courtney
Janey was able to find the webpage for the High Plains History Festival at https://greeleymuseums.com/historyfestival/ and probably an older picture of Courtney at https://greeleymuseums.com/wp-conten...t1609-1028.jpg
John
Lastly, John describes a project that he worked on some time ago. He writes:
I thought I might take this opportunity to mention something I did several years ago.
I should begin by saying that I don't sew very much. Janey does that for both of us. With years of experience, she is very accomplished. But I do observe, watch others and read. Sometimes I think I can contribute a gizmo or gadget that will help, sort of in a support role.
Several years ago, I thought to myself that there had to be a better way to hold and work on old sewing machines. Machine heads are heavy, they're unwieldy and are hinged from the bottom, making them very top heavy. Many parts of a sewing machine are very fragile. I've seen bent spool pins. I've seen machines rolled around and propped up. I've seen machines placed on their front or back, in order to access something on the underside.
I thought that an extremely sturdy frame, that the machine could be attached to, might be rotated from a point closer to its center of gravity. I built a workstand for doing just that. As the project progressed, I made interchangeable baseboards to accommodate a wide variety of sewing machines with their different footprints.
A few other people saw it and wanted one. So I made a few for others, as well. That was a long time ago and I am not intending on making any more of them. But the old thread offers pretty good instructions for anyone wanting to make their own.
The thread is a bit lengthy, since I wrote it step-by-step as things progressed. Anyone with an eye toward being easy on themselves, as well as giving safe and gentle care to these delicate old sewing machines, might find interest in the idea.
The thread may be found at:
Sewing Machine Work Stand
I hope that it's interesting and useful.
John
In Closing
We hope that everyone has a good October. We will post here again next month. Until then, thank you for reading.
10-01-2022, 07:32 PM
#329
Junior Member

Join Date: Mar 2014
Location: Colorado
Posts: 160
Originally Posted by JoeJr

I enjoy reading these, and that Titan is a really neat looking machine. Thanks Janey!
Dianne
11-02-2022, 06:44 AM
#330
Super Member
Join Date: Mar 2015
Location: Denver, CO
Posts: 4,254
We've had an extended fall in Colorado. No city snow to speak of, with overnight temperatures just dipping below freezing. Many trees still have their leaves and we are able to enjoy all the fall colors for even longer.
We have details of the activities of several of our members. So let's get started.
Krystal
We enjoyed the visit from a new person last month. Her name is Krystal. She is an art teacher for elementary aged children and enjoys working with printing patterns onto fabric. She uses carved linoleum blocks to print with and she showed us some of the fabrics she has produced this way. She talked a bit about inks and the need for heat setting of the work.
We welcome Krystal and hope she can join us again.
Dianne
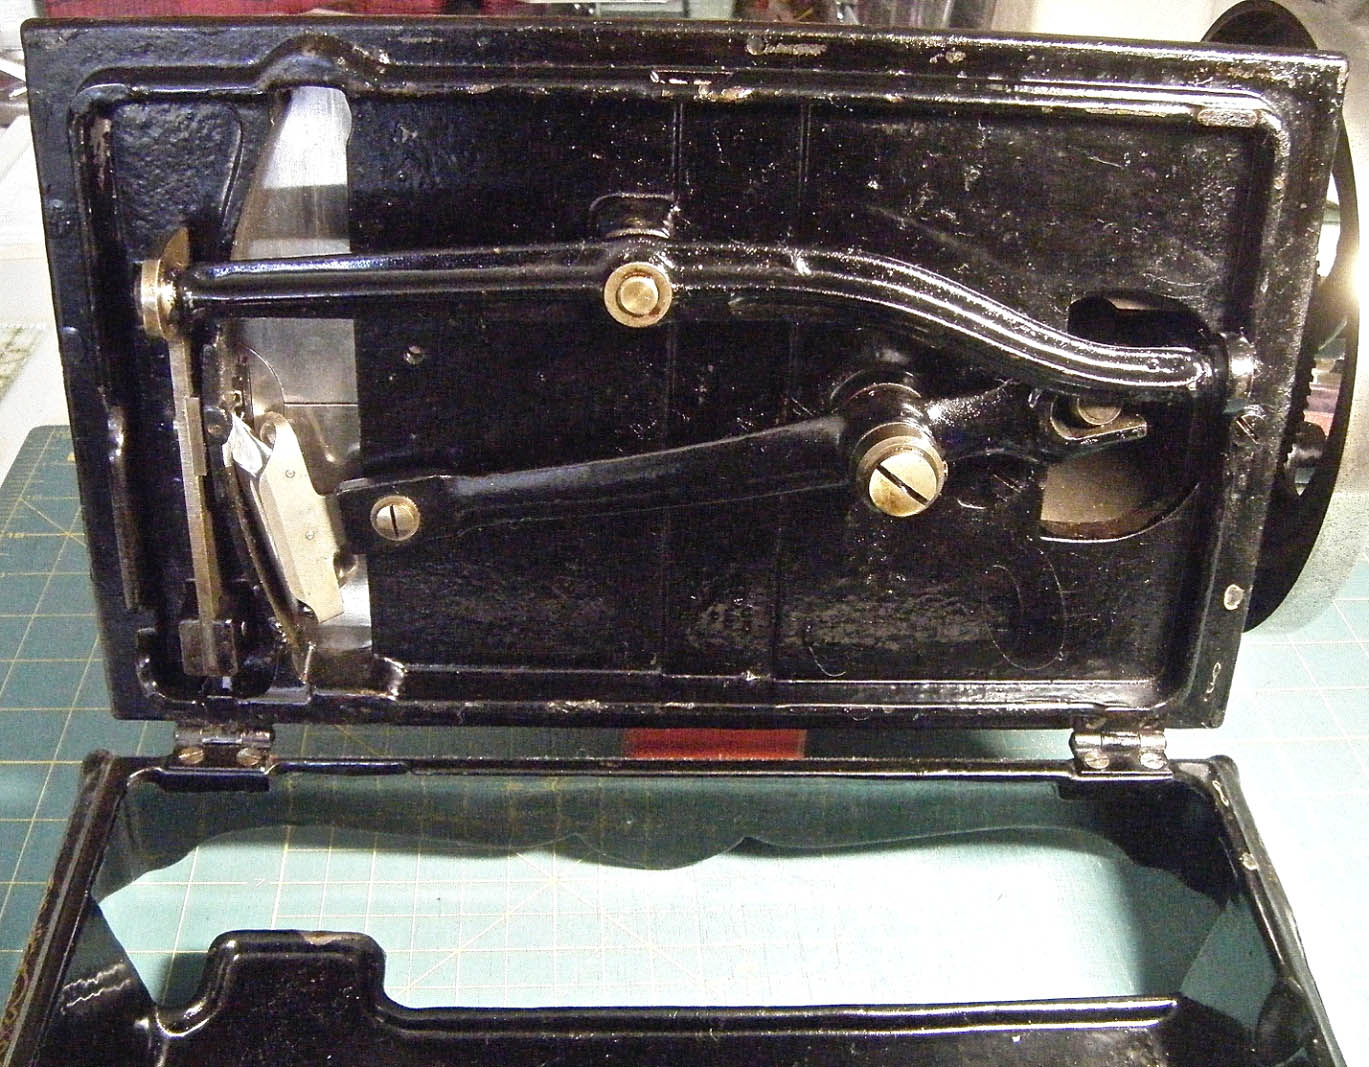
Dianne describes a machine that she has had for a while and recently used. She says:
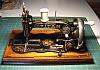
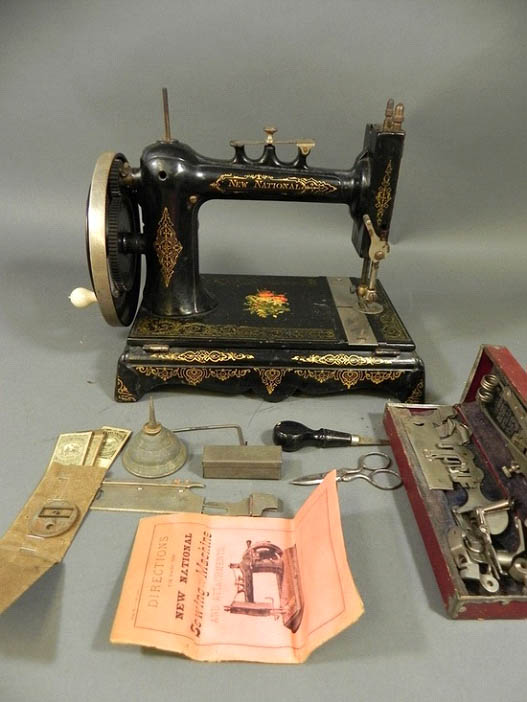
Late in September a New National machine (purchased in 2013) was pulled out to get some exercise. The machine is a vibrating shuttle handcrank, #965210, without a wood base. The New National machines were made by New Home, and use a 20x1 needle. The metal casting's integral base looks elegant to my eyes. A Janome employee dated the machine to 1889, which is also the date on the manual. The machine was spotted on eBay fifteen minutes before the auction expired, so there wasn't much time to mull over the purchase. I'm glad I jumped on it and quickly made a bid! As received the machine needed significant cleaning and rust removal. The Saxonia-type handwheel is unplated steel, so needed lots of help. Chipped paint is obvious in many places, but the overall look is attractive.
In the photos below you will note it came with lots of feet and other accessories, including a buttonhole scissors made by the Boker (Boeker) company of Germany, which apparently dates back to the 17th Century. Also there are two needle packets from Charles Howard & Co of Brockton, Mass. In the lid of the sturdy cardboard accessories box is a Johnston's Ruffler, a large gizmo that befuddles me. Maybe one day I'll attempt to use it.
The mechanism under the bed is very simple... but then everything about this machine is very simple, allowing it to be offered as a less expensive model. Is there a name for the flat coiled spring with the long extension on the face plate? This works very nicely and must have been far less expensive to manufacture than more common tension systems. Some other New Home machines have this spring, as does Ward's Arm and Platform. The leaf tension on top of the arm is another simple but effective solution. Of course, the operator must reach up and pull some thread to the left, through the leaf apparatus to provide thread at the end of a seam, as raising the foot doesn't release the tension. This is not a big deal, and after you've done it a few times it becomes routine. It is interesting that this less expensive and simple machine was so well accessorized.
The New National is easily adjusted to make nice stitches, and was used to sew paper-pieced Economy (square in a square in a square) blocks. Soon I'll have enough of these blocks to make a scrappy quilt pieced on several of these lovely old machines.


... to be continued
We have details of the activities of several of our members. So let's get started.
Krystal
We enjoyed the visit from a new person last month. Her name is Krystal. She is an art teacher for elementary aged children and enjoys working with printing patterns onto fabric. She uses carved linoleum blocks to print with and she showed us some of the fabrics she has produced this way. She talked a bit about inks and the need for heat setting of the work.
We welcome Krystal and hope she can join us again.
Dianne
Dianne describes a machine that she has had for a while and recently used. She says:
Late in September a New National machine (purchased in 2013) was pulled out to get some exercise. The machine is a vibrating shuttle handcrank, #965210, without a wood base. The New National machines were made by New Home, and use a 20x1 needle. The metal casting's integral base looks elegant to my eyes. A Janome employee dated the machine to 1889, which is also the date on the manual. The machine was spotted on eBay fifteen minutes before the auction expired, so there wasn't much time to mull over the purchase. I'm glad I jumped on it and quickly made a bid! As received the machine needed significant cleaning and rust removal. The Saxonia-type handwheel is unplated steel, so needed lots of help. Chipped paint is obvious in many places, but the overall look is attractive.
In the photos below you will note it came with lots of feet and other accessories, including a buttonhole scissors made by the Boker (Boeker) company of Germany, which apparently dates back to the 17th Century. Also there are two needle packets from Charles Howard & Co of Brockton, Mass. In the lid of the sturdy cardboard accessories box is a Johnston's Ruffler, a large gizmo that befuddles me. Maybe one day I'll attempt to use it.
The mechanism under the bed is very simple... but then everything about this machine is very simple, allowing it to be offered as a less expensive model. Is there a name for the flat coiled spring with the long extension on the face plate? This works very nicely and must have been far less expensive to manufacture than more common tension systems. Some other New Home machines have this spring, as does Ward's Arm and Platform. The leaf tension on top of the arm is another simple but effective solution. Of course, the operator must reach up and pull some thread to the left, through the leaf apparatus to provide thread at the end of a seam, as raising the foot doesn't release the tension. This is not a big deal, and after you've done it a few times it becomes routine. It is interesting that this less expensive and simple machine was so well accessorized.
The New National is easily adjusted to make nice stitches, and was used to sew paper-pieced Economy (square in a square in a square) blocks. Soon I'll have enough of these blocks to make a scrappy quilt pieced on several of these lovely old machines.


... to be continued

Thread
Thread Starter
Forum
Replies
Last Post
sewcrazygirl
General Chit-Chat (non-quilting talk)
10
04-21-2011 08:51 PM
