
Fleamarket find - Singer VS2 fiddleback
 05-20-2016, 03:34 AM
#31
Power Poster
Join Date: Mar 2011
Location: Somewhere
Posts: 15,507
Originally Posted by Mickey2

What is it you call French polish for sewing machines? I was tought French polishing for wood furniture. In the class I took the high gloss finish you see on guitars and violins was not called french polishing, but it's the same process; multiple layers of shellac dissolved in alcohol, and inbetween layers we sprinkled on a very fine milled stone dust to fill in the grain in the wood, sort of buffed up between applications. Shellac dries rather quickly. French polishing was finished by sanding down the gloss with the dust we used. It gave a flawless silky smooth finish which made the wood look very nice. The high gloss shine was made exactly the same way, but finishing of with a layer of shellac. We used woven cotton fabric, made into a ball for the buffing up between layers. On the web now, I have noticed they use the term French polishing for shellac treatments in general. These cabinet restorers had all kinds of traditional recepies for different polishes, waxes and treatments. I suspect Singer only dipped the machines in black dye and spray painted layers of shellac solution (there is a video on the web some where, but I have never found any detailed description of the process).
 05-20-2016, 03:44 AM
#32
Power Poster
Join Date: Mar 2011
Location: Somewhere
Posts: 15,507
Originally Posted by ndnchf
Mickey2 - Miriam explained it with helpful photos in this thread:
http://www.quiltingboard.com/vintage-antique-machine-enthusiasts-f22/lloooonnnngggg-over-due-before-after-singer-redeye-make-over-t235747.html
http://www.quiltingboard.com/vintage-antique-machine-enthusiasts-f22/lloooonnnngggg-over-due-before-after-singer-redeye-make-over-t235747.html
 05-24-2016, 01:39 PM
#35
Super Member
Join Date: Sep 2015
Posts: 1,963
I don't doubt your expertise at all Miriam, neither Glenn's, I hold them in great regard. I always assumed metal and s*e*w*i*n*g machines required slightly different methods than wood. I still find it a bit scary to refinish a table top or other wood surface. I only get a chance to do it now and then, not every year even, but I like the challenge and the result is usually nice. Luckily shellac is something that can be used by amateurs with less than a cabinet makers experience and work shop :- )
Last edited by Mickey2; 05-24-2016 at 01:42 PM.
05-29-2016, 06:07 AM
#36
Junior Member
Thread Starter
Join Date: Aug 2011
Location: Virginia
Posts: 111
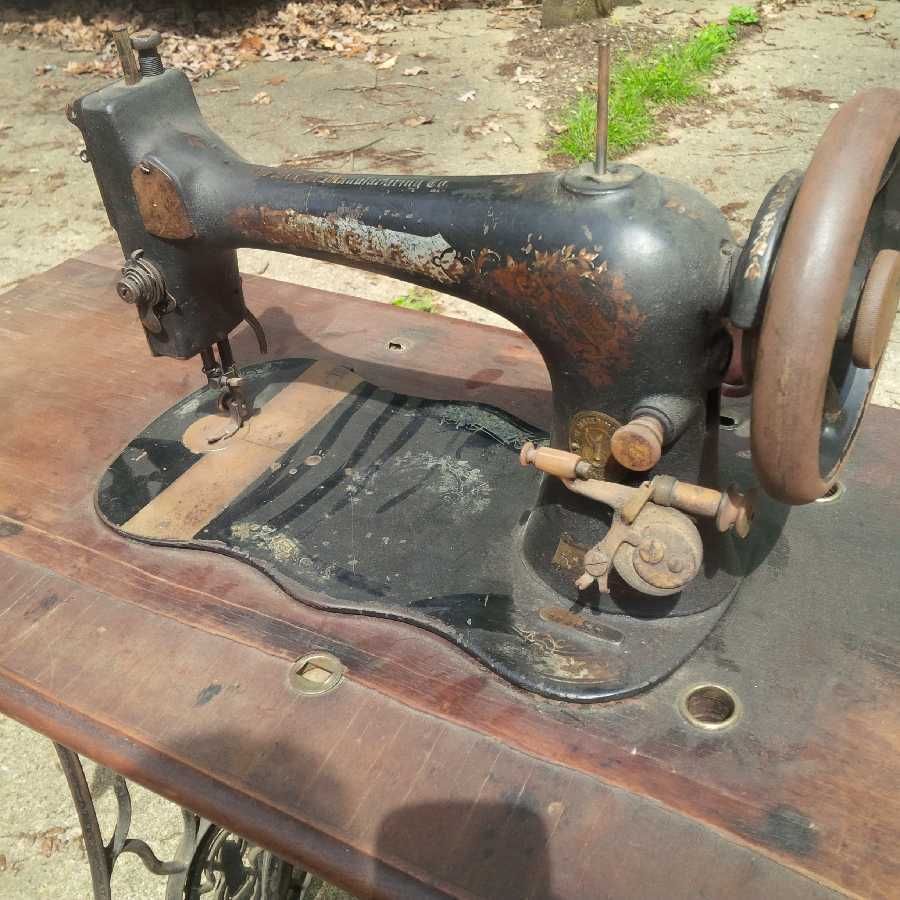
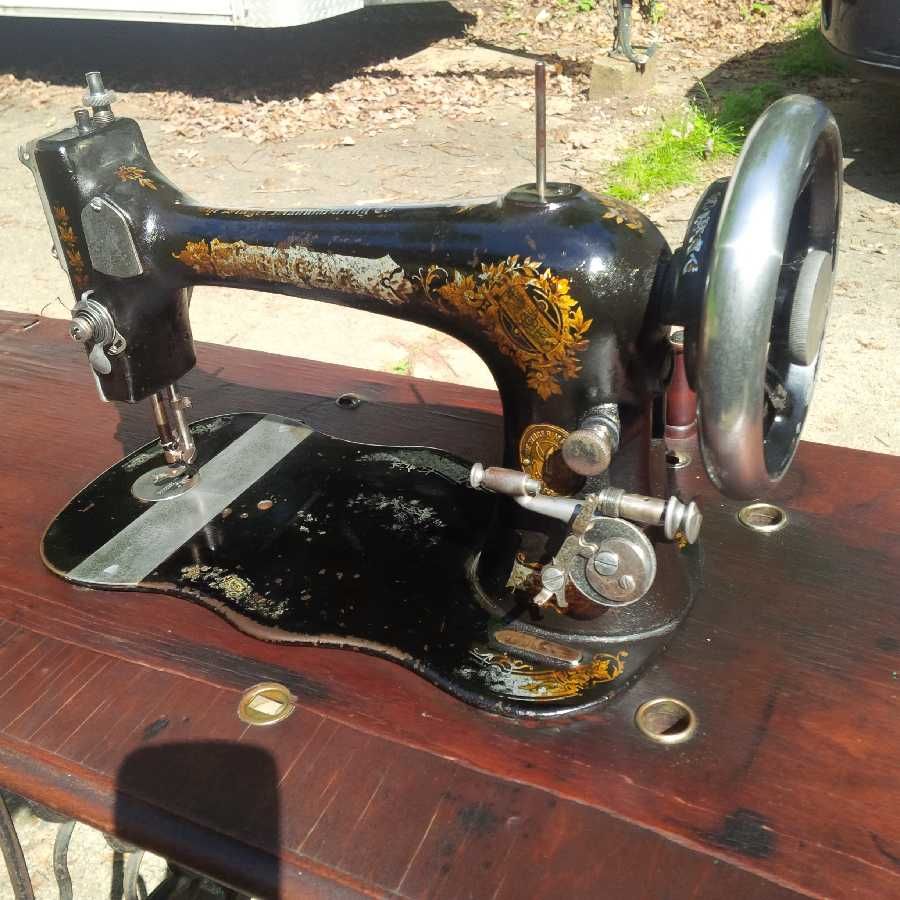
Well, the old girl was in pretty rough shape. But I got her cleaned, lubed and polished as well as I could. It runs smoothly and, while not the beauty she once was, she is presentable and runs smoothly - so I'm satisfied.

 06-09-2016, 03:48 AM
#38
Super Member

Join Date: Mar 2015
Location: Denver, CO
Posts: 4,248
Originally Posted by ndnchf
Well, the old girl was in pretty rough shape. But I got her cleaned, lubed and polished as well as I could. It runs smoothly and, while not the beauty she once was, she is presentable and runs smoothly - so I'm satisfied.
 Very impressive. You do beautiful work.
 Care to share techniques and products (besides ultrasonic)? I'm guessing that a tumbler wouldn't be good for the hand wheel and that looks really nice and shiny (along with the other metal bits).
Also I noticed the bumper on the back. My 15 fiddle base didn't have one. Could you give me the measurements (even approximate) of the wood and rubber piece??? I'm thinking that for the top rubber that maybe something like this would work http://www.amazon.com/Sorbothane-Hem.../dp/B0042U6ZDU
Janey - Neat people never make the exciting discoveries I do.
06-09-2016, 11:17 AM
#39
Junior Member
Thread Starter
Join Date: Aug 2011
Location: Virginia
Posts: 111
I used TR-3 Resin Glaze on the paint after the usual cleaning. I worked carefully over the decals trying to remove grime without wearing them down. I did lose a little decal, but not much. Then I did the French polish technique to add a fresh layer of shellac over the paint and decals. The plated parts were mostly rusty, so they were soaked in Evaporust. Then they were polished with Mothers Aluminum polish. Regarding the hand wheel. it was petty rough, so I set it up in a lathe so I could spin it. After the Evapoust I used 220 , 320, then 400 grit sand paper with oil to get it pretty shiny. Then with it spinning, I used the Mothers polish to finish I up. The last step was to coat all bare metal and plated parts with Boeshield T-9 to prevent corrosion.
I'll check on the wood post tonight.
I'll check on the wood post tonight.

Thread
Thread Starter
Forum
Replies
Last Post
KenmoreRulesAll
For Vintage & Antique Machine Enthusiasts
22
03-20-2015 10:21 AM
SteveH
For Vintage & Antique Machine Enthusiasts
41
05-16-2014 08:13 AM
frudemoo
For Vintage & Antique Machine Enthusiasts
23
03-28-2013 11:01 AM
Caroline S
For Vintage & Antique Machine Enthusiasts
7
02-09-2013 06:51 AM
