
How do I remove a machine from a carrying case?
 06-29-2021, 09:23 AM
#1
Junior Member
Thread Starter
Join Date: Feb 2021
Location: My own private Idaho
Posts: 182
My daughter rescued a sewing machine from the trash. The needle bar didn't go up and down. I thought this would be a good candidate for trying my hand at machine repair. I need to oil the bottom, but I can't seem to find a way to remove the machine from the bottom portion of the carrying case. Seems like it should be easy, but alas, it escapes me. I did a search on "carrying case" to see if this was already answered, but I didn't find anything.
Any help or advice on how to remove the machine from the bottom part of the carrying case would be helpful.
Thank you in advance!
Any help or advice on how to remove the machine from the bottom part of the carrying case would be helpful.
Thank you in advance!
 06-29-2021, 10:56 AM
#2
Senior Member
Join Date: Sep 2010
Location: NM
Posts: 995
Most of them just lift up, there usually there is a latch on the right that moves to unlock the machine from the bottom case.
Lift up, then look under the machine for the grub nuts. There should be 2, don't lose them, very small. They unscrew.
I did have one machine that had a screw that lifted up to loosen the machine from the case. If you have a featherweigh machine you have to unscrew the bottom screw under the machine.
06-29-2021, 12:59 PM
#3
Super Member

Join Date: May 2016
Location: near Topeka kansas
Posts: 4,524
A brand and model would be helpful , but yes generally there are two hinge pins at the back that can be released with a flat screwdriver. Portable cases tend to rock away when you lift the machine high enough to see them. Be careful.
06-29-2021, 06:19 PM
#4
Super Member

Join Date: Mar 2015
Location: Denver, CO
Posts: 4,672
Are you just trying to get to the bottom to oil or do you want to take it out completely? What kind of machine is it? Here is a picture of the lever (double blue circles) of a plastic case that needs to twisted to be able to tip it back to get to the bottom of the machine.
and here is a picture of my Miracle tipped back - please note that I have a couple of sturdy pool noodles to support the back of the machine while working on the bottom.
If it is a White or a National, those will sometime have a screw or push button that latches it into a case. Many of the Japanese machines have a similar lever as the plastic cases, but it is a little further back toward the handwheel that just needs twisted off the machine to be able to tilt the machine back.
If you want to remove the machine completely, there are instruction on the location of the set screws after the machine is tilted back at http://mysewingmachineobsession.blog...head-from.html
We like pictures. In order to post pictures on Quilting Board, you will probably need to reduce or compress the picture to a file size that is smaller than 2MB. How to post images can be found at https://www.quiltingboard.com/attach...020-01-17-.pdf
Don't forget to scroll over to the far right to find and click on the "Upload" button.
I have found that only the big red "Reply" button or "Quote" work to give me the paper clip icon to work for adding pictures.
https://www.quiltingboard.com/attach...p-location.jpg
Some additional info regarding reducing images at post #4 and images for the scroll and upload button can be found at #5 of quilt block ID?
Or simply - Make sure pictures are smaller than 2MB
Click on red "Reply" button
Click on the paper clip icon
Click browse - choose picture/s. (only 5 allowed per post)
Once they show up as being loaded, Scroll over to the right side and click on "Upload"
After the pictures show up as being attached, you can close that window and go back to the screen to finish posting your post.
Janey - Neat people never make the exciting discoveries I do.
Not affiliated with off-site link(s)

and here is a picture of my Miracle tipped back - please note that I have a couple of sturdy pool noodles to support the back of the machine while working on the bottom.

If it is a White or a National, those will sometime have a screw or push button that latches it into a case. Many of the Japanese machines have a similar lever as the plastic cases, but it is a little further back toward the handwheel that just needs twisted off the machine to be able to tilt the machine back.
If you want to remove the machine completely, there are instruction on the location of the set screws after the machine is tilted back at http://mysewingmachineobsession.blog...head-from.html
We like pictures. In order to post pictures on Quilting Board, you will probably need to reduce or compress the picture to a file size that is smaller than 2MB. How to post images can be found at https://www.quiltingboard.com/attach...020-01-17-.pdf
Don't forget to scroll over to the far right to find and click on the "Upload" button.
I have found that only the big red "Reply" button or "Quote" work to give me the paper clip icon to work for adding pictures.
https://www.quiltingboard.com/attach...p-location.jpg
Some additional info regarding reducing images at post #4 and images for the scroll and upload button can be found at #5 of quilt block ID?
Or simply - Make sure pictures are smaller than 2MB
Click on red "Reply" button
Click on the paper clip icon
Click browse - choose picture/s. (only 5 allowed per post)
Once they show up as being loaded, Scroll over to the right side and click on "Upload"
After the pictures show up as being attached, you can close that window and go back to the screen to finish posting your post.
We like pictures. In order to post pictures on Quilting Board, you will probably need to reduce or compress the picture to a file size that is smaller than 2MB. How to post images can be found at https://www.quiltingboard.com/attach...020-01-17-.pdf
Don't forget to scroll over to the far right to find and click on the "Upload" button.
I have found that only the big red "Reply" button or "Quote" work to give me the paper clip icon to work for adding pictures.
https://www.quiltingboard.com/attach...p-location.jpg
Some additional info regarding reducing images at post #4 and images for the scroll and upload button can be found at #5 of quilt block ID?
Or simply - Make sure pictures are smaller than 2MB
Click on red "Reply" button
Click on the paper clip icon
Click browse - choose picture/s. (only 5 allowed per post)
Once they show up as being loaded, Scroll over to the right side and click on "Upload"
After the pictures show up as being attached, you can close that window and go back to the screen to finish posting your post.
Janey - Neat people never make the exciting discoveries I do.
Not affiliated with off-site link(s)
Last edited by OurWorkbench; 06-29-2021 at 06:22 PM. Reason: typo
06-30-2021, 08:01 AM
#5
Junior Member
Thread Starter
Join Date: Feb 2021
Location: My own private Idaho
Posts: 182
Thank you for the quick reply! I would like to remove the machine altogether, but just tipping it back would be OK too!
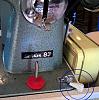
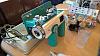
The machine says "Regency" ZigZag. (First pic).
There is a nub in front that keeps me from tipping it back. (Second pic) The nub looks pretty permanent. I looked at the bottom of the case to see if I could take off the hinges. The screw for the hinge looks like plastic and could be a one time use only type of screw.
I hope the pics help!
06-30-2021, 09:50 AM
#10
Super Member
Join Date: Mar 2015
Location: Denver, CO
Posts: 4,672
I'm pretty sure that if you will hold down the front of the case and then push back on the arm of the machine that it will probably snap out. I think some of the Kenmore machines may have had those kind of cases. It may take a bit of effort, but shouldn't be much. Remember you are tilting the machine not lifting it out. From the picture of the whole machine, it kind of looks like it wider in the middle than at the ends of the case, probably for a little more room to hold onto when tilting it back. Remember to have something to hold up the machine when it is tilted back.
It also looks like there is a hole in the corner, possibly for a lever to twist.
Janey - Neat people never make the exciting discoveries I do.
It also looks like there is a hole in the corner, possibly for a lever to twist.
Janey - Neat people never make the exciting discoveries I do.
