
Viking 4500
 06-11-2022, 01:54 PM
#1
Super Member
Thread Starter

Join Date: Jul 2010
Location: Ontario, Canada
Posts: 3,509
Today,I came upon this Viking 4500 at a yard sale, priced at $10! She is very clean and looks to be in decent condition, with a box of attachments and a nice case. The seller said she had picked the machine up at an auction and could not figure out how to thread it.
I even have the original sales slip from 1982. What I do not have is a manual. I found and downloaded a free manual online, and the one page that I need--how to navigate the tension area--is so blurred, that I cannot read it.
I am hoping that someone here might have some experience with this machine and can offer me some assistance. I'm hoping she will turn out to be a workhorse and not a finicky filly. BTW she has got to weigh close to 50 pounds!!
 06-11-2022, 05:27 PM
#3
Super Member

Join Date: Mar 2015
Location: Denver, CO
Posts: 4,248
Originally Posted by GingerK

...
I even have the original sales slip from 1982. What I do not have is a manual. I found and downloaded a free manual online, and the one page that I need--how to navigate the tension area--is so blurred, that I cannot read it.
I am hoping that someone here might have some experience with this machine and can offer me some assistance. ...

Some machine have a notch or hook (don't remember proper name) that after thread goes through the check spring that the thread needs to get caught in. I do not think that is what yours has. From the instructions (for the Imperial 4500) for threading, it appears that it would be threaded much like the diagram at http://web.archive.org/web/201407181...s/Ken1301c.jpg The difference I can see is that after going under the Thread Retainer Bar you will have to run the thread through the thread guide on the Thread Retainer Bar which appears fairly good size before going up to the thread take up lever.
Have you taken the top off to check the cam gear? It is probably some type of material other than metal and may have cracks in it. With 3D printing, it appears that there may be a replacement but kind of pricey compared to the cost of the machine. https://www.amazon.com/Stack-4111595...s%2C136&sr=8-5
Janey - Neat people never make the exciting discoveries I do.
Not affiliated with off-site link(s)
06-12-2022, 06:32 AM
#5
Super Member
Join Date: Mar 2015
Location: Denver, CO
Posts: 4,248
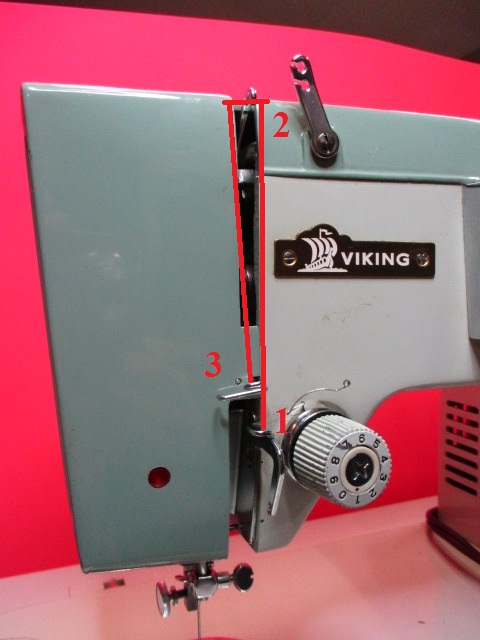
I would try to thread it like the link above and then through thread guide 1, then through take up lever 2, then through thread guide 3, as shown below. Be sure the presser foot is up while threading it.
It looks like the tension assembly is positioned a little different than shown in the manual, but I think I would try it like it is.
Janey - Neat people never make the exciting discoveries I do.
Not affiliated with off-site link(s)
It looks like the tension assembly is positioned a little different than shown in the manual, but I think I would try it like it is.
Janey - Neat people never make the exciting discoveries I do.
Not affiliated with off-site link(s)
06-12-2022, 09:58 AM
#6
Super Member
Thread Starter
Join Date: Jul 2010
Location: Ontario, Canada
Posts: 3,509
Thanks Janey. I actually took a magnifying glass to the diagram in the manual I found and threaded it pretty much like you drew. I found it interesting, that the first two guides have notches to allow the thread in, while the rest have to be 'threaded. I sewed a few stitches and the tension is surprisingly good.
Thanks so much for your help. This board is the greatest!
Thanks so much for your help. This board is the greatest!
06-12-2022, 02:14 PM
#8
Super Member
Join Date: Mar 2015
Location: Denver, CO
Posts: 4,248
Originally Posted by GingerK
... that the first two guides have notches to allow the thread in, while the rest have to be 'threaded. I sewed a few stitches and the tension is surprisingly good.
Thanks so much for your help. This board is the greatest!
Thanks so much for your help. This board is the greatest!
Glad it is stitching well.
Janey - Neat people never make the exciting discoveries I do.
06-12-2022, 03:25 PM
#9
Super Member
Thread Starter
Join Date: Jul 2010
Location: Ontario, Canada
Posts: 3,509
Huh!! Will definitely take a closer look. Thanks! The manual is very interesting. She certainly has some different features compared to the Singers that I know. Considering how clean she is and quietly she runs, I don't think she sat unused for long. And looking at the bill of sale, I think she came from an estate auction (small town, local news). Just glad she caught my eye.
06-12-2022, 04:33 PM
#10
Super Member
Join Date: Sep 2011
Posts: 2,559
Those loops look like my Necchi machine threading system. You don't have to thread it through the holes on the twisted loop, just put the thread up to the back of the loop and pull and it self'-threads/pops right into the loops. The only thing I truly have to thread is the eye in my needle....
