Abstraction Top Done
 02-25-2025, 05:14 AM
#1
Super Member
Thread Starter
Join Date: Sep 2011
Location: Carroll, Iowa
Posts: 3,979
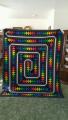
Finally got this lap quilt done. Thought I was going to add to the top and bottom to make it longer but once I got it all together, I decided it wasn't necessary. Had some troubles understanding some of the cutting instructions but was able to make use of those miscuts in other ways.
Only took a side photo of the quilt and I do have some fullness issues so will have to deal with them when I go to quilt it. But for now it done and I even got the backing cut ready to go when the time comes to quilt it.
The young gentleman requested colors in navy blue, purple and white so that's what he got. I was able to trade some fabric for the purple batik. The navy blue batik has a bit of purple running thru it. So all I had to order was the backing which is a navy blue batik. Everything else came from the stash.

 02-25-2025, 10:40 AM
#4
Power Poster
Join Date: Apr 2011
Location: Ontario, Canada
Posts: 18,340
Well Done, Snooze!! ... you're a fast worker at getting it done!
Looks absolutely wonderful.
I do the same, once I have a flimsy finished, I prepare both the backing and the binding, regardless of when it will get quilted.
Look forward to seeing the quilted and bound finish!
Looks absolutely wonderful.
I do the same, once I have a flimsy finished, I prepare both the backing and the binding, regardless of when it will get quilted.
Look forward to seeing the quilted and bound finish!
02-25-2025, 09:31 PM
#7
Super Member
Thread Starter
Join Date: Sep 2011
Location: Carroll, Iowa
Posts: 3,979
EmiliaNana, believe it or not but the instructions make it very easy to put it all together. They have you make up the sections, then the sections into rows of blocks that eventually slant instead of going up and down or sideways. Those large triangles (27.5) end up in each corner. Before you add the last borders of just I think 3.0" on all sides, they tell you to square it up. Once I figured out the instructions correctly, it wasn't as hard as it looked. I only had to wait for the specialty ruler to trim my blocks so I would have had it finished much sooner.
Thanks all for your compliments. I've got ideas on the quilting, at least in the large corners. I'll have to check to see just how large these words are but I know I can fill in the rest of the blank space with either lines or crosshatching, then use some sort of E2E for the center of the quilt.
Thanks all for your compliments. I've got ideas on the quilting, at least in the large corners. I'll have to check to see just how large these words are but I know I can fill in the rest of the blank space with either lines or crosshatching, then use some sort of E2E for the center of the quilt.
02-26-2025, 12:46 PM
#8
Super Member

Join Date: Jul 2018
Location: Southern USA
Posts: 2,337
I like SOME illusion quilts and this is one I like. Sometimes, with my vertigo, the designs can really effect me. I saved your post earlier about this pattern so you know I like it.-lol So is it about 60 inch square?
02-26-2025, 04:05 PM
#9
Super Member
Thread Starter
Join Date: Sep 2011
Location: Carroll, Iowa
Posts: 3,979
toogie, it came out at 64x64 so a nice size. Smaller than I'm used to but I was afraid if I added anything at the top or bottom it would take away from the design so left it as is. The specialy ruler by Deb Tucker really helped with trimming out the blocks as you have some 3-patch and some rectangle shaped blocks to trim out almost a 1/4" on each side.