
Flower Pincushion -- my avatar

 04-24-2013, 05:14 AM
#32
Senior Member
Join Date: Feb 2010
Location: South Central Missouri
Posts: 333
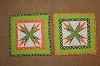
Judy, when you cover the 3" cardboard circle, do you turn the covered side up or down. I am thinking it should be down to looked finished on the underside but your picture looks like it is on the top side with the peddles added? I will finish this one I've started and post a picture but it is going to be slightly larger as I goofed. I had a new EZ circle ruler so drew my cirlcles with it without thinking the sizes have added seam allowance. Ok that's me, do it first then read the instructions. lol Thanks again for the tut.
 04-24-2013, 04:57 PM
#37
Super Member
Thread Starter

Join Date: Aug 2010
Location: Phoenix, AZ suburb
Posts: 4,664
Yes, you wnt the turned edge up and the good side down, you put your petals onto the turned edge side.
Good job, Dogwood, too cute.
Good job, Dogwood, too cute.
Originally Posted by Dogwood Quilter

Judy, when you cover the 3" cardboard circle, do you turn the covered side up or down. I am thinking it should be down to looked finished on the underside but your picture looks like it is on the top side with the peddles added? I will finish this one I've started and post a picture but it is going to be slightly larger as I goofed. I had a new EZ circle ruler so drew my cirlcles with it without thinking the sizes have added seam allowance. Ok that's me, do it first then read the instructions. lol Thanks again for the tut.


Thread
Thread Starter
Forum
Replies
Last Post
barbsbus
Member Swaps and Round/Row Robins
113
08-30-2011 08:43 AM
craftybear
Links and Resources
1
07-22-2011 07:02 AM
barbsbus
Member Swaps and Round/Row Robins
294
11-17-2010 02:36 PM
