
Colorado get-together?
 04-28-2021, 04:56 AM
#241
Super Member

Join Date: Mar 2015
Location: Denver, CO
Posts: 4,254
Courtney
Courtney, who lives in northern Colorado, sends us details of some quilting projects and other things he has been working on:
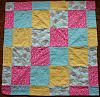
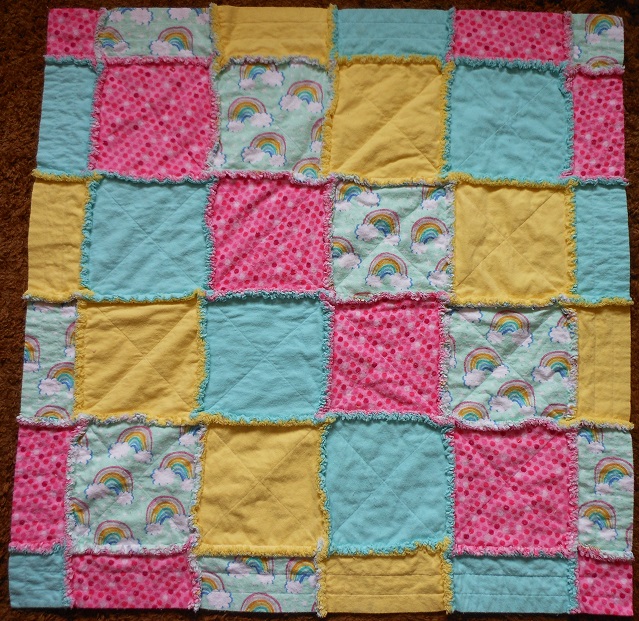
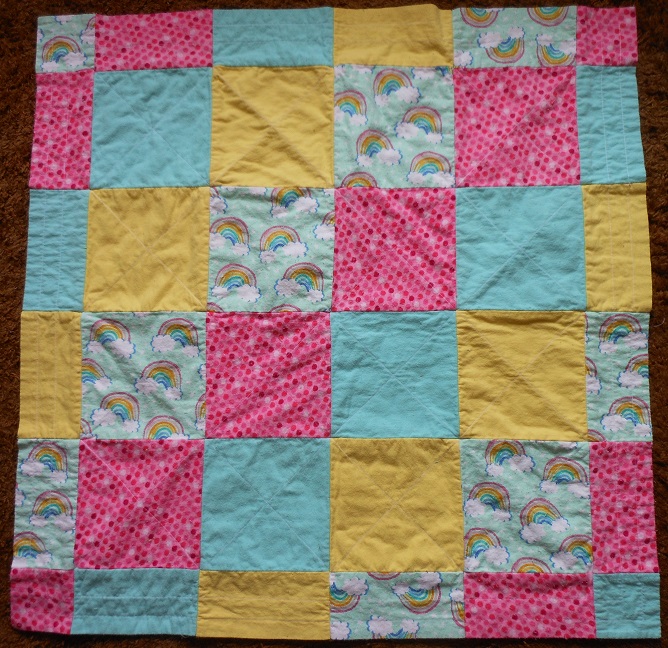
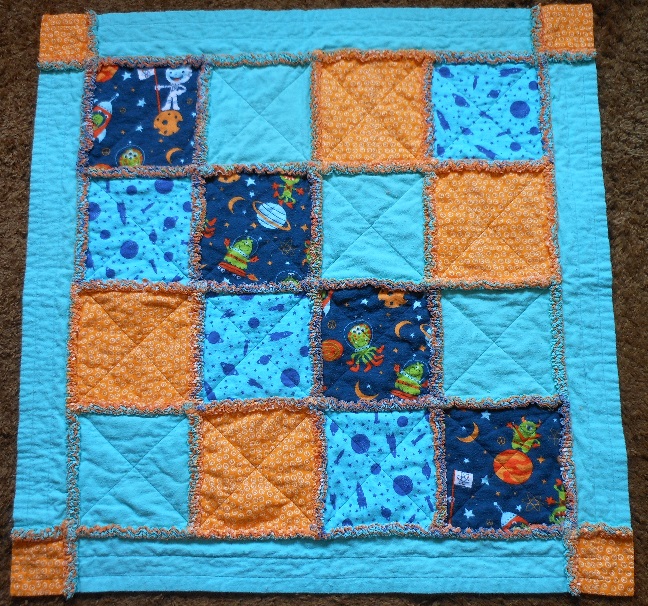
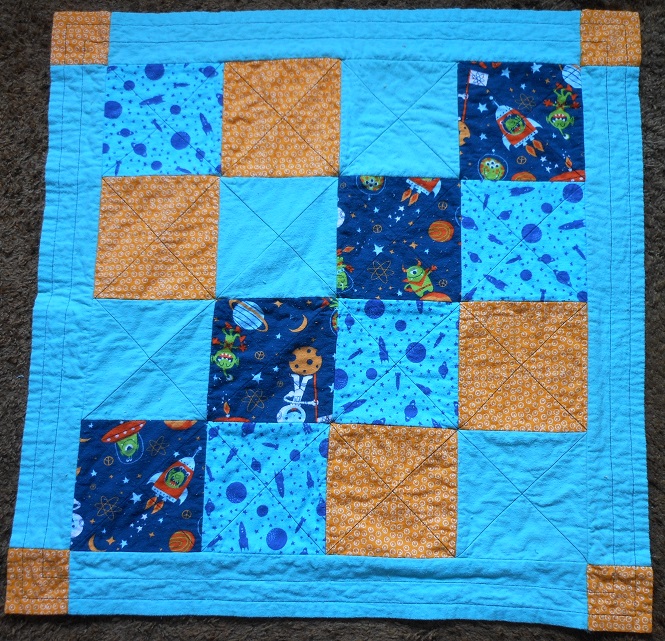
It's Spring time so it's baby time! Much of my time this last month was involved trying to finish two baby quilts. One is for an astronomer and his wife and the second is for the daughter of some old friends. Out of history, I generally make rag quilts for babies. I usually make the baby quilts with only a top and bottom layer and no batting as shown in the rainbow quilt. This makes a nice lightweight quilt that is especially suitable for summer. I try and make the quilts so there is no fraying along the edge so the baby can be wrapped in the back and not be bothered with the fraying. The astronomy quilt I felt needed a bit more color so I used a batting of orange flannel which I think really sets things off but unfortunately it does make the quilt 50% heavier. I hope it is not too heavy for summertime.
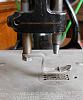
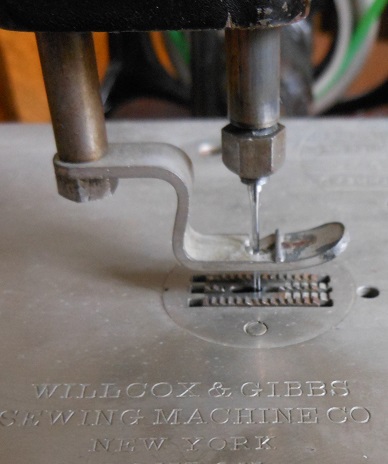
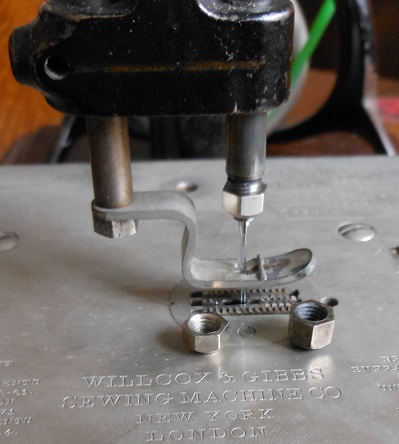
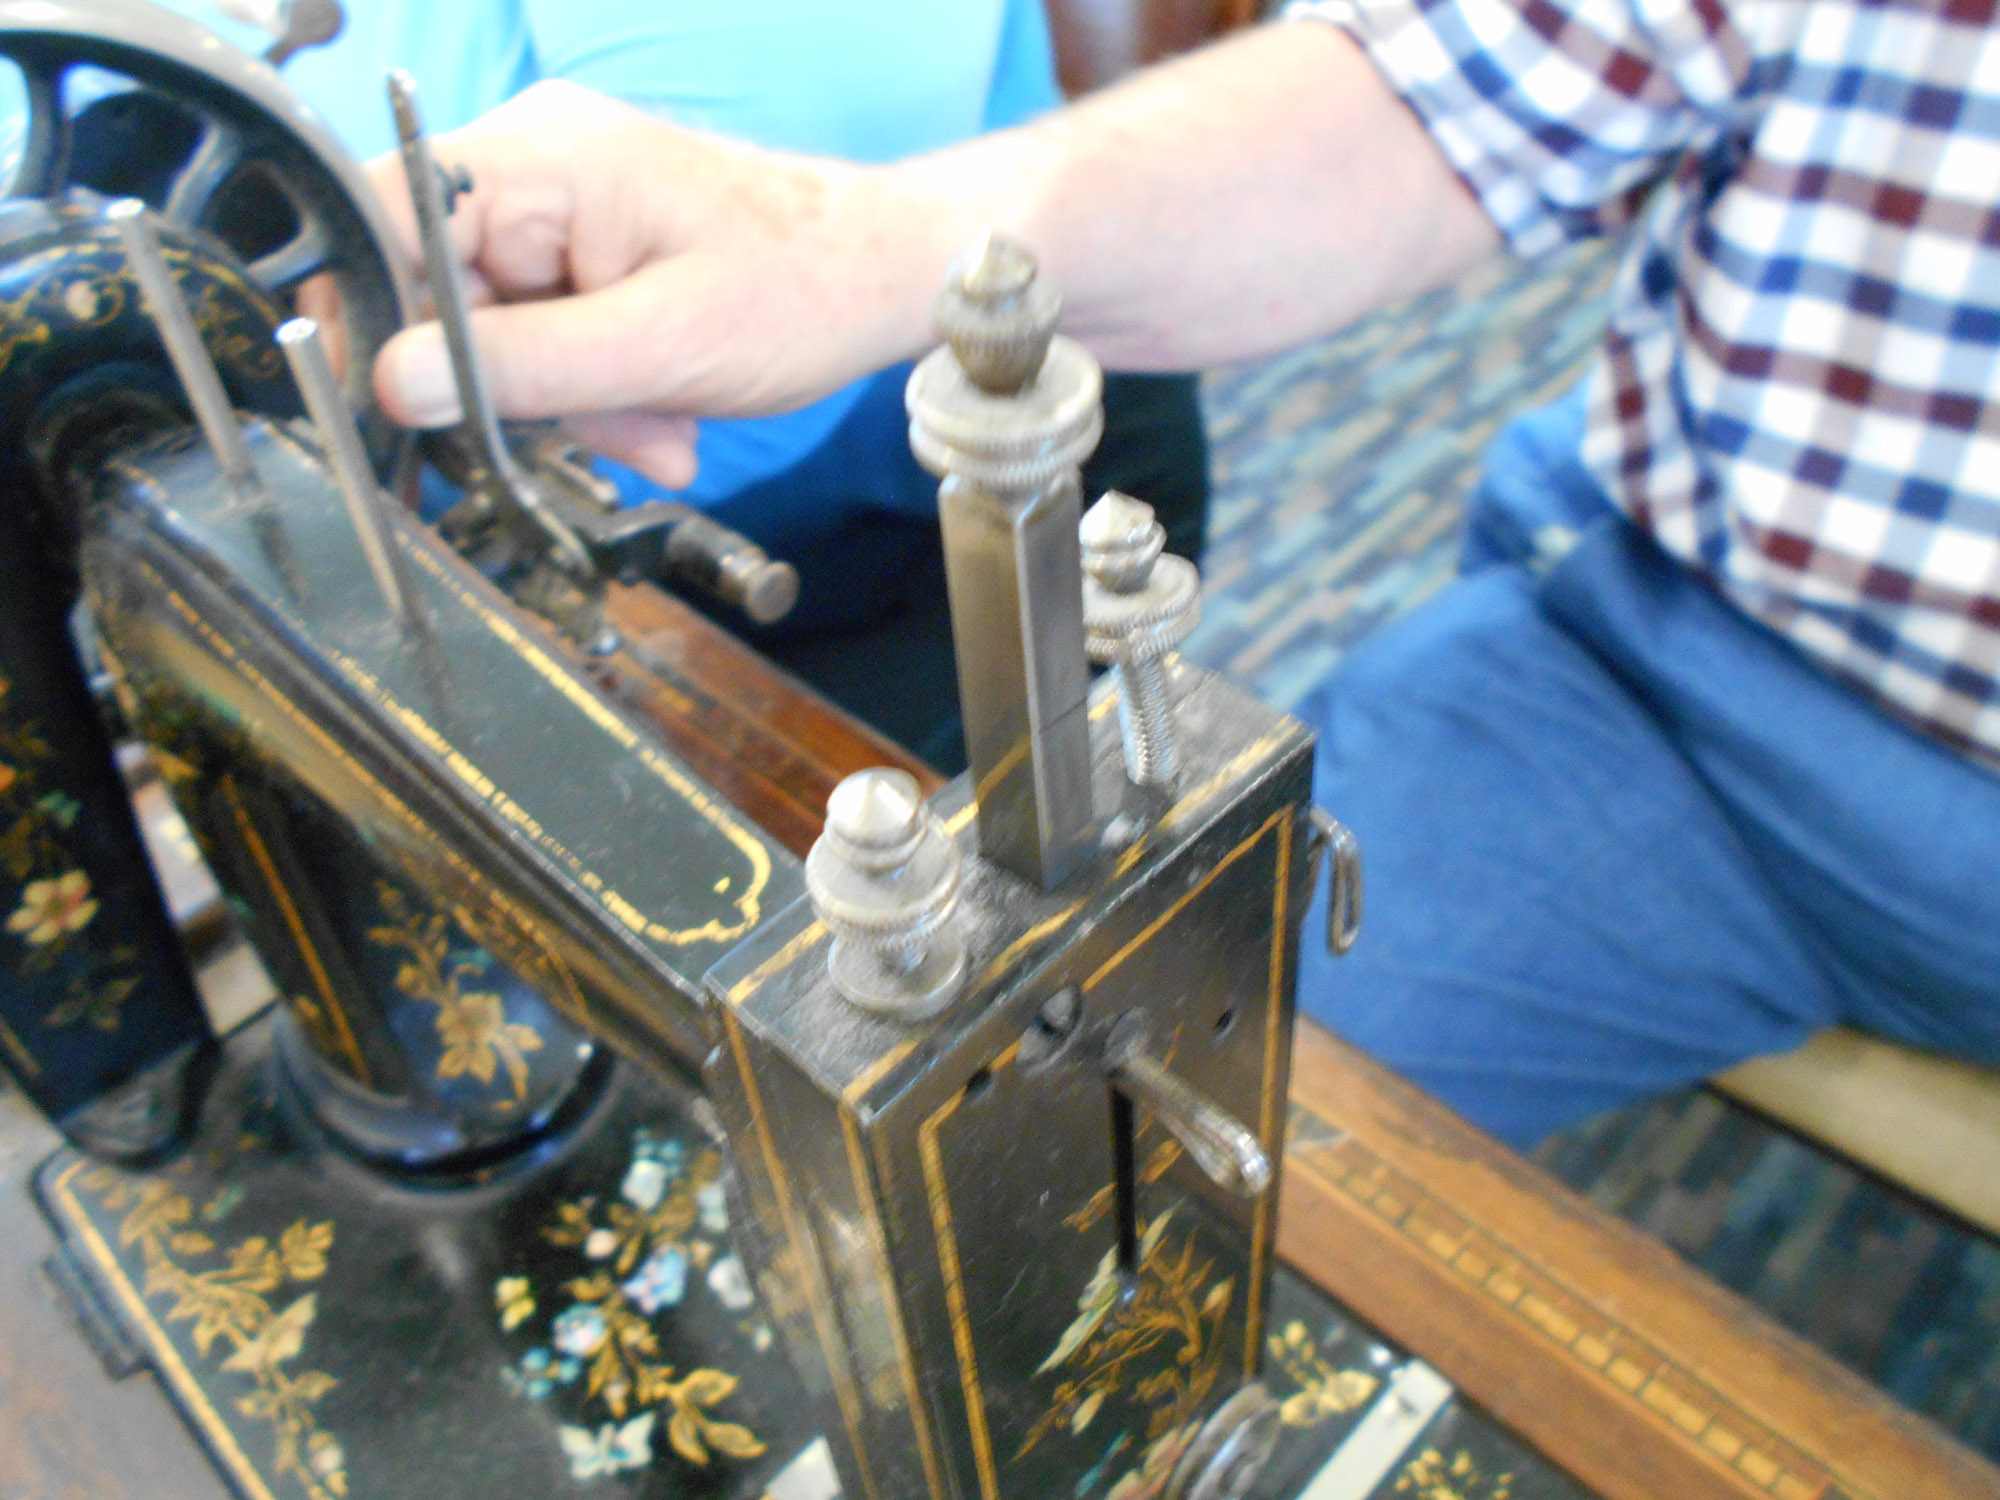
Most of my sewing machine time was spent of working with Willcox and Gibbs machines. Shortly after our last meeting, Janey dropped me an email about someone having some problems with a W&G machine on Quilting Board. To me it looked like someone had lost the needle bar nut that holds the needle in place. I wrote my observations and said that I would see what I could find to replace the original nut. The W&G Automatic needle bar nuts are hard to replace because they have tapered threads to fit the tapered needle bar. They are very rare and often demand a rather high price if they can be found. As luck would have it, a couple of days later, someone was offering needle bar nuts on the ubiquitous auction site for a commercial Pegasus machine which was also made by W&G. They did not look identical to the nuts on W&G Automatic machines, but the cost was $9 for a pair, so I took a chance. I got out my cheap calipers and below I compare the two nuts: The first column are measurements from the original nut on a W&G machine from the early 1880's while the second column is the Pegasus nuts.
W 7.1mm 7.0mm
H 6.1mm 4.6mm
D1 3.4mm 3.8mm
D2 4.3mm 4.3mm
The width of the nuts is the same; they both take a 9/32 inch wrench. The biggest difference is the original nut is taller. The lower diameter is smaller on the original nut but the upper diameter is the same (which shows the nuts are tapered.) The Pegasus nuts do seem to hold a needle on a W&G Automatic. I did do some internet searching and found the Pegasus nuts are available from some of the commercial sewing machine sites but who knows for how long.
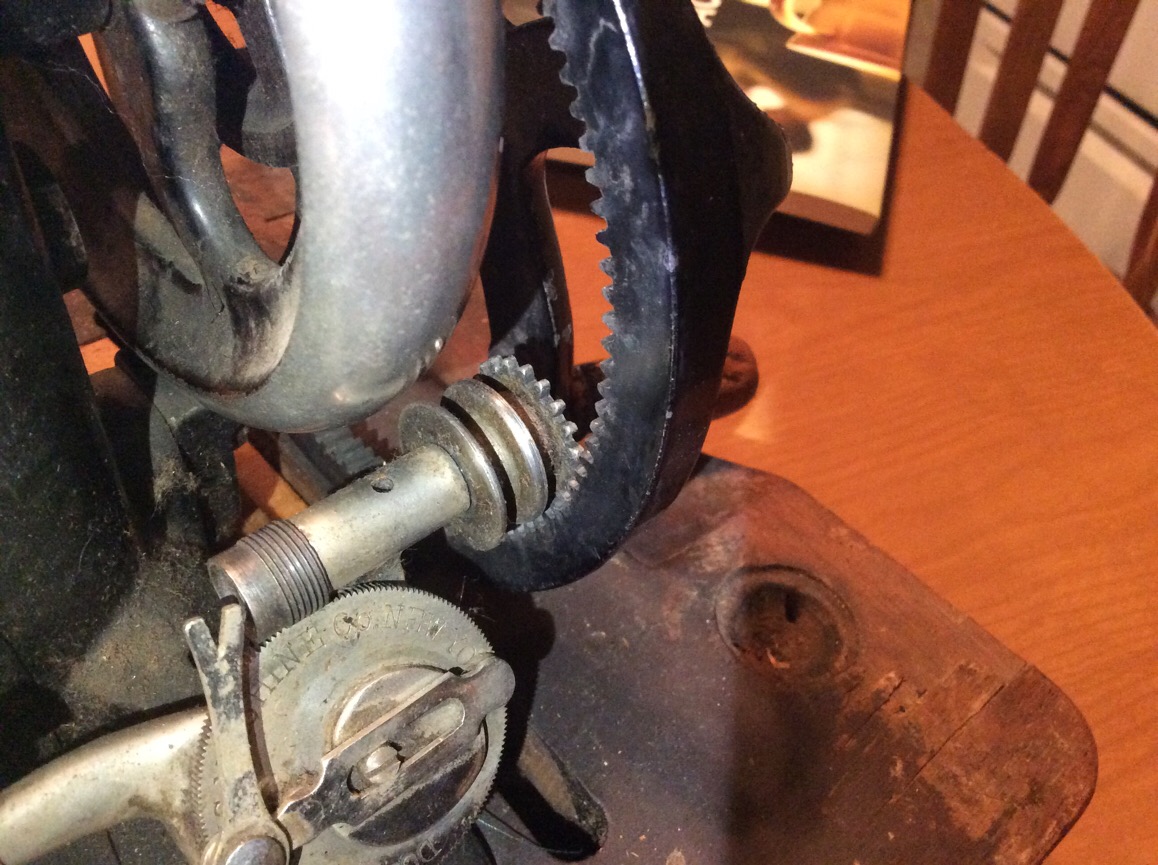
You can see the comparison between the two nuts it the photos. Pic 1 shows the tapered threads on a W&G Automatic. Pic 2 Shows the original nut on the needlebar. Pic 3 shows a Pegasus nut on a W&G Automatic and the taller original nut next to a Pegasus nut. Finally, PIC 4 shows an Automatic needle bar wrench fitting on a Pegasus nut.
Courtney

... to be continued
Courtney, who lives in northern Colorado, sends us details of some quilting projects and other things he has been working on:
It's Spring time so it's baby time! Much of my time this last month was involved trying to finish two baby quilts. One is for an astronomer and his wife and the second is for the daughter of some old friends. Out of history, I generally make rag quilts for babies. I usually make the baby quilts with only a top and bottom layer and no batting as shown in the rainbow quilt. This makes a nice lightweight quilt that is especially suitable for summer. I try and make the quilts so there is no fraying along the edge so the baby can be wrapped in the back and not be bothered with the fraying. The astronomy quilt I felt needed a bit more color so I used a batting of orange flannel which I think really sets things off but unfortunately it does make the quilt 50% heavier. I hope it is not too heavy for summertime.
Most of my sewing machine time was spent of working with Willcox and Gibbs machines. Shortly after our last meeting, Janey dropped me an email about someone having some problems with a W&G machine on Quilting Board. To me it looked like someone had lost the needle bar nut that holds the needle in place. I wrote my observations and said that I would see what I could find to replace the original nut. The W&G Automatic needle bar nuts are hard to replace because they have tapered threads to fit the tapered needle bar. They are very rare and often demand a rather high price if they can be found. As luck would have it, a couple of days later, someone was offering needle bar nuts on the ubiquitous auction site for a commercial Pegasus machine which was also made by W&G. They did not look identical to the nuts on W&G Automatic machines, but the cost was $9 for a pair, so I took a chance. I got out my cheap calipers and below I compare the two nuts: The first column are measurements from the original nut on a W&G machine from the early 1880's while the second column is the Pegasus nuts.
W 7.1mm 7.0mm
H 6.1mm 4.6mm
D1 3.4mm 3.8mm
D2 4.3mm 4.3mm
The width of the nuts is the same; they both take a 9/32 inch wrench. The biggest difference is the original nut is taller. The lower diameter is smaller on the original nut but the upper diameter is the same (which shows the nuts are tapered.) The Pegasus nuts do seem to hold a needle on a W&G Automatic. I did do some internet searching and found the Pegasus nuts are available from some of the commercial sewing machine sites but who knows for how long.
You can see the comparison between the two nuts it the photos. Pic 1 shows the tapered threads on a W&G Automatic. Pic 2 Shows the original nut on the needlebar. Pic 3 shows a Pegasus nut on a W&G Automatic and the taller original nut next to a Pegasus nut. Finally, PIC 4 shows an Automatic needle bar wrench fitting on a Pegasus nut.
Courtney

... to be continued
Last edited by OurWorkbench; 04-28-2021 at 05:12 AM.
 04-28-2021, 05:03 AM
#242
Super Member
Join Date: Mar 2015
Location: Denver, CO
Posts: 4,254

Dianne
Dianne acquired an interesting attachment that she tells us about:
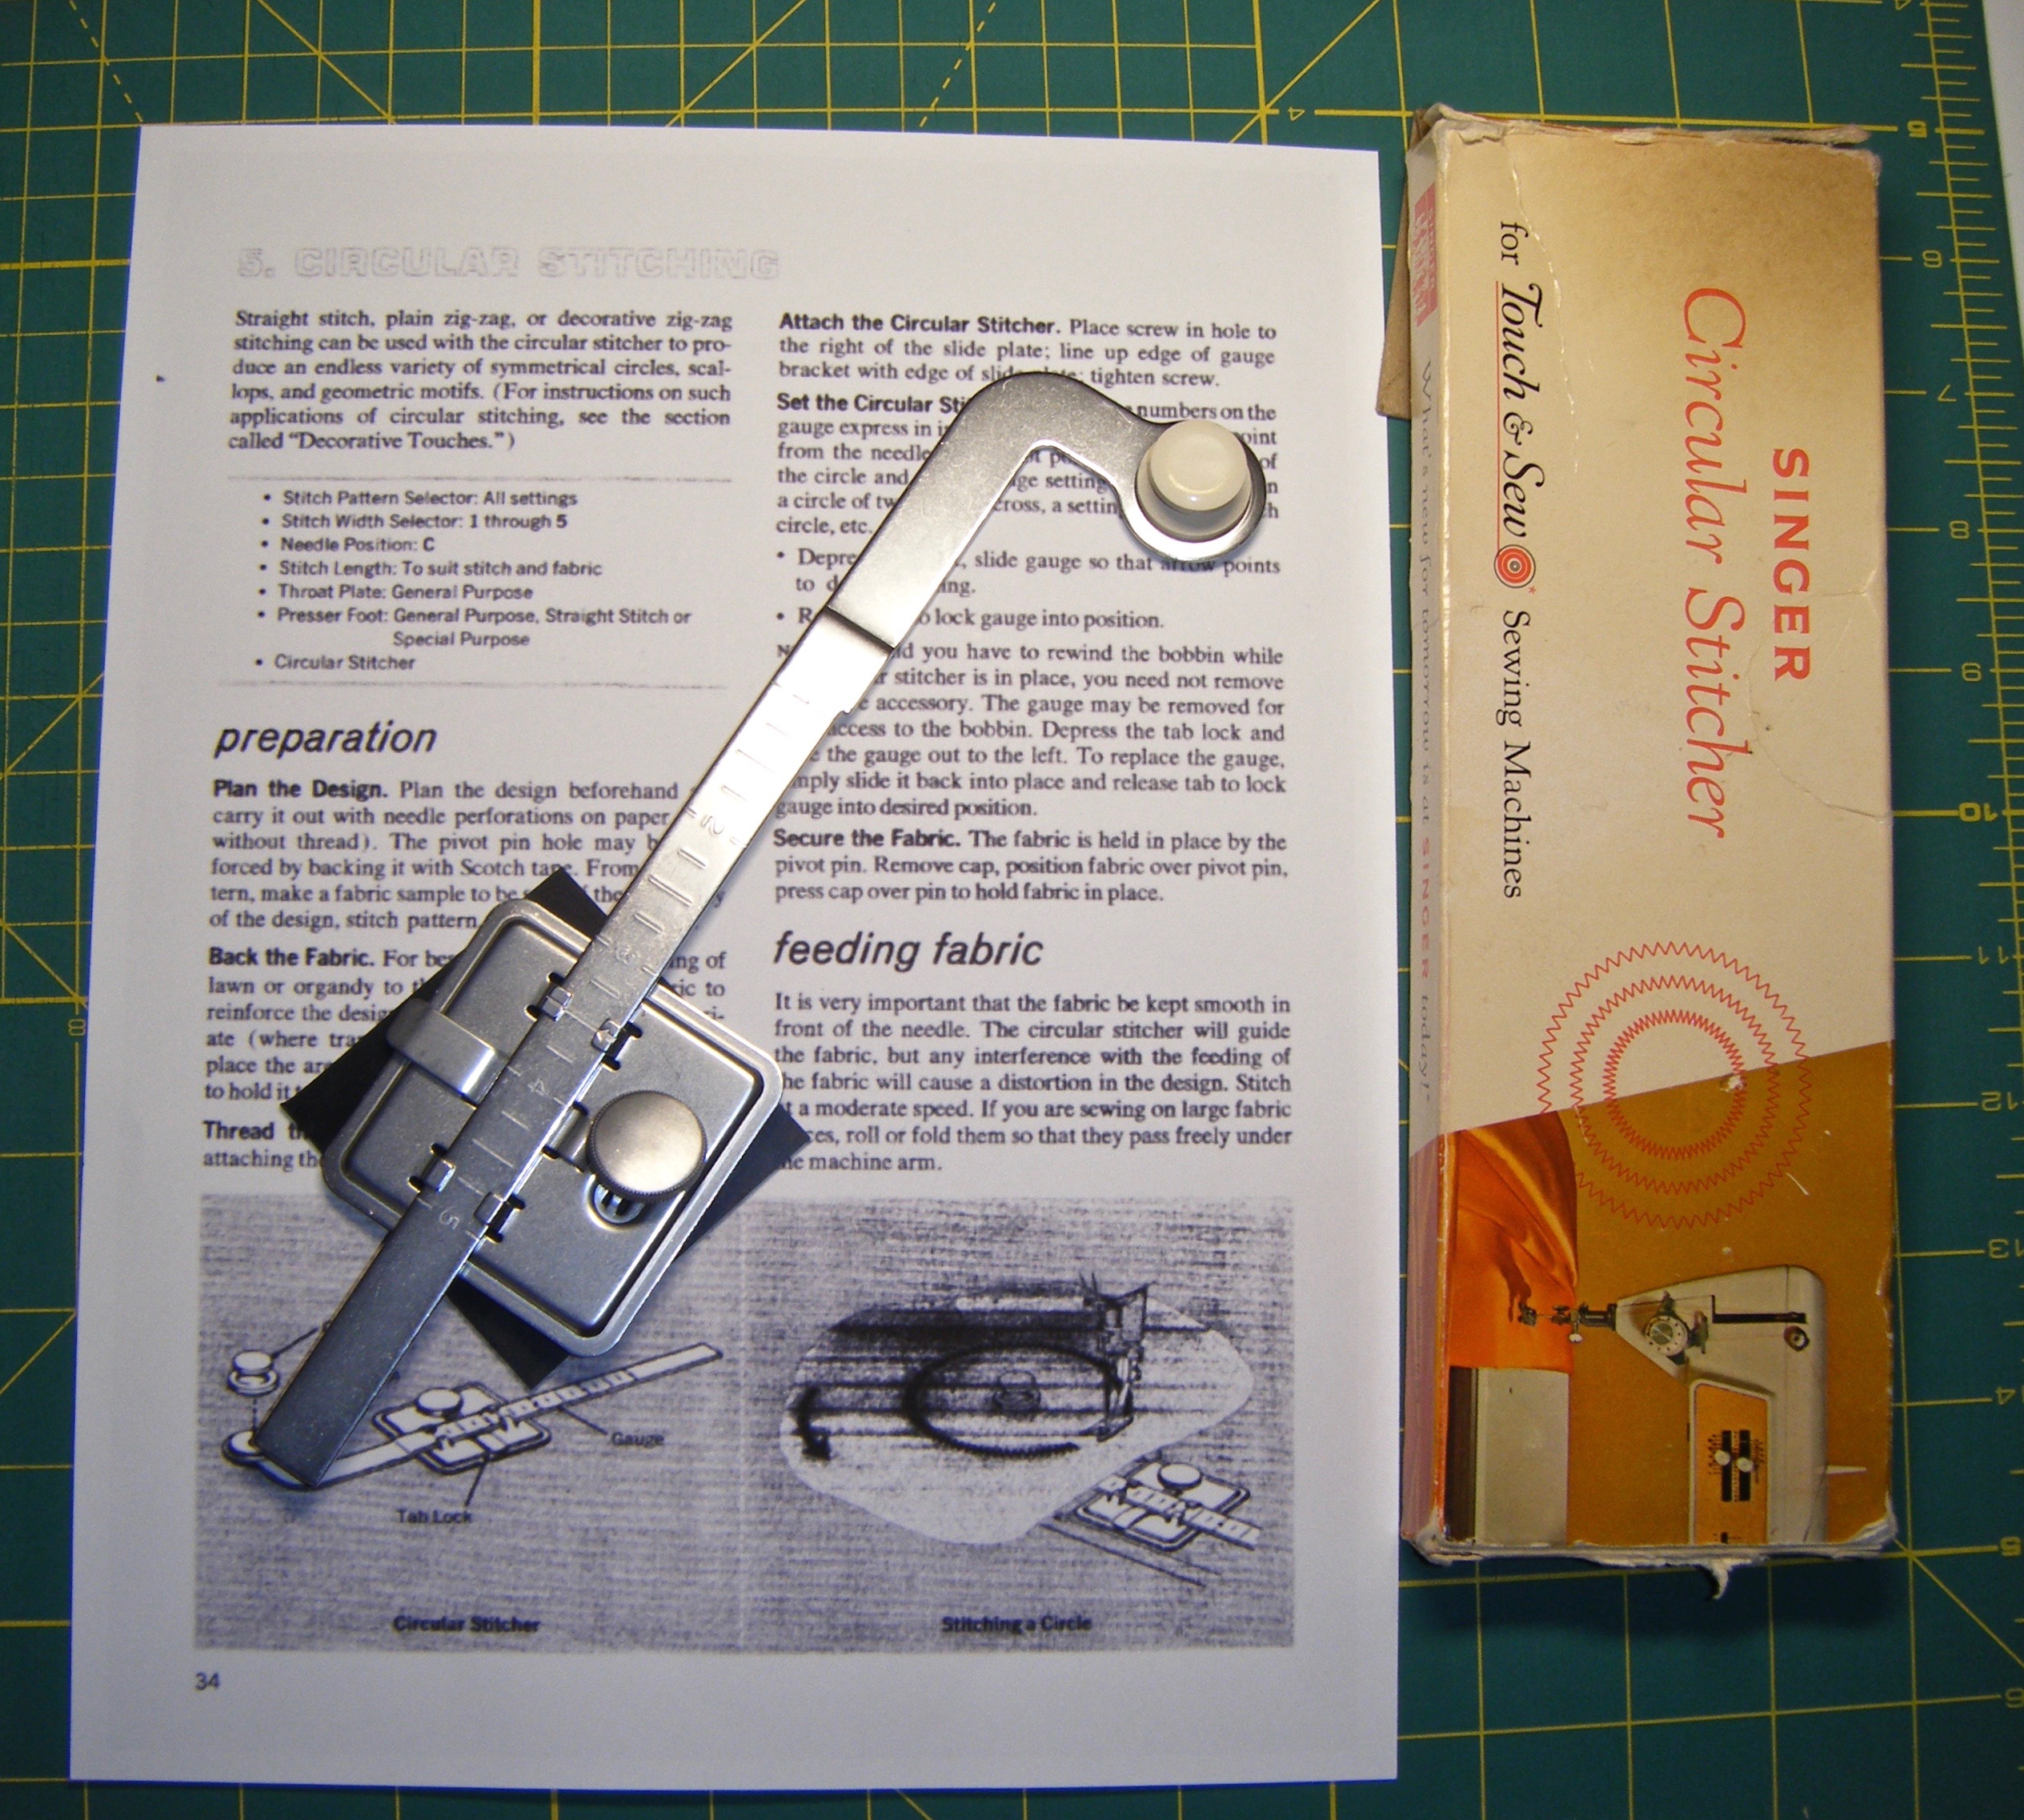
I have been busy finishing up quilts over the last month, but did acquire one vintage Singer attachment. The Circular Stitcher was created for Touch and Sew machines, of which I have exactly none, but it didn't appear to need the special attachment spots that many such stitchers need for newer machines - just the usual spot on the bed used to screw down other attachments. The only machine I've tried yet is a 15-91, on which the attachment would initially not anchor down firmly. A simple rubber washer will not do the trick. One needs a piece of rubber stuff - this one being 1/16� thick from a hardware store years ago, cut so that it covers the square plate. I don't know what this rubber stuff is called, but in the photo it is turned a bit so it is visible. Punch a hole for the screw. With this, the stitcher fastens down nicely. Using a piece of quilt "sandwich" used for practicing free motion designs, the attachment sewed very nice circles of any size, up to 10 inches in diameter. The quilt sandwich proved acceptably firm to use without any further stiffening.
My thought was this would be fun for quilting small projects with circles - placemats, small wallhangings, or blocks if one is doing quilt-as-you-go. Concentric circles, overlapping circles, fancy stitch circles, etc. The fabric moves around the pin, and getting anything very large to move smoothly would be difficult and slow, and one would be better off to mark the fabric and freehand the job.
The concept is very simple, and one YouTube video shows a woman creating beautiful round objects with decorative stitches using a homemade version with phone books in which to stick a poster pin to hold the fabric.
Courtney, this is a challenge for you!
Dorothy
Dorothy, our sewing professional, sends the following about her month passed:
Wow! Time passes quick!
I have done little sewing, Mostly adjustments to trial garments finding the Very Lack of information on fabric content is proving to be detrimental. I made some under garments from a knit with spandex which turns out has No Recovery. Ugh. I wish the bolt labeling had more USEFUL information.
I have been doing lots of planning. I hope to use my design programs more, but find I may need to start sketching what the final intent is. Thinking a design is, apparently, a roving target which I can not hit. Start out with one thought and Bam something totally different crops up. Seems the very nice thing about patterns is the line drawing.
I have an avid interest in Hemp fabric and was delighted to find Hemp Traders is starting to manufacture Jersey knit in the US. They are still buying fiber off shore, but hope to bring that online also! I did purchase a Jersey knit blend (55% hemp) and look forward to making, then dying the garment!
I look forward to May Day!
Dorothy

... to be continued
04-28-2021, 05:12 AM
#243
Super Member
Join Date: Mar 2015
Location: Denver, CO
Posts: 4,254
James
James tells us about a recent machine that he acquired and his findings about it:
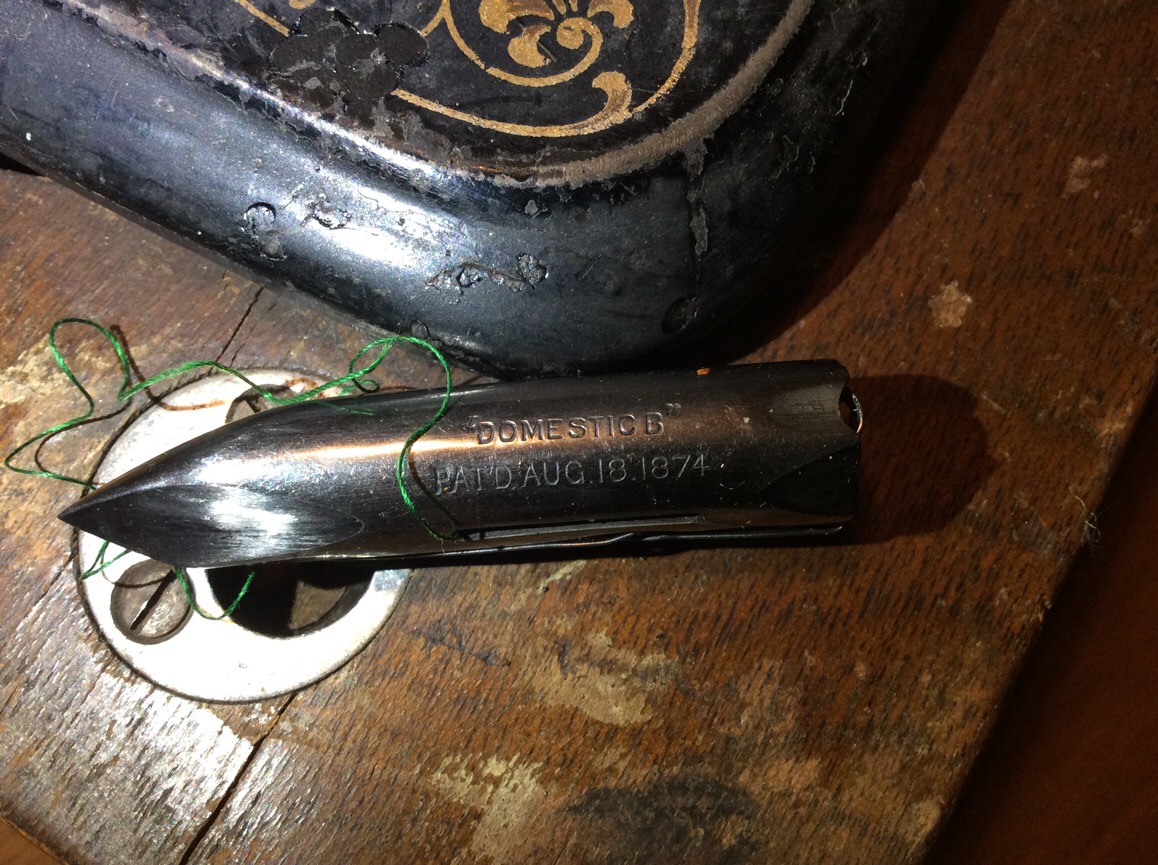
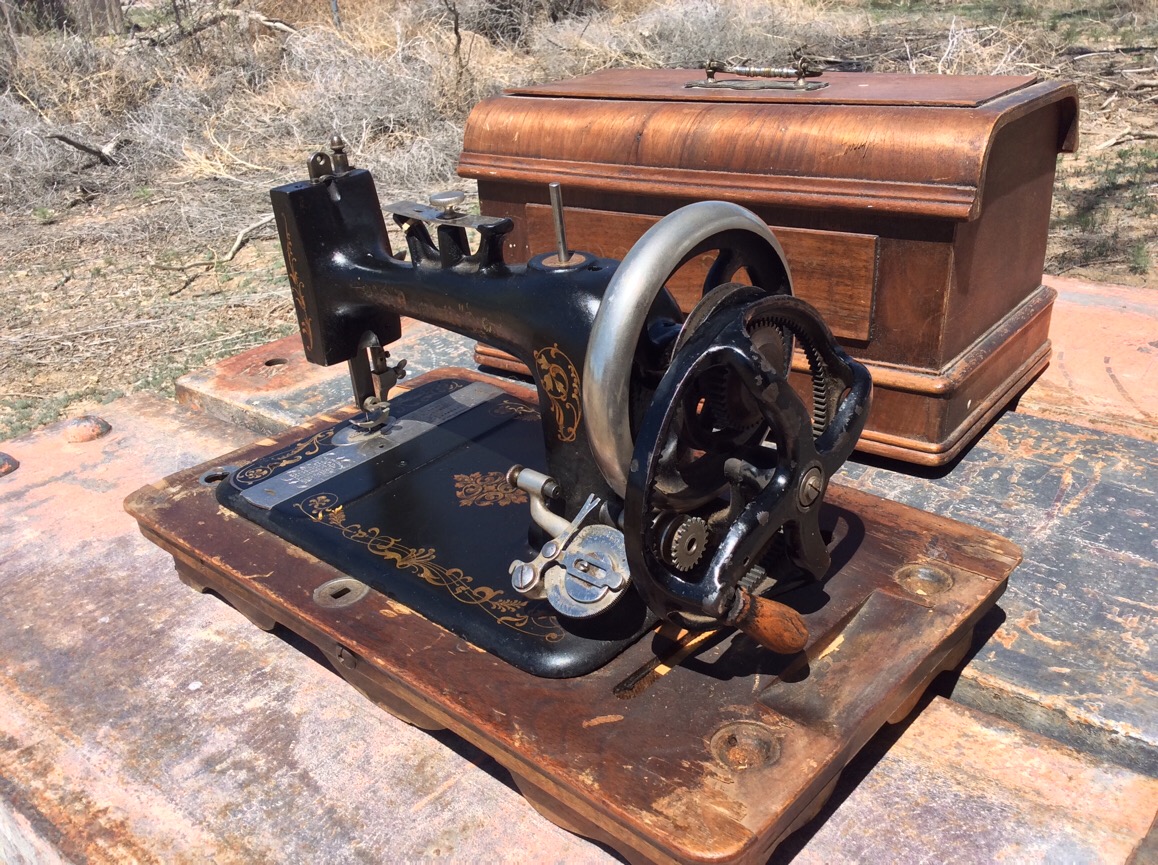
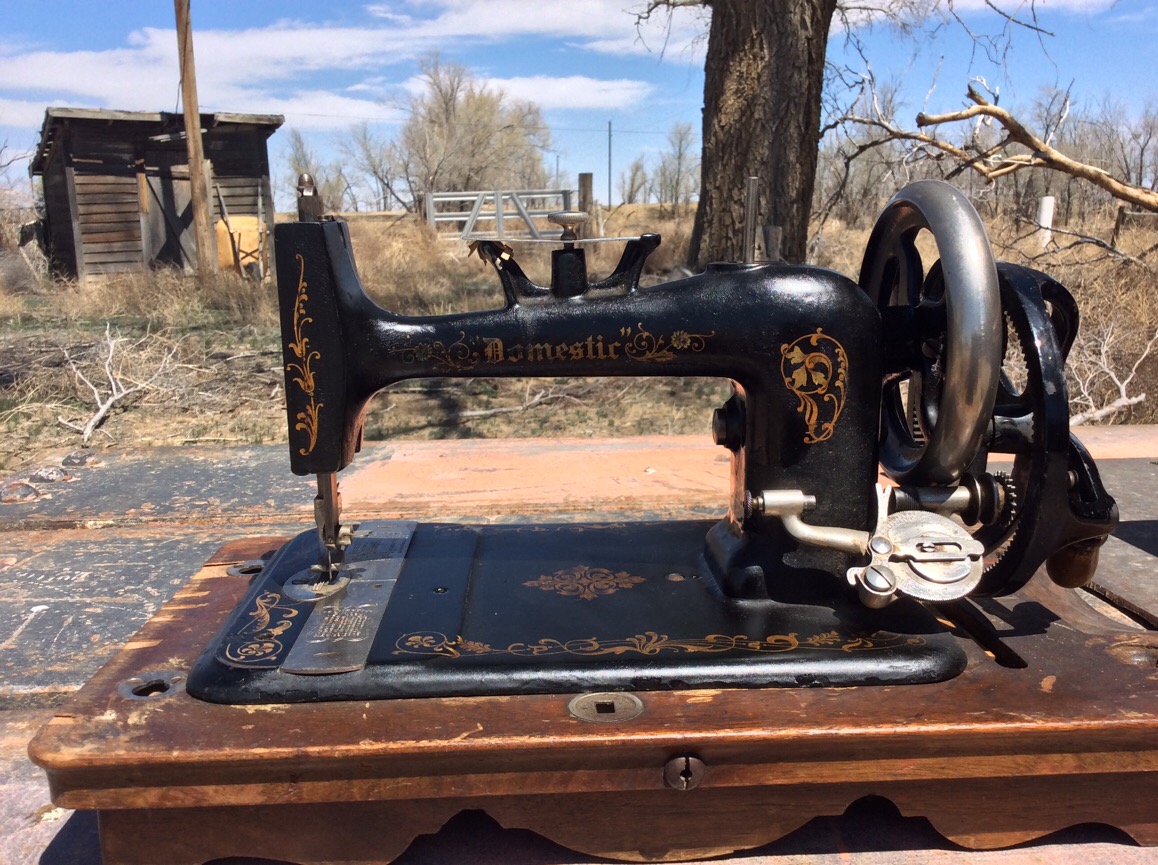
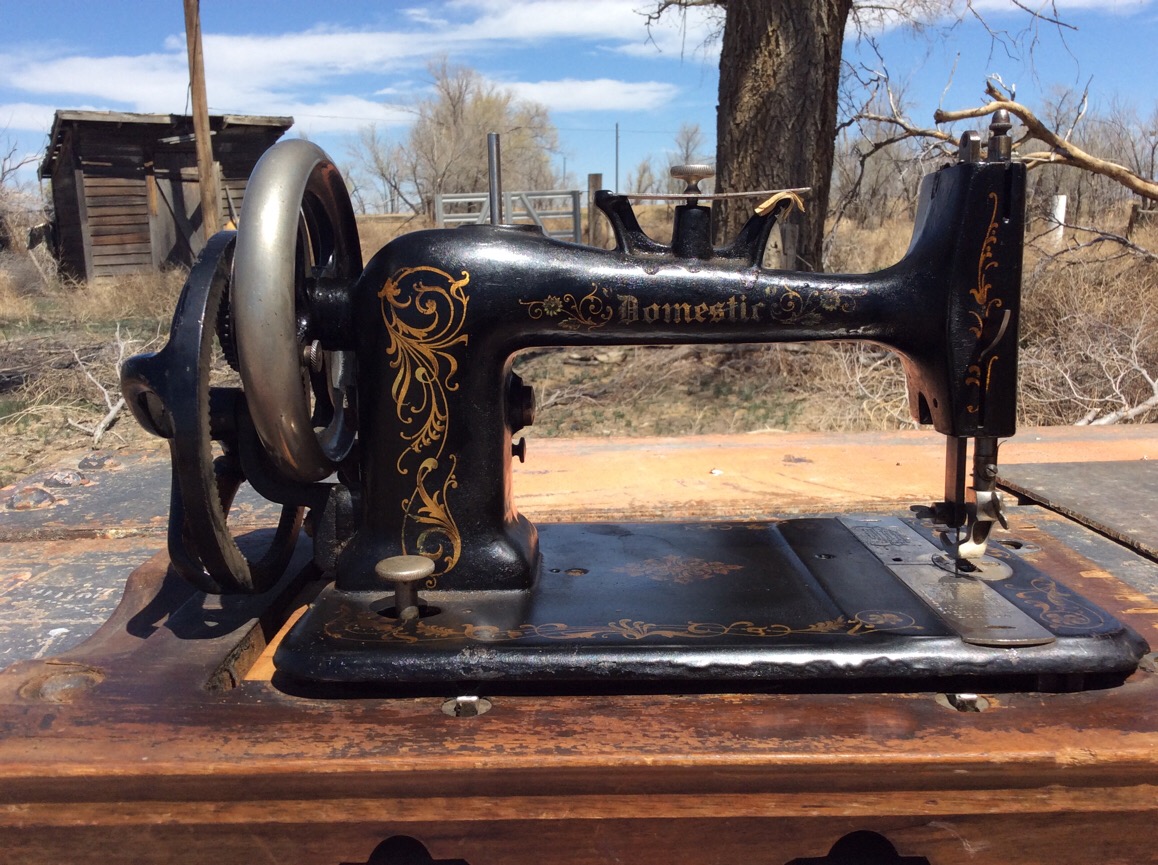
I just picked up another sewing machine a day ago. This one is a Domestic B type hand crank. The best guess seems to be around 1908 to 1909 based on the serial number. It is a 3/4 size machine. The details are in really great shape with the only real wear being the white petals on the flowers seen on the arm. For now I just wiped the machine down with sewing machine oil. I will need to oil up the machine as the hand crank is a bit stiff.
I did get shipping damage on the back of the case but I believe with steam and a new coat of shellac on the back it should repair fairly well. The display front of the case looks good so Howard Restor A Finish should clean it up nicely. The base is in fairly good shape with two missing case hold points on the right matching those on the left. The lock key is missing but a screwdriver should work since I see a square hole on the inside.
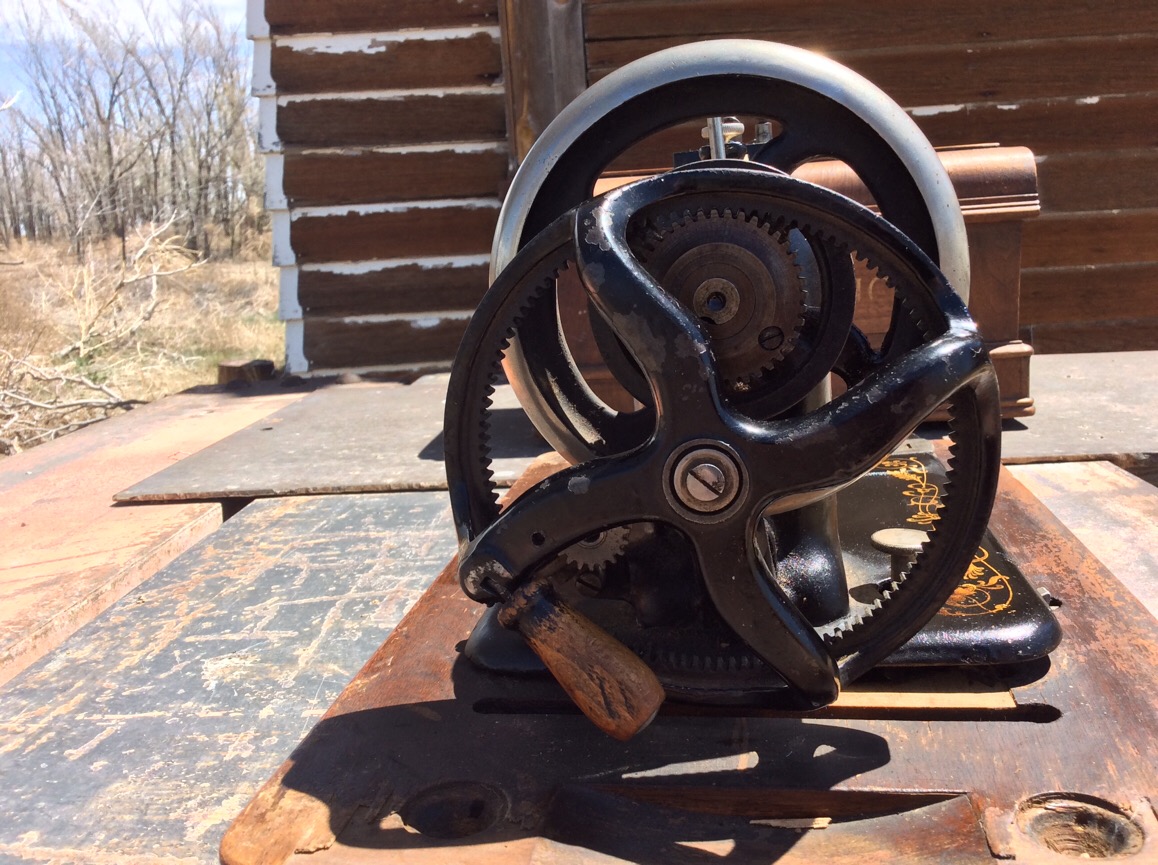
As you can see the machine case is dual purpose allowing both treadle use and hand crank use. Of interest is the geared bobbin winder that connects to the gears of the hand wheel when a spool needs to be wound via the hand crank. To the left is a pulley allowing use of a treadle belt to wind the spool when in treadle mode.
James


... to be continued
James tells us about a recent machine that he acquired and his findings about it:
I just picked up another sewing machine a day ago. This one is a Domestic B type hand crank. The best guess seems to be around 1908 to 1909 based on the serial number. It is a 3/4 size machine. The details are in really great shape with the only real wear being the white petals on the flowers seen on the arm. For now I just wiped the machine down with sewing machine oil. I will need to oil up the machine as the hand crank is a bit stiff.
I did get shipping damage on the back of the case but I believe with steam and a new coat of shellac on the back it should repair fairly well. The display front of the case looks good so Howard Restor A Finish should clean it up nicely. The base is in fairly good shape with two missing case hold points on the right matching those on the left. The lock key is missing but a screwdriver should work since I see a square hole on the inside.
As you can see the machine case is dual purpose allowing both treadle use and hand crank use. Of interest is the geared bobbin winder that connects to the gears of the hand wheel when a spool needs to be wound via the hand crank. To the left is a pulley allowing use of a treadle belt to wind the spool when in treadle mode.
James

... to be continued
04-28-2021, 05:18 AM
#244
Super Member
Join Date: Mar 2015
Location: Denver, CO
Posts: 4,254

In Closing
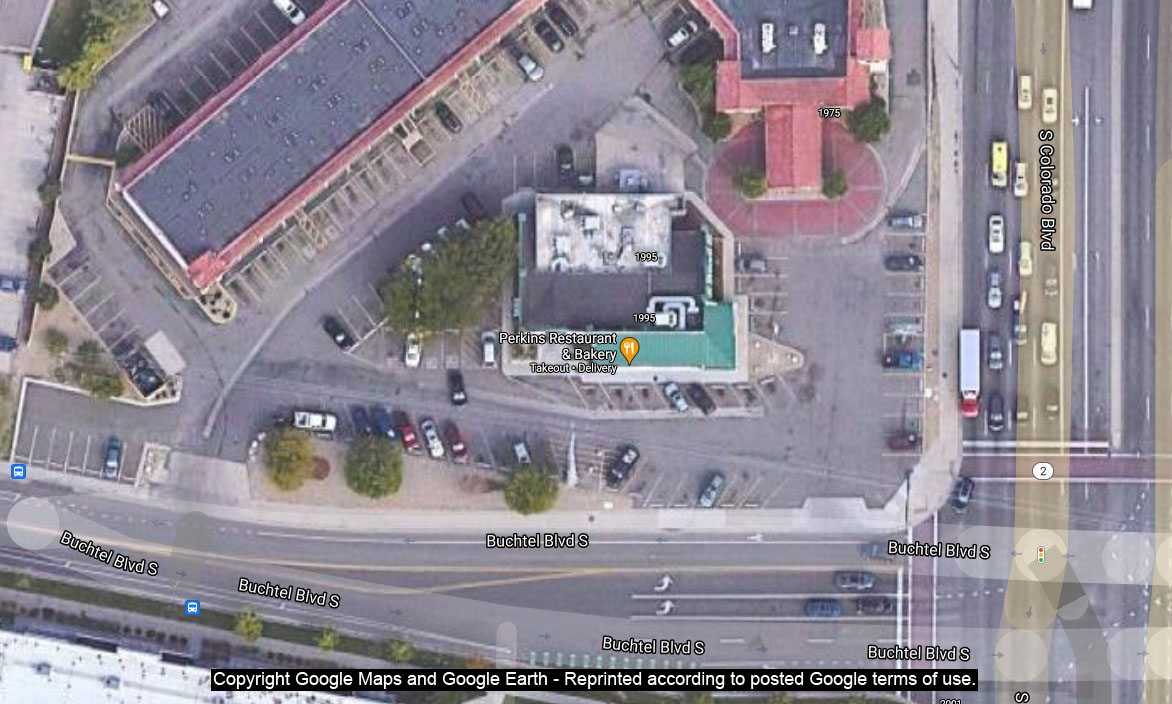
Just for sentimental reasons, here is an aerial view of the Perkins where we used to meet in Denver. It has re-opened, but hasn't had the volume of business it used to have. Some of us may be able to locate our old favorite parking places in the picture.
As we continue to look forward to being able to meet in person soon, we will post here again next month.
Thank you for reading.

 06-02-2021, 06:17 AM
#246
Super Member
Join Date: Mar 2015
Location: Denver, CO
Posts: 4,254
Every year about this time I think of a tune from the radio a long time ago called "Here Comes Summer" by Jerry Keller. Some of you may remember, too. It brings back memories of simpler times.
We haven't formed any plans yet about going back to the old in-person get togethers, but we're thinking about it. We all miss it.
The first of our summer Colorado sewing machine get togethers features several contributions from our members.
Courtney
Courtney, from northern Colorado, sent us the following notes and pictures of what he's been doing:
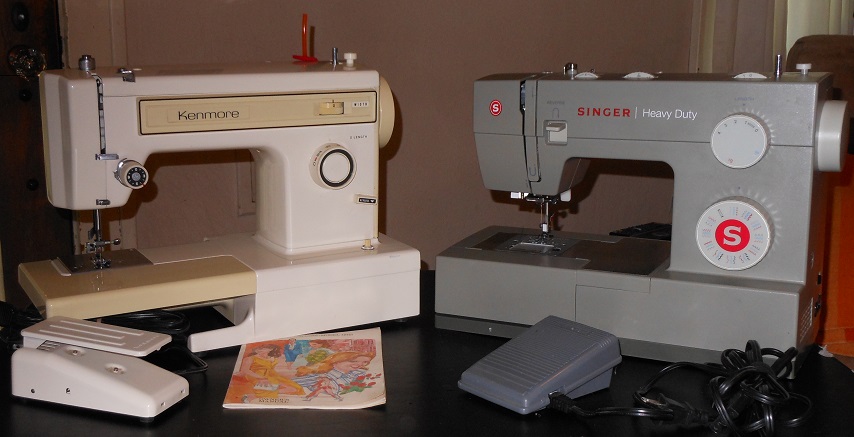
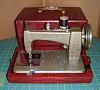
Most of my time this last month has been spent adopting a couple of orphans. Most of my machines are rather old and antique but these two are much younger. The first was a Kenmore from about 1980 that I found at the local Habitat for Humanity. It was very dirty and when I tried it out it screamed metal on metal. The power switch did not work but the foot pedal was a good quality carbon pile and it had one important accessory, the instruction manual. When I got it home, I spent some time just cleaning it up and then lubricating it. It now runs very smoothly, as smoothly as an old mechanical Bernina or Elna. It is a 158.1212180, the most basic of zig-zag machines. It does a straight stitch and a zig-zag but that is all. No needle position or blind hem, only the two stitches, but it does do both of them very nicely. The only missing piece was the spool pin. I am trying an experiment, instead of a metal spool pin I am using a short piece of 5mm urethane belting. Because the belting is flexible the sewing machine will fit in a salesman's case and so far will come back to straight and vertical when I take it out of the case. I figure if necessary, I can put a small diameter soda straw over it to make it straight.
I first saw the second machine while taking Connie to Starbucks one Friday. As we passed a small Garage Sale I noticed there was a sewing machine for sale. On the way back from Starbucks I stopped at the sale and walked up and noticed the sign on the sewing machine "$5 Works but need adjusting."� It did have the foot pedal, so I got my money out. When we got home, I got to cleaning it up. I then took off the plastic covers and oiled everything inside. Most of the original accessories were included but it was missing the bobbin cover plate. I got out my Dremel tool and a thin piece of plastic and made one. Seems to be fine so far. The machine is now running well. All the stitches seem to be fine, and it is the first machine I have purchased that is currently available on Amazon. It is a Singer Heavy Duty 4452 and is the youngest of all on my machines.
Because a lot of people know I play around with sewing machines, I often get a lot of requests. I always like to have a couple of loaners available. During the pandemic, the loaners I had were put out to good use making masks. One was liked enough that they asked to buy it, but I said just keep it. I am not sure if I will see the other loaner again, so I am well pleased that I now have a couple of loaners again and my total cost has been less than $20 for the pair!
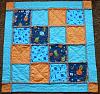
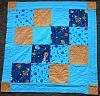
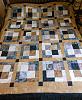
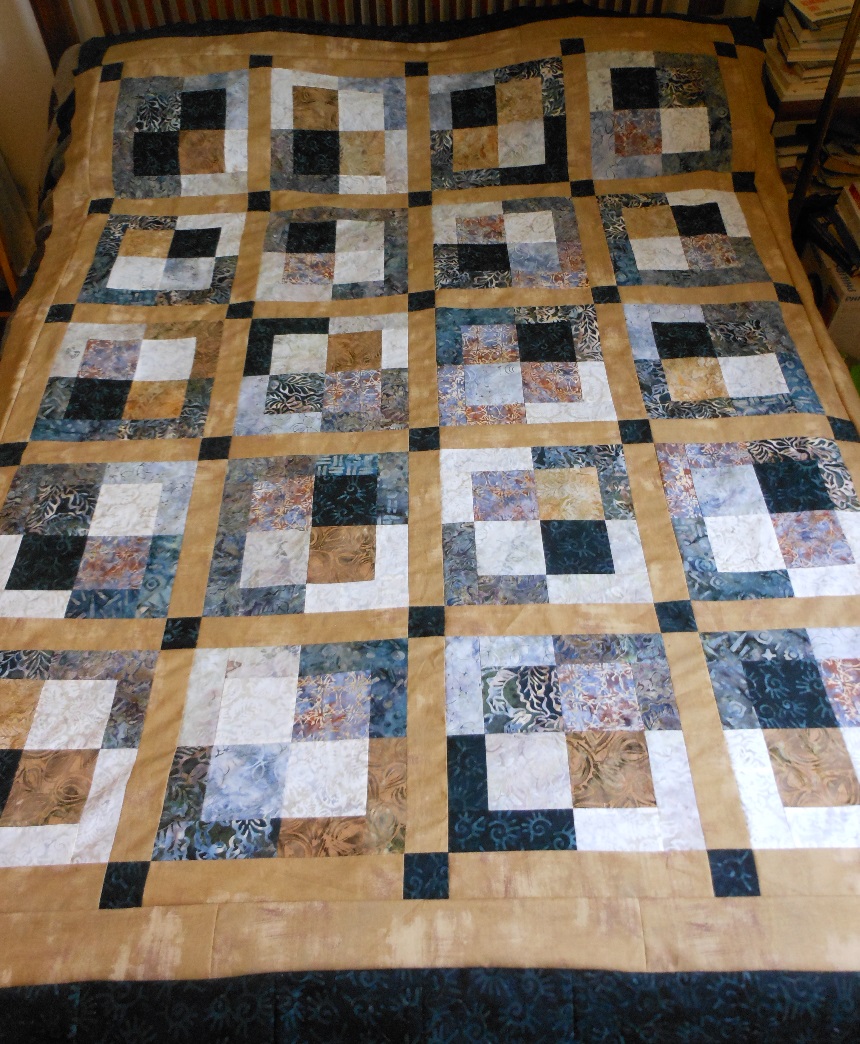
A few years ago, a good friend passed away from breast cancer and the family gave me her fabric stash. In the stash were a number of pieces of fabric she had already cut. A couple of squares had already been started so I completed the all the rest of the squares in the same manner. They were basically a 9 inch square with 2 inch borders all the way around. I had no idea what she had planned for the squares but another friend suggested cutting them in half diagonally and sewing them back into a square. I liked the idea of cutting them up, so I ended up cutting them into quarters and then sewed the quarters back together in a four patch. I sashed the four patches together with 2 inch sashing and have finished the top. Since I hope the start the quilting this weekend, I have gone ahead and included a picture of the top on a bed. I am very well pleased with the quilt so far.
Courtney

James
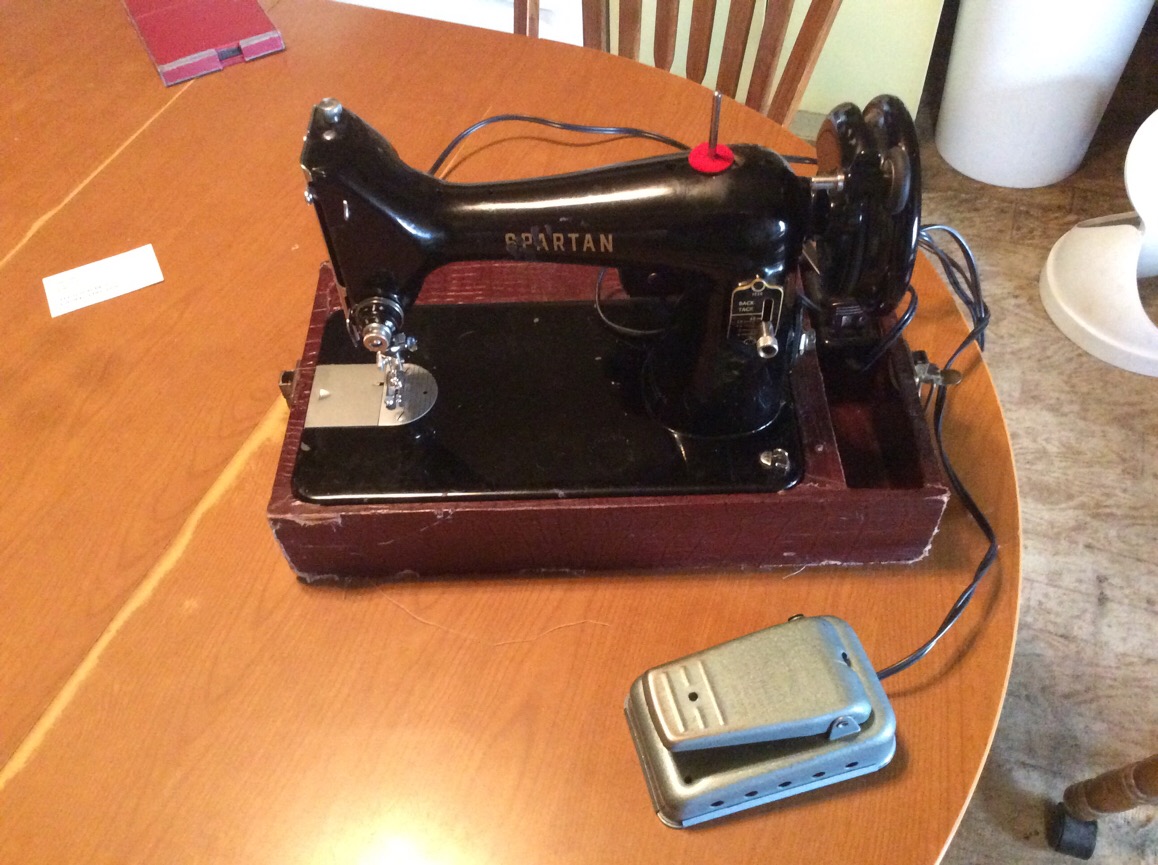
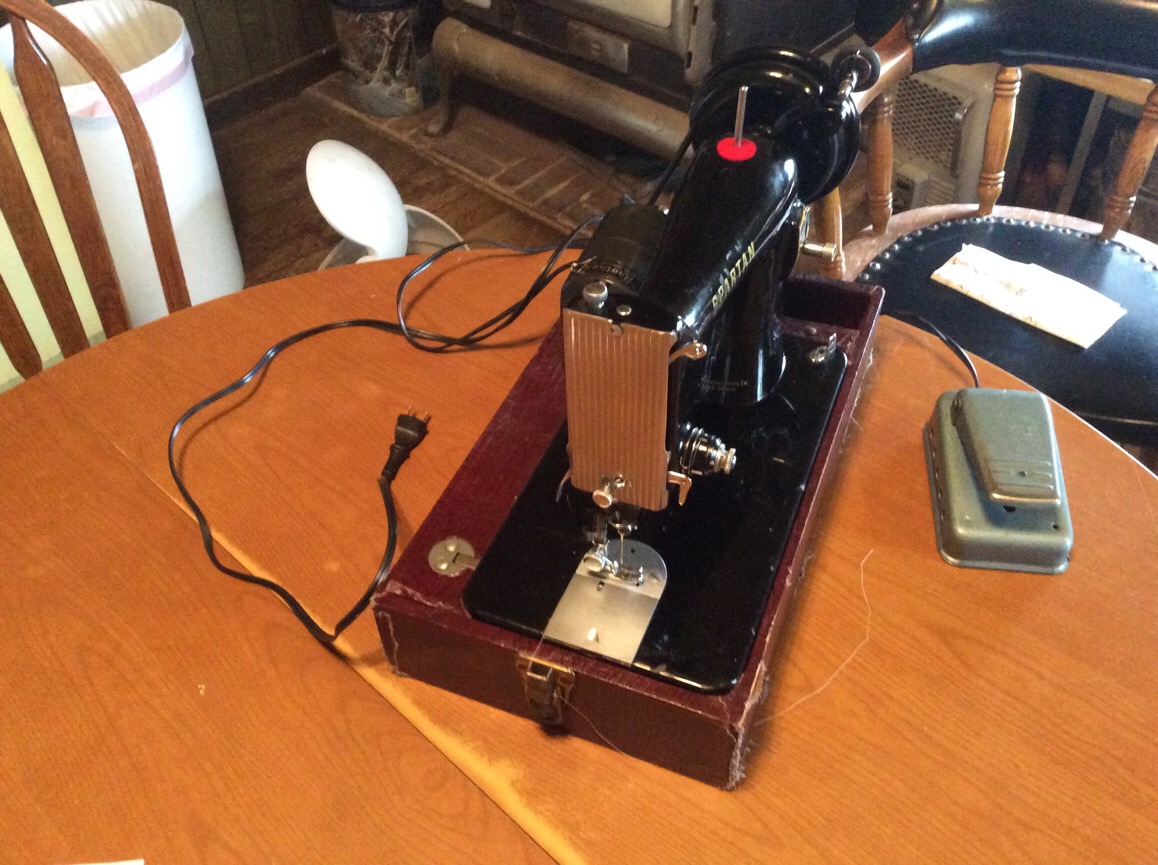
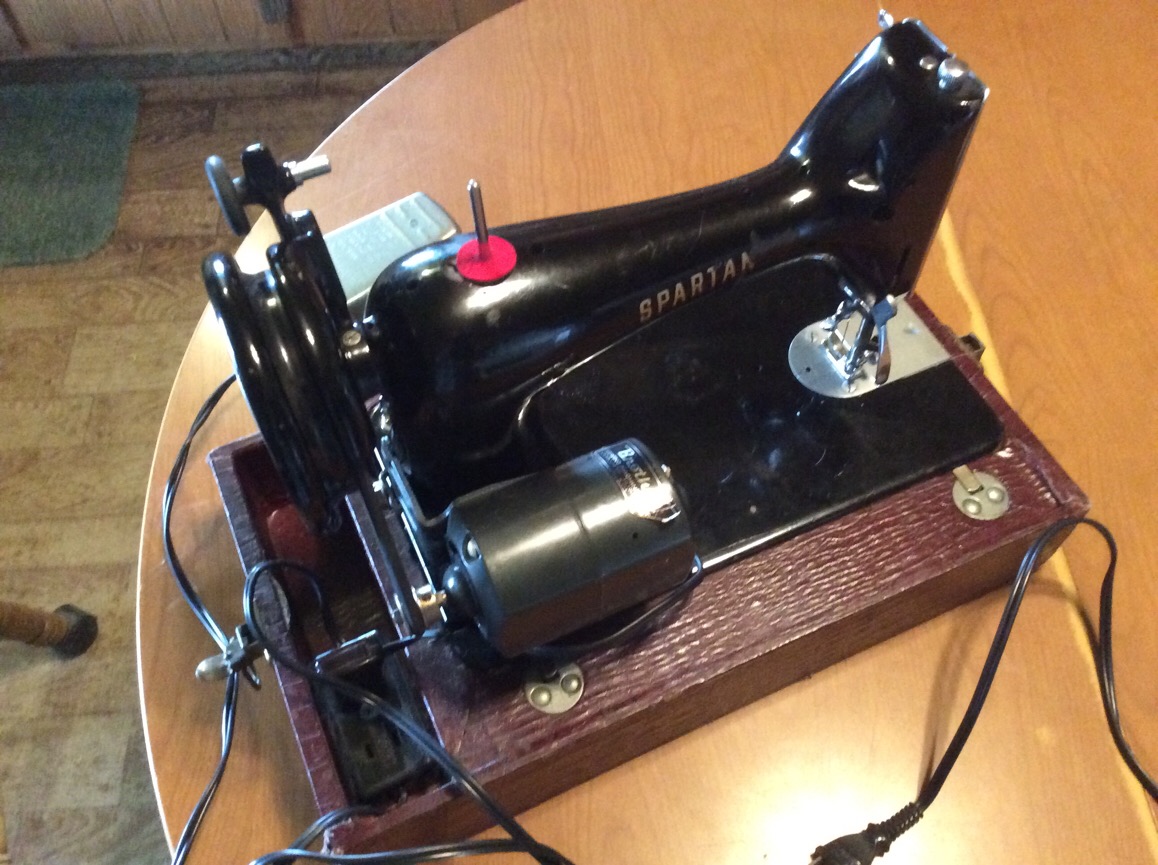
James has two newly received machines, which he describes to us, along with pictures:
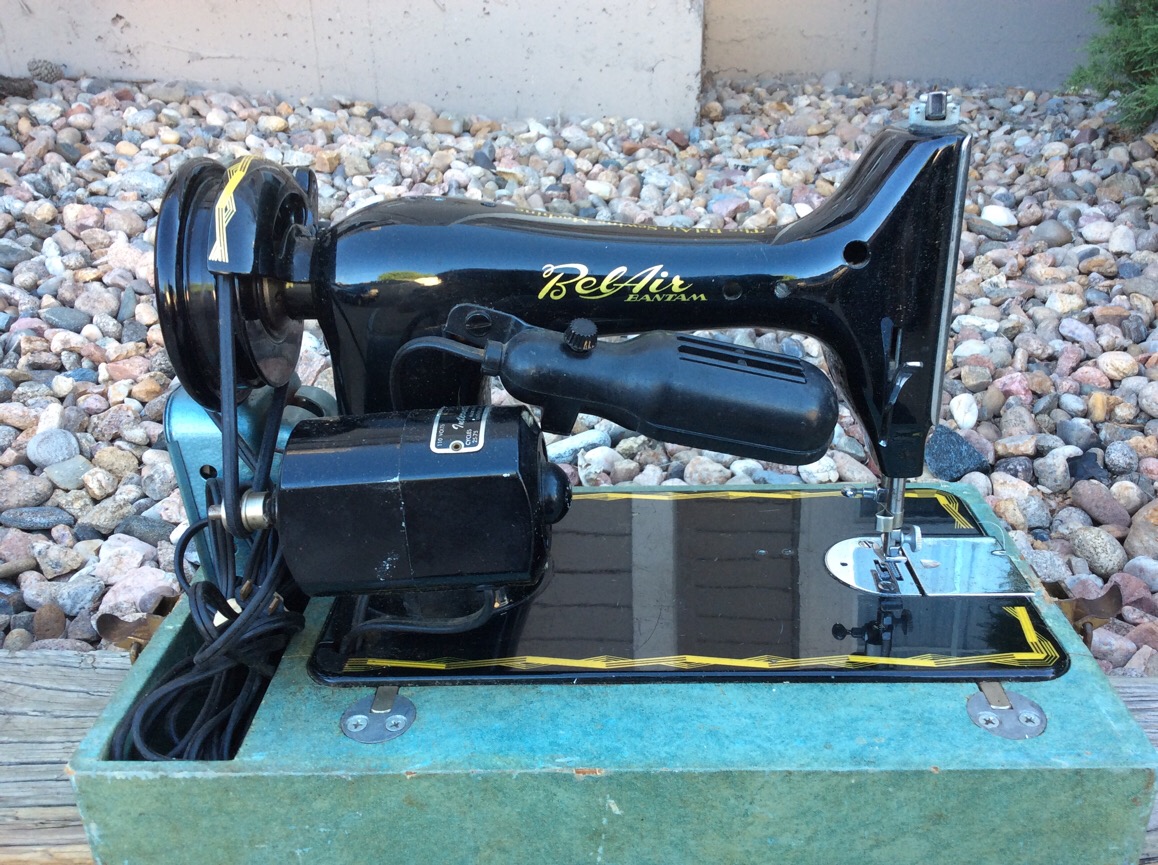
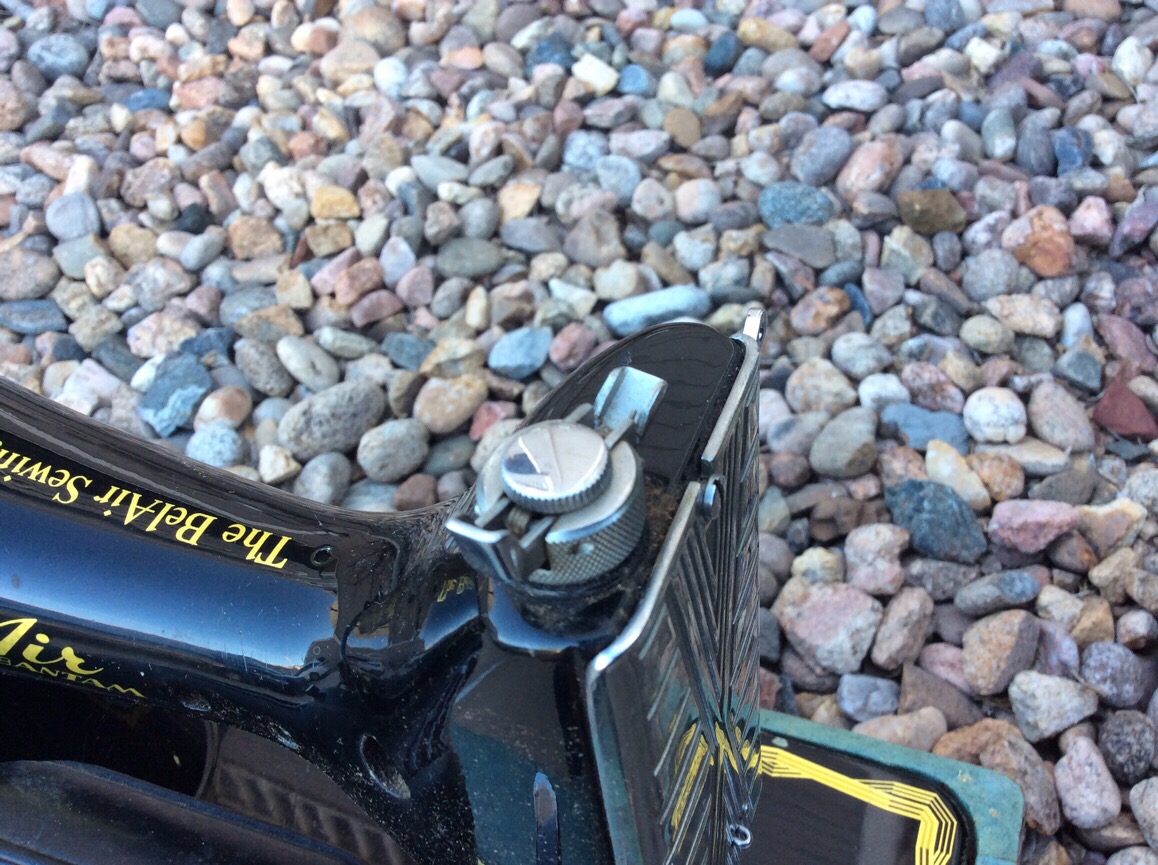
I have picked up two sewing machines lately. One of them is a BelAir Bantam which is the sister machine to my Sewmor 303. It is an aluminum body clone of a Singer 99. I am not sure if the motor is the original as it mentions International on it. The motor runs well but I need to oil the machine as it is sluggish running with the belt on. Decals are in great condition as well as the wiring. Of interest is the unusual pressure foot adjuster that look unlike any Revco adjusters I have seen. There are no markings to tell who made it.
The second machine is a Singer 192K better known as a Spartan. Interestingly the serial number data base lists it as a Singer 185 made in 1959 which it obviously is not. I do think it is a 1959 machine as it was made in that time period. Originally it would have come in a plastic base, no case and only one foot. This machine had been transferred to a much better case and had a light clamped on that I took off. The motor had also been replaced with one from a Brother machine. Wiring is in excellent condition and the machine runs strong. Has slight loss of the gold lettering. It was interesting to compare them side by side. The weight of the Singer is very noticeable compared to the Bantam. The Bantam has a complete green case while the Singer had a case that someone sprayed gold paint on for some reason. I will strip that off and cover with something less garish.


... to be continued
We haven't formed any plans yet about going back to the old in-person get togethers, but we're thinking about it. We all miss it.
The first of our summer Colorado sewing machine get togethers features several contributions from our members.
Courtney
Courtney, from northern Colorado, sent us the following notes and pictures of what he's been doing:
Most of my time this last month has been spent adopting a couple of orphans. Most of my machines are rather old and antique but these two are much younger. The first was a Kenmore from about 1980 that I found at the local Habitat for Humanity. It was very dirty and when I tried it out it screamed metal on metal. The power switch did not work but the foot pedal was a good quality carbon pile and it had one important accessory, the instruction manual. When I got it home, I spent some time just cleaning it up and then lubricating it. It now runs very smoothly, as smoothly as an old mechanical Bernina or Elna. It is a 158.1212180, the most basic of zig-zag machines. It does a straight stitch and a zig-zag but that is all. No needle position or blind hem, only the two stitches, but it does do both of them very nicely. The only missing piece was the spool pin. I am trying an experiment, instead of a metal spool pin I am using a short piece of 5mm urethane belting. Because the belting is flexible the sewing machine will fit in a salesman's case and so far will come back to straight and vertical when I take it out of the case. I figure if necessary, I can put a small diameter soda straw over it to make it straight.
I first saw the second machine while taking Connie to Starbucks one Friday. As we passed a small Garage Sale I noticed there was a sewing machine for sale. On the way back from Starbucks I stopped at the sale and walked up and noticed the sign on the sewing machine "$5 Works but need adjusting."� It did have the foot pedal, so I got my money out. When we got home, I got to cleaning it up. I then took off the plastic covers and oiled everything inside. Most of the original accessories were included but it was missing the bobbin cover plate. I got out my Dremel tool and a thin piece of plastic and made one. Seems to be fine so far. The machine is now running well. All the stitches seem to be fine, and it is the first machine I have purchased that is currently available on Amazon. It is a Singer Heavy Duty 4452 and is the youngest of all on my machines.
Because a lot of people know I play around with sewing machines, I often get a lot of requests. I always like to have a couple of loaners available. During the pandemic, the loaners I had were put out to good use making masks. One was liked enough that they asked to buy it, but I said just keep it. I am not sure if I will see the other loaner again, so I am well pleased that I now have a couple of loaners again and my total cost has been less than $20 for the pair!
A few years ago, a good friend passed away from breast cancer and the family gave me her fabric stash. In the stash were a number of pieces of fabric she had already cut. A couple of squares had already been started so I completed the all the rest of the squares in the same manner. They were basically a 9 inch square with 2 inch borders all the way around. I had no idea what she had planned for the squares but another friend suggested cutting them in half diagonally and sewing them back into a square. I liked the idea of cutting them up, so I ended up cutting them into quarters and then sewed the quarters back together in a four patch. I sashed the four patches together with 2 inch sashing and have finished the top. Since I hope the start the quilting this weekend, I have gone ahead and included a picture of the top on a bed. I am very well pleased with the quilt so far.
Courtney
James
James has two newly received machines, which he describes to us, along with pictures:
I have picked up two sewing machines lately. One of them is a BelAir Bantam which is the sister machine to my Sewmor 303. It is an aluminum body clone of a Singer 99. I am not sure if the motor is the original as it mentions International on it. The motor runs well but I need to oil the machine as it is sluggish running with the belt on. Decals are in great condition as well as the wiring. Of interest is the unusual pressure foot adjuster that look unlike any Revco adjusters I have seen. There are no markings to tell who made it.
The second machine is a Singer 192K better known as a Spartan. Interestingly the serial number data base lists it as a Singer 185 made in 1959 which it obviously is not. I do think it is a 1959 machine as it was made in that time period. Originally it would have come in a plastic base, no case and only one foot. This machine had been transferred to a much better case and had a light clamped on that I took off. The motor had also been replaced with one from a Brother machine. Wiring is in excellent condition and the machine runs strong. Has slight loss of the gold lettering. It was interesting to compare them side by side. The weight of the Singer is very noticeable compared to the Bantam. The Bantam has a complete green case while the Singer had a case that someone sprayed gold paint on for some reason. I will strip that off and cover with something less garish.


... to be continued
 06-02-2021, 06:32 AM
#248
Super Member
Join Date: Mar 2015
Location: Denver, CO
Posts: 4,254
Dianne
It sounds like Dianne has been enjoying the outdoors. She has a couple of new acquisitions to tell us about:
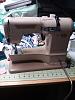
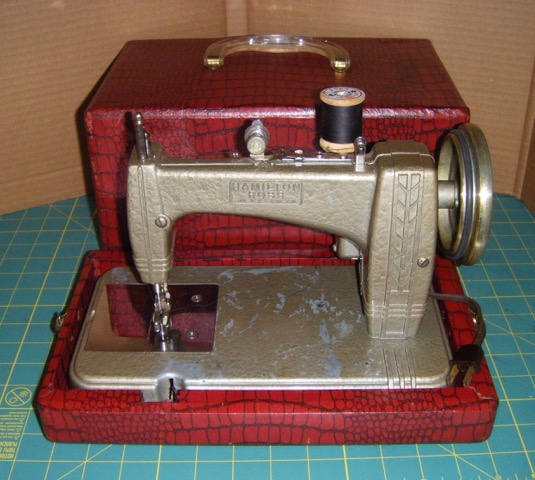
This month has been busy with gardening, adding many new plants in hopes of attracting more and different kinds of butterflies. However, two interesting small machines have come my way. Both are dated to the 1950s, and are cast aluminum chain stitchers.
The Betsy Ross is readily available on auction sites, and comes in hand crank and electric versions, with and without a case. Several color variations existed. Manufacture must have changed from one company to another, or the manufacturer's name was changed. Betsy Ross Manufacturing and Gibralter Manufacturing are both seen in searches. Gibralter added a large label to the back of the machine. rather ugly. The electric version I purchased needed removal of old grease from the gears, application of new grease, and several oilings over a few weeks before it would sew using its little motor, which is located under the machine. Now that it has decided to work, the machine zips along briskly after activating with the on-off button. Stitches are excellent once the perfect tension adjustment is made. A hand crank was added, which came from a Singer Model 20 and fits nicely. This sweet little machine makes me wish I could have had one of these as a child!
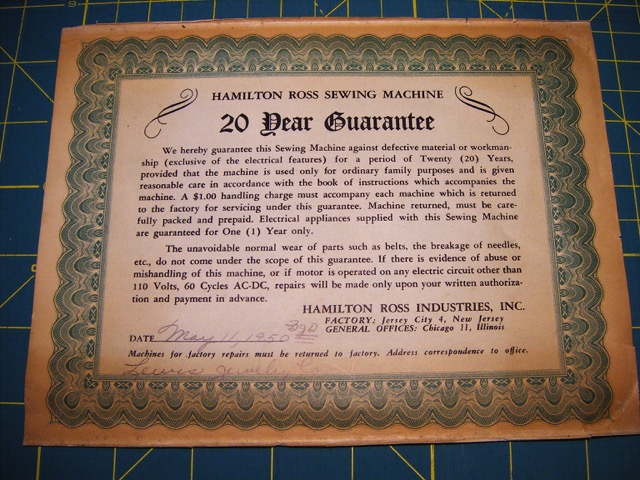
The Hamilton Ross seems much less common, and the paperwork with it indicates it was made by Hamilton Ross Industries, Inc. in New Jersey. The style is obviously the same as the Betsy Ross, and most likely was manufactured at the same place. The motor, located on the back of the machine, is labelled Sew-Rite. Badged versions of this machine exist, both named Sew-Rite and a less-similar version manufactured in the UK called Essex. The Sew-Rite machines have the raised design in the metal of the pillar, and appear identical except for the name. The Essex, made in the UK, lacks the raised design in the casting, and I am not aware if it is aluminum or cast iron, or even the same size. The Hamilton Ross is larger than the Betsy Ross, being about 11"� wide instead of 7"� or so for the Betsy Ross. Nothing in the paperwork that came with it indicates it is considered or sold as a toy. A warranty for 20 years on a toy machine?? Not likely. Another slip of paper noted a fair trade price of $49.50, fairly expensive at the time. Mine stitches nicely using its foot control, but unlike the Betsy Ross is fairly noisy.
The pair, with their cases the same design, look rather nice together. The cases are wood, with embossed heavy paper coverings. Overall, these machines seem simply constructed but quite sturdy and well made.
Dorothy
Hello,
These meetings are getting closer & closer as time flies!
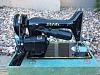
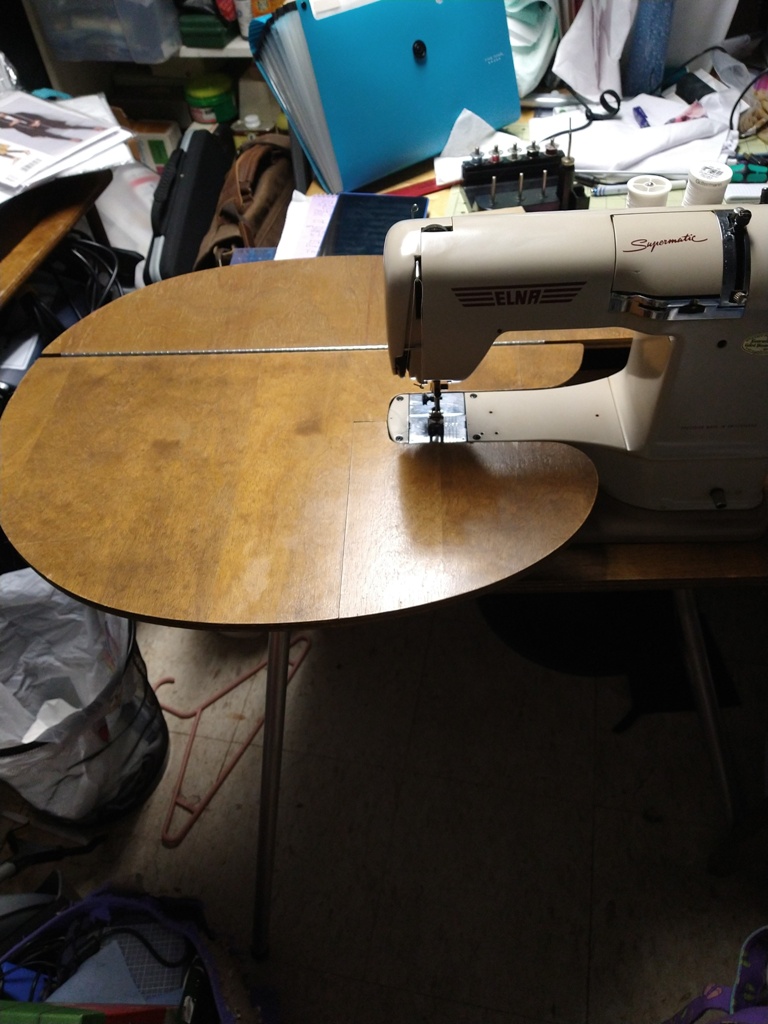
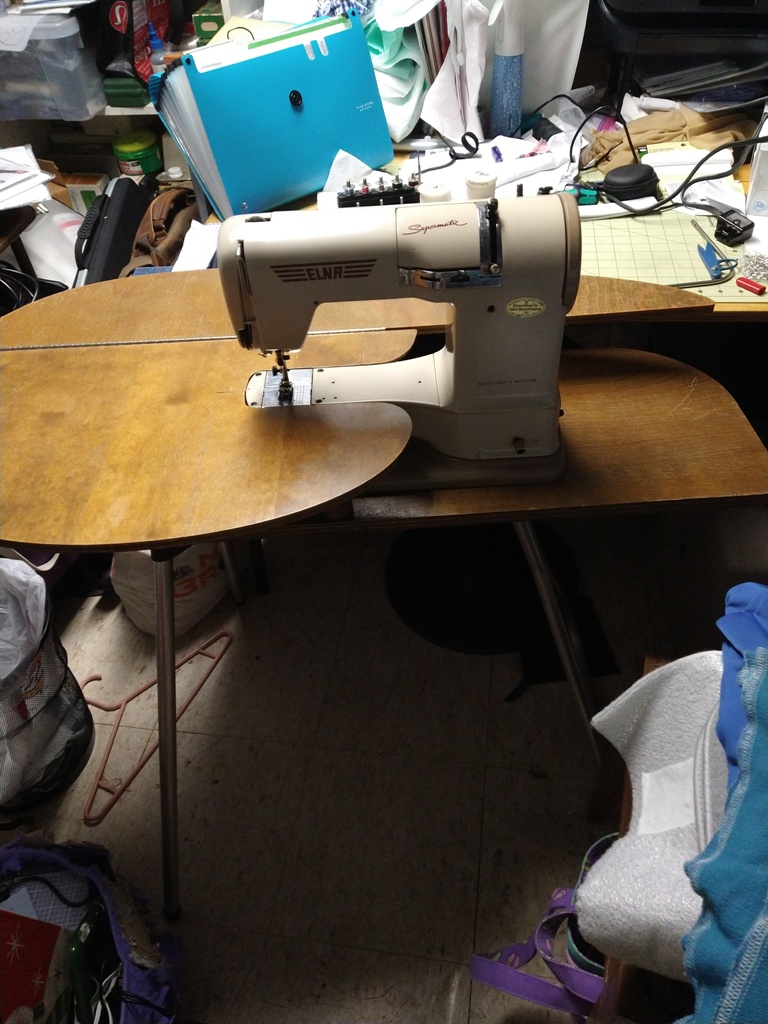
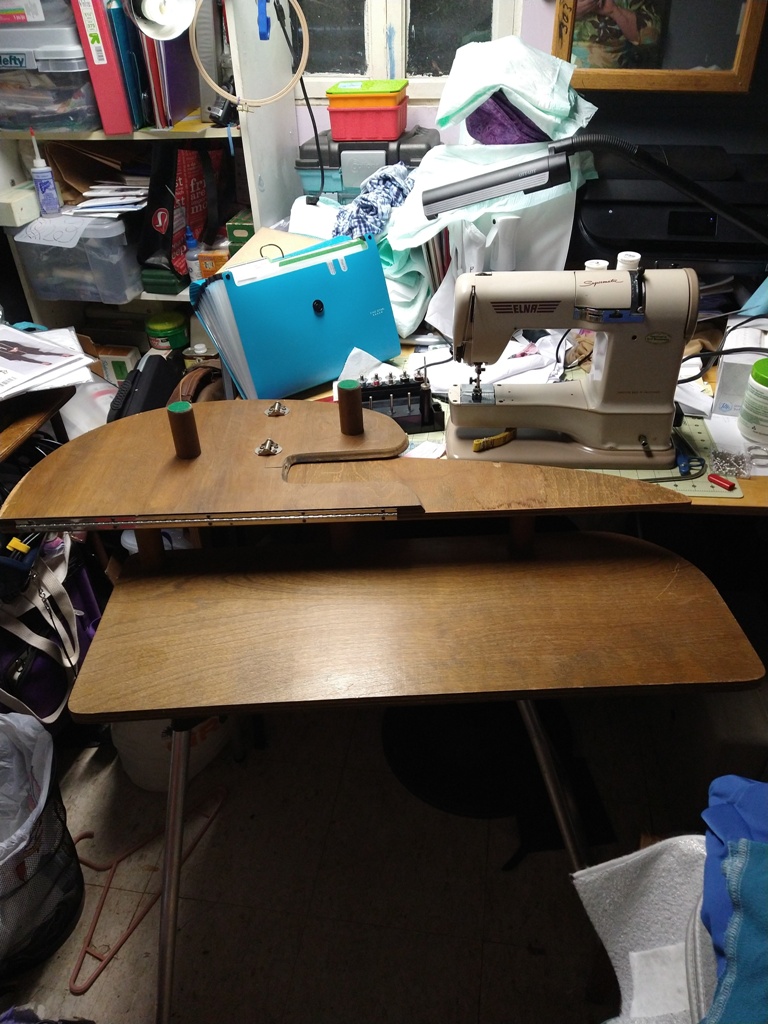
I have this Elna (Tan). A couple of years ago my Daughter and I drove to the western slope to get this machine with the original break down table. The seller was the Nephew of the original owner. Unfortunately, he broke the stitch width lever.
Like all early Elna, it is a very good stitcher, but Fussy on specific order you set it up for decorative stitches - stitch length 0, stitch width 0, lever moved to the left, etc.
This machine was in constant use until I got it so there was no flat spot on the drive pulley. I keep the clutch fully out (4 or 5 complete turns) which should prevent getting the flat spot.
It is a knee lever drive of which I am not a Fan. I do understand those who Do like them. In another email is the table with machine.
Thanks So much for doing these posts!
... to be continued
It sounds like Dianne has been enjoying the outdoors. She has a couple of new acquisitions to tell us about:
This month has been busy with gardening, adding many new plants in hopes of attracting more and different kinds of butterflies. However, two interesting small machines have come my way. Both are dated to the 1950s, and are cast aluminum chain stitchers.
The Betsy Ross is readily available on auction sites, and comes in hand crank and electric versions, with and without a case. Several color variations existed. Manufacture must have changed from one company to another, or the manufacturer's name was changed. Betsy Ross Manufacturing and Gibralter Manufacturing are both seen in searches. Gibralter added a large label to the back of the machine. rather ugly. The electric version I purchased needed removal of old grease from the gears, application of new grease, and several oilings over a few weeks before it would sew using its little motor, which is located under the machine. Now that it has decided to work, the machine zips along briskly after activating with the on-off button. Stitches are excellent once the perfect tension adjustment is made. A hand crank was added, which came from a Singer Model 20 and fits nicely. This sweet little machine makes me wish I could have had one of these as a child!
The Hamilton Ross seems much less common, and the paperwork with it indicates it was made by Hamilton Ross Industries, Inc. in New Jersey. The style is obviously the same as the Betsy Ross, and most likely was manufactured at the same place. The motor, located on the back of the machine, is labelled Sew-Rite. Badged versions of this machine exist, both named Sew-Rite and a less-similar version manufactured in the UK called Essex. The Sew-Rite machines have the raised design in the metal of the pillar, and appear identical except for the name. The Essex, made in the UK, lacks the raised design in the casting, and I am not aware if it is aluminum or cast iron, or even the same size. The Hamilton Ross is larger than the Betsy Ross, being about 11"� wide instead of 7"� or so for the Betsy Ross. Nothing in the paperwork that came with it indicates it is considered or sold as a toy. A warranty for 20 years on a toy machine?? Not likely. Another slip of paper noted a fair trade price of $49.50, fairly expensive at the time. Mine stitches nicely using its foot control, but unlike the Betsy Ross is fairly noisy.
The pair, with their cases the same design, look rather nice together. The cases are wood, with embossed heavy paper coverings. Overall, these machines seem simply constructed but quite sturdy and well made.

Dorothy
Hello,
These meetings are getting closer & closer as time flies!
I have this Elna (Tan). A couple of years ago my Daughter and I drove to the western slope to get this machine with the original break down table. The seller was the Nephew of the original owner. Unfortunately, he broke the stitch width lever.
Like all early Elna, it is a very good stitcher, but Fussy on specific order you set it up for decorative stitches - stitch length 0, stitch width 0, lever moved to the left, etc.
This machine was in constant use until I got it so there was no flat spot on the drive pulley. I keep the clutch fully out (4 or 5 complete turns) which should prevent getting the flat spot.
It is a knee lever drive of which I am not a Fan. I do understand those who Do like them. In another email is the table with machine.
Thanks So much for doing these posts!

... to be continued
06-02-2021, 06:39 AM
#249
Super Member
Join Date: Mar 2015
Location: Denver, CO
Posts: 4,254
From her followup email, Dorothy sent the following pictures:
These are photos of the Elna in the very Mod 1960's table.
Dorothy.
In Closing
We will post here again next month. Thank you for reading about our Colorado group's activities.
07-12-2021, 04:31 AM
#250
Super Member
Join Date: Mar 2015
Location: Denver, CO
Posts: 4,254
We met for the first time since the lockdown on Saturday, July 10th, at ten o'clock at Perkins in Denver. It sure was good to see old friends in person after so long a time. While people sent their own reports for us to compile and post for several months, it hasn't been the same and can't compare to the enjoyment of our face to face conversations.
Our meeting was attended by Dorothy, Courtney, Dianne, James, Cheryl & Chris and Janey & John. Eight of us in all.
It was noted that Perkins wasn't nearly as busy as it used to be. Parking spaces were more easily available, no waiting to get in, it might have been only 70 percent of the previous activity. Saturday morning was typically very busy. Perhaps that will return over time.
So let's get started with our show and tell.
Dorothy
Dorothy, as we've mentioned before, is our only member who sews professionally. She brings a variety of tips, techniques and skills to the group from her work and experience, which are very welcome.
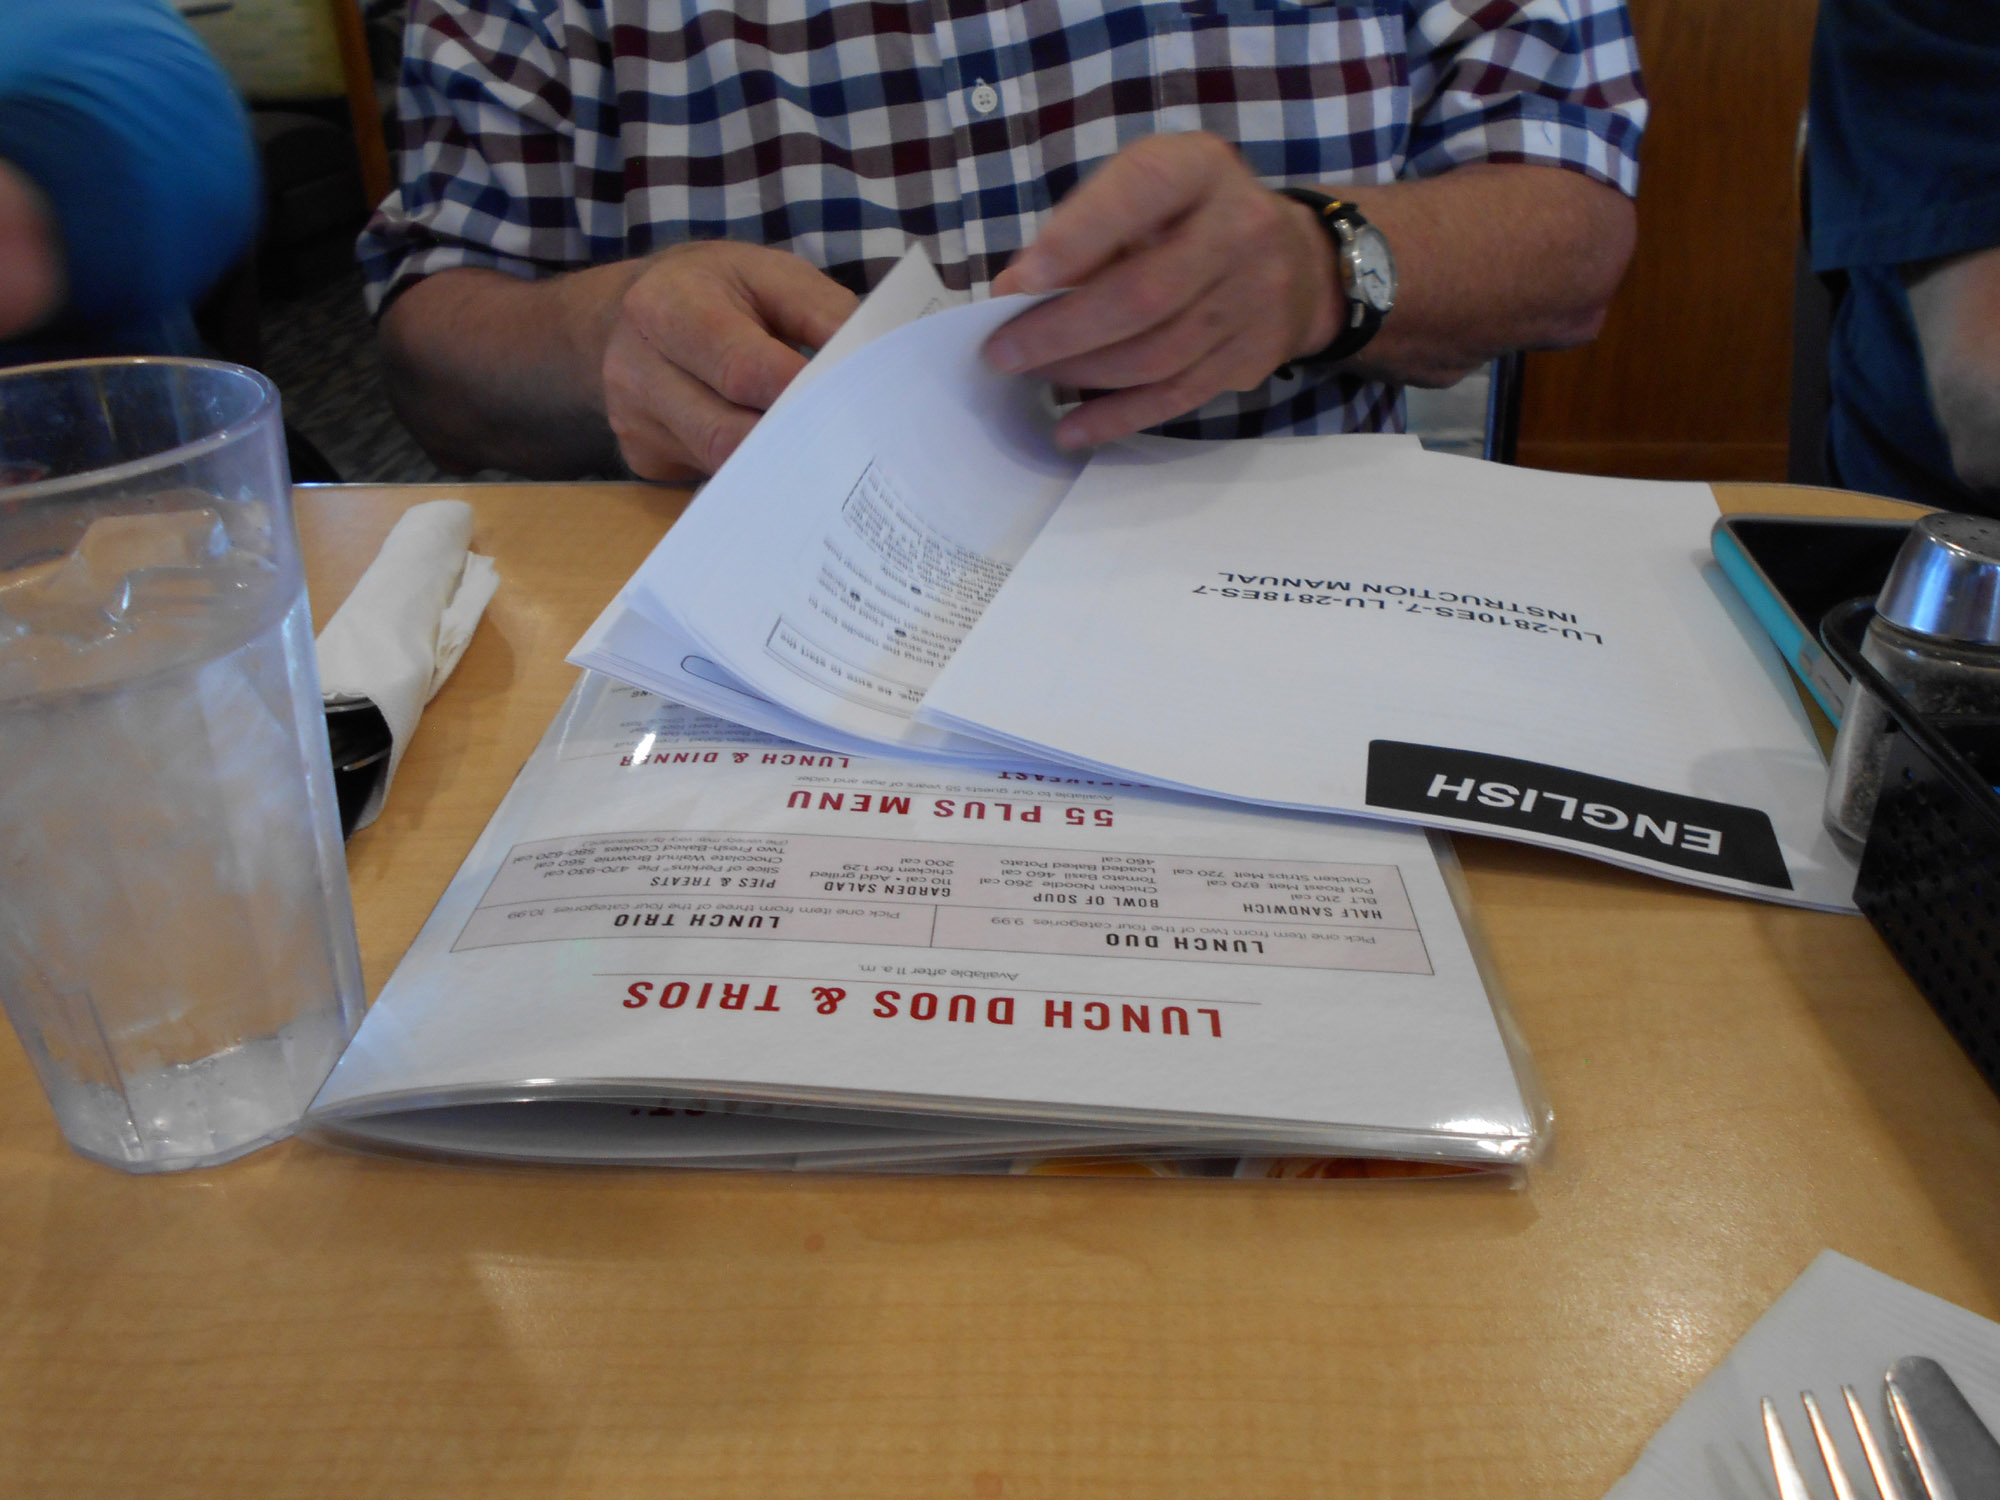
She brought a manual of a Juki machine that they recently acquired where she works. The manual was passed around for all to see. The machine head weighs about 80 lbs. and uses pneumatic controls for many functions, including needle up, needle down and back tack.
As can be imagined, Dorothy is excited to learn about and use the new machine.


Courtney
Courtney brought a few things. Courtney shared his recent purchase of a simple Kenmore machine, only doing straight stitch and zig-zag, with a center only needle homing. After cleaning and oiling it, it works well. He plans to add it to his "loaners", which he tries to have on hand for people who need them, most recently for some folks who wanted to make masks. A second machine he got to use as a loaner is a Singer Heavy Duty series.
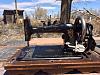
Still another machine he acquired has a bentwood case, which has a split end piece. He asked the group for some ideas as to how to best repair the cover and several ideas from the group were discussed. It's a tricky repair, since there isn't room for an additional layer of wood on the inside. Chris suggested thin strips, located at front and back.

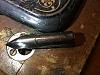
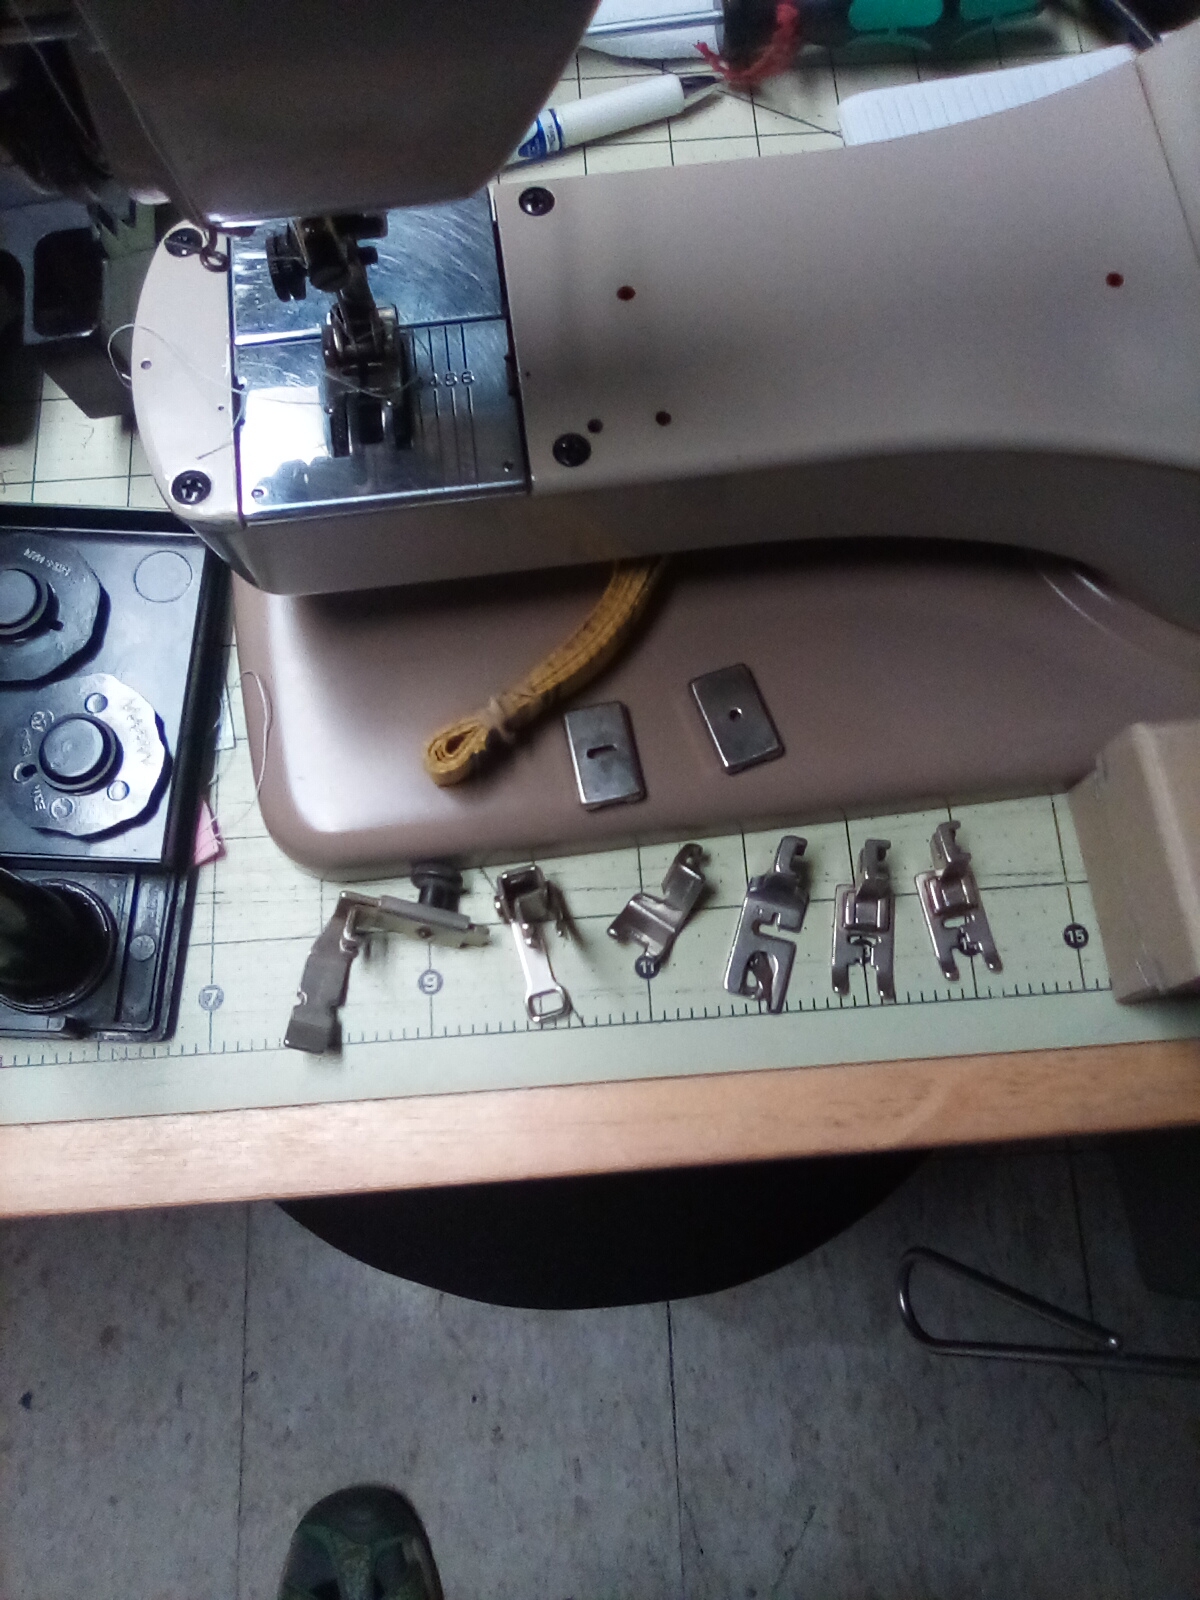
Yet one more machine Courtney brought for us to see is a German machine. From a difficult to see name plate, it was determined to be a Gritzner. It has an unfortunately bent adjustment screw atop the needle case, which he is trying to figure out a way of straightening without further damaging or breaking it. Some pictures of the machine are below.
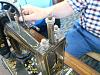

... to be continued
Our meeting was attended by Dorothy, Courtney, Dianne, James, Cheryl & Chris and Janey & John. Eight of us in all.
It was noted that Perkins wasn't nearly as busy as it used to be. Parking spaces were more easily available, no waiting to get in, it might have been only 70 percent of the previous activity. Saturday morning was typically very busy. Perhaps that will return over time.
So let's get started with our show and tell.
Dorothy
Dorothy, as we've mentioned before, is our only member who sews professionally. She brings a variety of tips, techniques and skills to the group from her work and experience, which are very welcome.
She brought a manual of a Juki machine that they recently acquired where she works. The manual was passed around for all to see. The machine head weighs about 80 lbs. and uses pneumatic controls for many functions, including needle up, needle down and back tack.
As can be imagined, Dorothy is excited to learn about and use the new machine.

Courtney
Courtney brought a few things. Courtney shared his recent purchase of a simple Kenmore machine, only doing straight stitch and zig-zag, with a center only needle homing. After cleaning and oiling it, it works well. He plans to add it to his "loaners", which he tries to have on hand for people who need them, most recently for some folks who wanted to make masks. A second machine he got to use as a loaner is a Singer Heavy Duty series.
Still another machine he acquired has a bentwood case, which has a split end piece. He asked the group for some ideas as to how to best repair the cover and several ideas from the group were discussed. It's a tricky repair, since there isn't room for an additional layer of wood on the inside. Chris suggested thin strips, located at front and back.
Yet one more machine Courtney brought for us to see is a German machine. From a difficult to see name plate, it was determined to be a Gritzner. It has an unfortunately bent adjustment screw atop the needle case, which he is trying to figure out a way of straightening without further damaging or breaking it. Some pictures of the machine are below.

... to be continued

Thread
Thread Starter
Forum
Replies
Last Post
sewcrazygirl
General Chit-Chat (non-quilting talk)
10
04-21-2011 08:51 PM
