
White 1514 help
 10-07-2020, 09:09 AM
#1
Member
Thread Starter
Join Date: Sep 2016
Location: Spokane, WA
Posts: 7
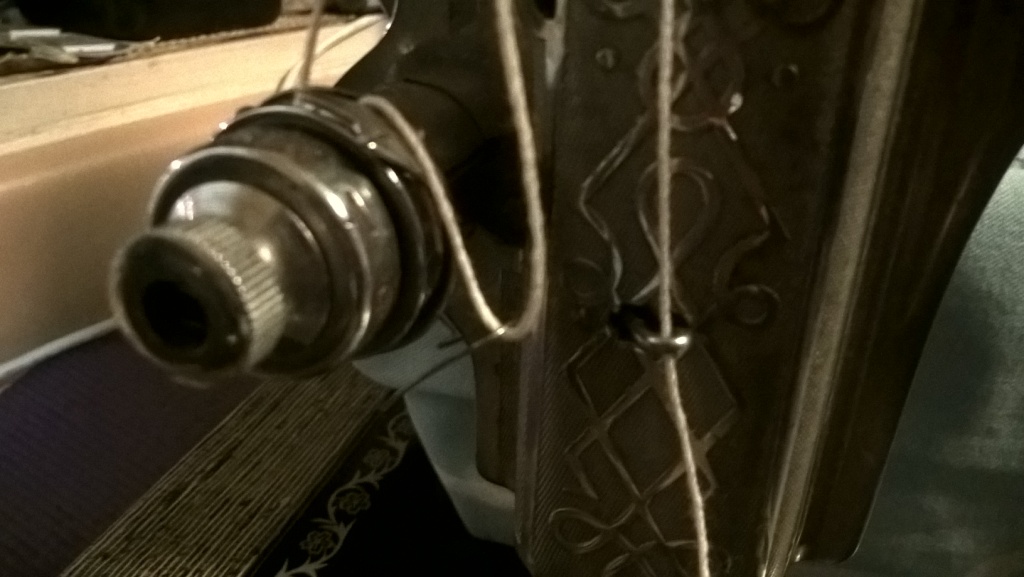
Hello - I was just checking to see if anyone here owns a White 1514 machine. It's a 50's Japanese JA358 model. I've been refurbing mine and am having issues with the tension unit after removing/replacing. Attached a photo. I'm thinking the spring is bent, but was hoping to compare to another 1514. I have the 1514 manual and have checked web/groups.io/YouTube etc but cannot find a good photo of the tension unit/spring/components. Looks like a standard tension unit but is slightly different that the vintage Singers I'm used to. Shot in the dark, but thought I'd check to see if anyone might own the same machine. Thanks in advance!
- Mike
- Mike

 10-07-2020, 06:19 PM
#3
Super Member

Join Date: Mar 2015
Location: Denver, CO
Posts: 4,254
Welcome, Mike. That is a nice looking machine. If you have a manual similar to the one available at https://www.singer.com/support (W1514 model number) I'm wondering if you are referring to what is referred to as "C" in that manual on page 12 of the pdf (pg. 11 of the manual). It appears very similar to the Singer 15-90 tension. The manual for the 15-90 can be found at http://ismacs.net/singer_sewing_mach...odel-15-90.pdf On page 24 of that pdf it show how to remove and reassemble the tension. Perhaps that will help.
Also, could we get a picture of the JA number and if there is a JC numbers? I've never seen one that large. There is someone that has trying to compile info regarding Japanese machines with JA and JC numbers at http://www.doubleveil.net/zssmp/resources.htm (about 2/3rds down).
Janey - Neat people never make the exciting discoveries I do.
Not affiliated with off-site link(s)
 10-08-2020, 09:19 AM
#6
Member
Thread Starter
Join Date: Sep 2016
Location: Spokane, WA
Posts: 7
Thanks for the info Janey - I checked the 15-91, seems to be very similar. Attached are more photos of the dismantle I took (to make sure everything got put back in correct order) that describe my questions, etc.
Spring: I noticed the spring is not shaped as in the manual. The manual version shows it tightening up towards the bottom and then flaring out. Not sure if that is the issue? The thread take-up (at it's highest point) is not even at the top of the spring loop (it just pulls it the the left side (circled in yellow). I don't have a 15-91 to compare it to but it seems to be similar. I was thinking that the spring needed to be positioned out farther so it's directly underneath the "hook - figure D" - so it wouldn't pull the thread sideways, but not sure that is the issue.
Re: JA number - sticky keys. I meant to type JA 35. . Sorry.
Also: aren't the 'fingers' of the stop washer supposed to be pointing towards you (as on Singers etc)? Noticed this one was pointing away when dismantling. The unit still dials coreectly with it pointing away, was just curious.
Thanks again for any notes/suggestions -
- Mike
10-08-2020, 09:49 AM
#7
Member
Thread Starter
Join Date: Sep 2016
Location: Spokane, WA
Posts: 7
Thanks Joe - will take a closer look at the thread path - appreciate it!
- Mike
- Mike
Originally Posted by JoeJr

Janey posted a link for a manual for a Singer 15. The thread path is on page 17 of the PDF document and page number 15 of the manual itself. Yours does not appear to be threaded correctly.
10-08-2020, 06:12 PM
#8
Super Member
Join Date: Mar 2015
Location: Denver, CO
Posts: 4,254
Originally Posted by mike509
Thanks Joe - will take a closer look at the thread path - appreciate it!
- Mike
- Mike
I am so used to doing it, I had to go do it again to take a picture. I used crochet thread so it was thicker and easier to see. If you read #5 of the instructions, it says after through the check spring to tug the thread to bring it past the hook (notch) "D" then up to the take up. I actually was able to come down through the discs and then down around with thread off to the left so that it would go under "D" and then under the check spring before going up to the take up lever. It will look like this after either method.
Janey - Neat people never make the exciting discoveries I do.
Not affiliated with off-site link(s)
Last edited by OurWorkbench; 10-08-2020 at 06:21 PM.
10-08-2020, 06:19 PM
#9
Super Member
Join Date: Mar 2015
Location: Denver, CO
Posts: 4,254
Originally Posted by JoeJr
Janey posted a link for a manual for a Singer 15. The thread path is on page 17 of the PDF document and page number 15 of the manual itself. Yours does not appear to be threaded correctly.
Janey - Neat people never make the exciting discoveries I do.
10-09-2020, 08:29 AM
#10
Member
Thread Starter
Join Date: Sep 2016
Location: Spokane, WA
Posts: 7
Thanks Janey, funny thing, I rethreaded using the Joe's suggestion + 15-90 path. Made a couple quick 'test' sew outs - + with Singer buttonholer/zigzagger - worked much better than the previous way I had it threaded. Posting the threading path from the White manual below. The issue with the White manual version of threading is that when you go thru the check spring (C) first, then "tug" the thread up into the hook (D), the thread does not sit in the loop of the check spring (but off to the left - as on my original photos circled in yellow).
If you look at the inset illustration from the manual, the thread is coming off the check spring (C) and going directly up to the take-up lever (E). If you go thru the check spring FIRST - as stated in the manual - then tug up into the hook (D), the thread would have to be coming from the hook to the take-up lever, correct? Unless I am just completely out in left field, which could be totally possible.
Re: stop washer. It seems to work just fine with the finger pointed toward machine - again, not sure if that was the previous owner's error or a difference with White assembly. I've been looking for a service/adjuster's manual but no luck, would be interested to find out correct orientation).
I'll continue to fiddle - just wanted to share that progress
Thanks again for all the input - truly appreciate it!
- Mike
Originally Posted by OurWorkbench
Yes, that does show how to go through the tension assembly. However, the needle is actually threaded differently between the 15-90 and the 1514
Janey - Neat people never make the exciting discoveries I do.
Janey - Neat people never make the exciting discoveries I do.
