
My WIP. Ideas for quilting around pinwheel?
 07-13-2012, 01:25 AM
#1
Senior Member
Thread Starter

Join Date: Jun 2011
Location: Cleburne, Texas, USA
Posts: 341
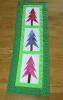
I am a hand quilter. I have quilted the pink diamonds and triangles. I want to quilt around the pinwheels with something that portrays movement. Any ideas?

 07-13-2012, 03:31 AM
#3
Super Member

Join Date: Jan 2011
Location: Knot Merrill, Southern Indiana
Posts: 5,781
Radiating line work.
Draw a circle around the pin-wheel a few inches from the center - still under the pin-wheel but not all the way under it. Use your ruler to draw radiating lines. Make the lines come off the edge of the circle at a slant - don't pull them straight off the circles edge. This will give a slight spinning motion. If you took the lines straight off the circle it would look more like a radiating sun.
I might even make the lines so two lines were close together (1/2"?) then a larger space, the two 1/2" spaced lines - etc.
Not sure if I explained this well.
07-13-2012, 03:37 AM
#4
Super Member
Join Date: Jan 2011
Location: Knot Merrill, Southern Indiana
Posts: 5,781
Ahh .... looked again a bit closer and I have another idea. line work again 
4 straight lines evenly spaced starting at the edge where the pin-wheel is sewn into the quilt top. When you reach the edge where the pin wheel folds - use that fold line to bend the lines and follow them all the way through to the edge of the block.
Again ... not sure if I explained it right.
4 straight lines evenly spaced starting at the edge where the pin-wheel is sewn into the quilt top. When you reach the edge where the pin wheel folds - use that fold line to bend the lines and follow them all the way through to the edge of the block.
Again ... not sure if I explained it right.
07-13-2012, 04:33 AM
#5
Power Poster
Join Date: Dec 2010
Location: Michigan
Posts: 11,276
Love the colors!
Don't know what kind of batting you used and how far apart you can quilt. Are the pinwheels tied thru the centers of all layers, or is the ribbon just for embellishment? If your batting allows it, I would go with less quilting in the pinwheel blocks. If it's not tied, just stitch in the ditch tip to tip to stablize the block then a swirl or two coming off the tips of the pinwheels at an angle.
Don't know what kind of batting you used and how far apart you can quilt. Are the pinwheels tied thru the centers of all layers, or is the ribbon just for embellishment? If your batting allows it, I would go with less quilting in the pinwheel blocks. If it's not tied, just stitch in the ditch tip to tip to stablize the block then a swirl or two coming off the tips of the pinwheels at an angle.
 07-14-2012, 12:11 AM
#8
Senior Member

Join Date: Feb 2011
Location: Peoria Arizona
Posts: 696
Agree with PaperPrincess - I would stablize those pinwheels with outline quilting around the pinwheels. Then I would quilt 2-3 or 4 shallow curved semi-circles starting about 1/4-1/2" out from each of the folded corners of the pinwheel radiating out towards the outside of the block. Stagger them so that they are not parallel to each other so it gives a circular motion. If your first shallow semi-circle starts closest to the pinwheel and a little below the tip of a pinwheel blade, curve it down partway past the folded part of the blade. Then as you move out away from the pinwheel, and that first curve, drop down and start your next shallow curve a little below where you began you first curve. Hard to tell how many curves you would need around each of the blade - it would depend on how far apart you quilt each curve so that you get the motion you need. Easier to do that it is to try a verbally explain the conception. Will be interesting in seeing how you quilt around those pinwheels - don't forget to post a picture. Good luck - someown is sure going to be lucky if they get this as a gift. Have you given it a name yet???
07-14-2012, 01:12 AM
#9
Senior Member
Thread Starter
Join Date: Jun 2011
Location: Cleburne, Texas, USA
Posts: 341
DogHouseMom, I like the idea of radiating lines. I'm thinking about starting them at the tip of the pinwheel and go into the open space on the block. I think it will look like wind coming off the pinwheel after you blow on it.
I have been doing drawings of it with curls, lines, swirls, everything I can think of.
JanQuiltz, No, it doesn't have a name yet. It is a gift for the unborn baby of a coworker. I still have several months to finish it.
I have been doing drawings of it with curls, lines, swirls, everything I can think of.
JanQuiltz, No, it doesn't have a name yet. It is a gift for the unborn baby of a coworker. I still have several months to finish it.
07-14-2012, 04:15 AM
#10
Senior Member
Join Date: Jul 2010
Location: Queensland, Australia
Posts: 684
Agree with PaperPrincess - I would stablize those pinwheels with outline quilting around the pinwheels. Then I would quilt 2-3 or 4 shallow curved semi-circles starting about 1/4-1/2" out from each of the folded corners of the pinwheel radiating out towards the outside of the block. Stagger them so that they are not parallel to each other so it gives a circular motion. If your first shallow semi-circle starts closest to the pinwheel and a little below the tip of a pinwheel blade, curve it down partway past the folded part of the blade. Then as you move out away from the pinwheel, and that first curve, drop down and start your next shallow curve a little below where you began you first curve. Hard to tell how many curves you would need around each of the blade - it would depend on how far apart you quilt each curve so that you get the motion you need. Easier to do that it is to try a verbally explain the conception. Will be interesting in seeing how you quilt around those pinwheels - don't forget to post a picture. Good luck - someown is sure going to be lucky if they get this as a gift. Have you given it a name yet???
I agree, I would call it shadow quilting but that would be perfect. Very nice quilt

Thread
Thread Starter
Forum
Replies
Last Post
craftybear
Links and Resources
7
07-04-2011 08:32 PM
