
Quilted Recliner Slipcover Tutorial - pdf at post #14
 01-10-2012, 10:20 AM
#1
Senior Member
Thread Starter

Join Date: May 2010
Location: Marathon, Texas
Posts: 854
Tutorial for Quilted Recliner Slipcover
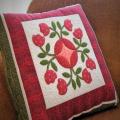
After my recent post Quilted Recliner Slipcover-thing several of you asked for a tutorial, so here goes my first tute on QB. Feel free to post questions or PM me. I included lots of pictures. The link above is to the first cover I made. Figure 1 shows the finished project that you’ll see in this tutorial.
I know this looks like a long project with lots of steps, but the chair cover is just a long rectangle with two short side panels. And the arm panels are also just rectangles with short front panels. After you read through to the end, you’ll see that the steps are actually easy.
Materials
Fabric for front and backing. I used 2.5 yards of quilting cotton of each, based on the size of my recliner. Your yardage requirements will vary depending on the measurements of your chair.
Fabric for binding. The amount will depend on the measurements of your recliner. I needed less than 1 yard for my binding.
Batting of your choice. I used cotton batting because we live in a hot climate.
Measurements for the Rectangle
You’ll need to make a couple of decisions and take some measurements.
1. First, decide how far down the outside back of the chair you want the cover to hang. On mine, the drop is about 11 inches.
2. Drape your tape measure from that drop point up and over the back of the chair, down to the seat, and across the seat to the front edge of the seat or wherever you want the cover to end. My measurement was 72 inches. Figure 2.
3. Add 4 to 6 inches to the length you determined in steps 1 and 2. (Be sure your total includes the drop over the outside back.) The extra inches are for “tuck in” at the back of the seat and to allow the cover to expand when the chair is reclined.
4. Measure the width of the back at its widest point. This will be the width of your rectangle. Be sure there is a little ease (add about 1 � inches to the width measurement) so you can get the cover on and off easily and so it can shift around a little bit when someone moves around in the chair. Figure 3.
So now you have the measurements for your rectangle. Mine turned out to be 27” by 76”.
There is a Part 2...separate post.
Last edited by AnitaSt; 01-10-2012 at 10:33 AM. Reason: To note that there is a Part 2 in a separate post.

 01-10-2012, 10:25 AM
#3
Senior Member
Thread Starter
Join Date: May 2010
Location: Marathon, Texas
Posts: 854
Measurements for Arm Covers
The arm covers are constructed the same way�.they are a rectangle with a little front panel. You need three measurements:
7. The length of the arm. On my chair the length was 21 inches. Figure 6.
8. The width of the arm cover. Drape your tape measure over the arm and decide how much drop you want on the inside and the outside. Mine are pretty narrow because I was short on fabric�next time I�ll make them a little wider. Figure 7.
9. The length of the little front panel. This will depend on the shape of the arm on your chair. Measure to the point you want the cover to end. For safety, cut this piece at least a couple of inches longer than your measurement. Figure 8 shows what can happen if you don�t�.my panel was a little too short and I had to trim the rectangle.
Pinning and Fitting
This part is the same as making a custom slipcover by draping and cutting the fabric on the chair.
10. Drape the cover rectangle on the chair with the back edge at the point you determined in Step 1. You can place your quilted fabric right side up or right side down. Figure 9.
11. With right sides together, pin the side panel rectangle to the edges of the cover rectangle. In Figure 10, the squiggly line shows where it is pinned to the edge of the rectangle. Then trim the excess so that the side panel now curves to match the draped cover rectangle. Figure 11.
12. Do the same thing for the opposite side panel.
14. The arm covers are pinned and fitted the same way. Drape the arm cover over the arm, pin the front panel to the arm cover then trim to create the curve. Figure 12.
Assembling
13. Stitch side panels to the rectangle. I used a � inch seam. Be sure to secure the stitching well at the point where the side panel meets the front part of the chair cover. This point takes a lot of stress when the chair is reclined. In Figure 13.
14. I zig-zagged the seam allowances to prevent raveling. You could serge them or even cover them with binding. Using the binding would make the cover reversible.
15. The arm covers are assembled the same way as the chair cover.
Binding
Use your preferred method of binding for the chair cover and the arm covers.
The only unusual part of the binding is the inside corner created where the side panel meets the chair cover rectangle. I followed the method described by Bonnie Hunter at this link. There are other methods but they tell you to clip the seam at the intersection. Because this point gets a lot of stress and pulling, I didn�t want to risk clipping the seam. Bias binding makes it MUCH easier to turn the inside corner, but it can be done with straight-grain binding also.
That�s it�.you�re ready for the inspector! Post questions or PM me. Thanks for liking my project!
Anita
01-10-2012, 11:21 AM
#4
Super Member
Join Date: Nov 2010
Location: Mars
Posts: 2,549
What a great idea! My recliner is leather - and it's beige like half the stuff in the house. In the summer, it's hot and sticky and in the winter, it's cold and won't warm up. If I make one of these, it solves all the problems with it because I will make it in burgundy red and gold! 
I might even add some pockets on the arms to hold the remotes and my sewing stuff!
Thank you - you're very clever and talented - and generous to share your idea, too.
I might even add some pockets on the arms to hold the remotes and my sewing stuff!
Thank you - you're very clever and talented - and generous to share your idea, too.
 01-10-2012, 04:32 PM
#8
Super Member
Join Date: Oct 2010
Location: Arizona
Posts: 4,039
You are amazing. This is great. Thank you!!
Measurements for Arm Covers
The arm covers are constructed the same way….they are a rectangle with a little front panel. You need three measurements:
7. The length of the arm. On my chair the length was 21 inches. Figure 6.
8. The width of the arm cover. Drape your tape measure over the arm and decide how much drop you want on the inside and the outside. Mine are pretty narrow because I was short on fabric…next time I’ll make them a little wider. Figure 7.
9. The length of the little front panel. This will depend on the shape of the arm on your chair. Measure to the point you want the cover to end. For safety, cut this piece at least a couple of inches longer than your measurement. Figure 8 shows what can happen if you don’t….my panel was a little too short and I had to trim the rectangle.
Pinning and Fitting
This part is the same as making a custom slipcover by draping and cutting the fabric on the chair.
10. Drape the cover rectangle on the chair with the back edge at the point you determined in Step 1. You can place your quilted fabric right side up or right side down. Figure 9.
11. With right sides together, pin the side panel rectangle to the edges of the cover rectangle. In Figure 10, the squiggly line shows where it is pinned to the edge of the rectangle. Then trim the excess so that the side panel now curves to match the draped cover rectangle. Figure 11.
12. Do the same thing for the opposite side panel.
14. The arm covers are pinned and fitted the same way. Drape the arm cover over the arm, pin the front panel to the arm cover then trim to create the curve. Figure 12.
Assembling
13. Stitch side panels to the rectangle. I used a � inch seam. Be sure to secure the stitching well at the point where the side panel meets the front part of the chair cover. This point takes a lot of stress when the chair is reclined. In Figure 13.
14. I zig-zagged the seam allowances to prevent raveling. You could serge them or even cover them with binding. Using the binding would make the cover reversible.
15. The arm covers are assembled the same way as the chair cover.
Binding
Use your preferred method of binding for the chair cover and the arm covers.
The only unusual part of the binding is the inside corner created where the side panel meets the chair cover rectangle. I followed the method described by Bonnie Hunter at this link. There are other methods but they tell you to clip the seam at the intersection. Because this point gets a lot of stress and pulling, I didn’t want to risk clipping the seam. Bias binding makes it MUCH easier to turn the inside corner, but it can be done with straight-grain binding also.
That’s it….you’re ready for the inspector! Post questions or PM me. Thanks for liking my project!
Anita
01-11-2012, 06:26 AM
#9
Junior Member

Join Date: Feb 2011
Location: Rochester New York
Posts: 180
I love this! Thank you for the tut.
I would like to know if anyone knows a way to convert both parts into one PDF file? I tied it into word but got several blank pages.
Thanks fo any suggestions or help.
dawn227
I would like to know if anyone knows a way to convert both parts into one PDF file? I tied it into word but got several blank pages.
Thanks fo any suggestions or help.
dawn227
Last edited by Dawn227; 01-11-2012 at 06:28 AM. Reason: wasn't finished posting

Thread
Thread Starter
Forum
Replies
Last Post
ligia
General Chit-Chat (non-quilting talk)
0
01-28-2013 07:49 AM
magnolia
General Chit-Chat (non-quilting talk)
4
03-21-2011 07:48 AM
