
Do you apply Elmers for basting like THIS?
 04-01-2013, 04:34 AM
#41
Super Member
Join Date: Sep 2010
Location: Heart of Colorado's majestic mountains!
Posts: 6,026
Here is another 'two bits' worth. I have used this method several times and have applied it to several sizes of projects. I do not thin the glue with water because it takes longer for the quilt to dry as the water soaks into the quilt or backing and into the batting. I usually use clamps on my 30" X 72" table and work from the center of the quilt out in sections. I work with the backing and batting first because it is cut several inches larger than the top. I clamp the backing down and roll up the batting while I apply the glue. I have done the grid method but usually do the figure "A" method. I use a rubber spatula from the kitchen to spread the glue out and smooth the backing (or quilt top) down with my hands, working from the center out to the edges. If it is a small project such as place mats or a runner I will carry it to the ironing board and iron it dry but if it is a large quilt I let it dry overnight. I try not to let the glue get old because it is harder to control. I did have a big problem one time when I used a packages king sized batting. When I unfolded it there were areas that had stretched when it was packaged. It was a bit of a headache to manage. But I used thread basting in those areas when putting the batting and backing together. By handling it this way the stretching was managed. There were no problems using glue when putting the top together with the backing/batting combination. I took the basting stitches out as I quilted with no difficulties.
 04-01-2013, 04:41 AM
#42
Super Member
Join Date: Oct 2011
Location: Timmins, Ont. Canada
Posts: 4,683
Thanks for those pics Jan, I have also wondered which method was best. I have wondered if putting the glue in a small dish & using a paint brush to "paint" the glue on in strokes would work. I think I will give that a try also.
04-01-2013, 05:14 AM
#43
Super Member
Join Date: Mar 2012
Location: Thornton, Colorado
Posts: 1,023
I have used Elmer's washable glue stick for matching open seams, etc. with success. Then I tried basting a quilt top the other day...it went well, and I am now an Elmer's glue convert,  . For this particular project, I used very thin drizzles in large zig zags across one section of the backing. Then I rolled up the batting and centered it across the top. After that, I gently unrolled the batting, gently patting it down as I went down the backing. I repeated the process until the whole backing was covered. I did not baste between the top and the backing because of the nature of the project and it still came out fine. Thus far, I have not diluted the glue. Next time I will keep a light touch on the amount of glue and see what happens. I agree with Tashana about leaving the space for the binding. Once that glue dries, it is sure like trying to poke a needle through metal
 . The quilting was done by the SITD method. For my next machine quilting project, I will pin the backing to the leader and then baste the batting and the top to the backing across the top edge only and let it dry before I start quilting.
. For this particular project, I used very thin drizzles in large zig zags across one section of the backing. Then I rolled up the batting and centered it across the top. After that, I gently unrolled the batting, gently patting it down as I went down the backing. I repeated the process until the whole backing was covered. I did not baste between the top and the backing because of the nature of the project and it still came out fine. Thus far, I have not diluted the glue. Next time I will keep a light touch on the amount of glue and see what happens. I agree with Tashana about leaving the space for the binding. Once that glue dries, it is sure like trying to poke a needle through metal. The quilting was done by the SITD method. For my next machine quilting project, I will pin the backing to the leader and then baste the batting and the top to the backing across the top edge only and let it dry before I start quilting.
04-01-2013, 05:47 AM
#45
Super Member

Join Date: Nov 2010
Location: soCal
Posts: 1,495
here is my tutorial on this method hope that it helps
http://www.quiltingboard.com/tutoria...e-t208057.html
http://www.quiltingboard.com/tutoria...e-t208057.html
04-01-2013, 05:51 AM
#46
Senior Member
Join Date: Nov 2011
Location: Texas
Posts: 440
I use very small amounts based on size of the pieces. Generally one dot at intersections and then one dot on each end. I haven't used it to sandwich the quilt together yet, but plan to try it.
Last edited by quiltinglady-1; 04-01-2013 at 06:00 AM.
04-01-2013, 06:00 AM
#47
Super Member
Join Date: May 2012
Location: Central Wisconsin
Posts: 4,391
There are many of us who still do not have the "picture" of how this glue basting is done.
Please tell us which, if any, of these ways you apply the glue when you are basting a quilt.
Also, do you apply the glue to the fabric or the batting? Do you glue the front or the back first?
<fieldset class="postcontent"><legend> Attached Images</legend>
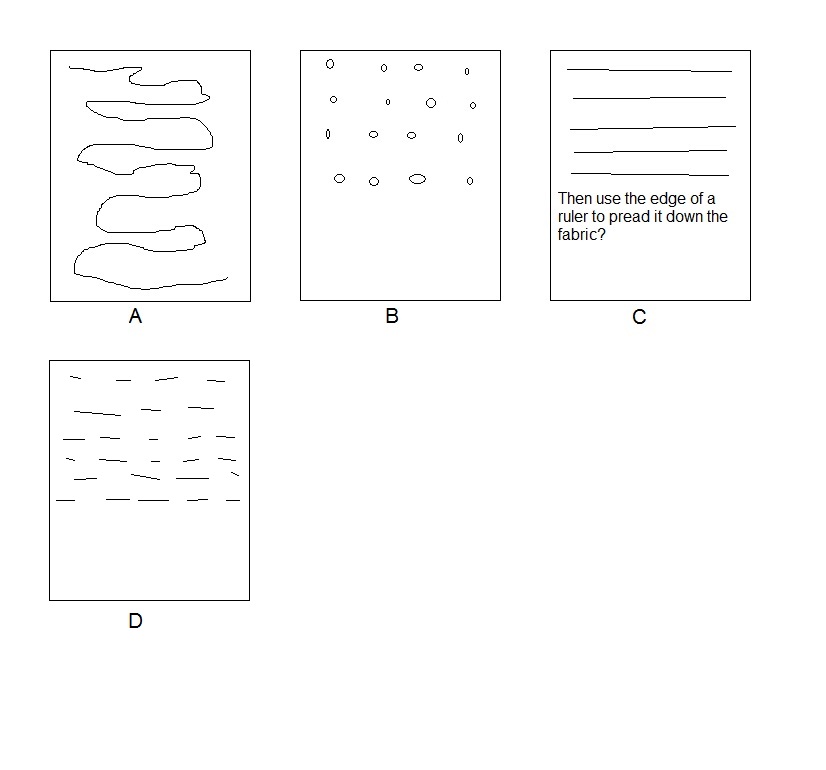
</fieldset>
Thanks!
Jan in VA
That should read SPREAD not pread in C!
Please tell us which, if any, of these ways you apply the glue when you are basting a quilt.
Also, do you apply the glue to the fabric or the batting? Do you glue the front or the back first?
<fieldset class="postcontent"><legend>
Attached Images</legend> </fieldset>
Thanks!
Jan in VA
That should read SPREAD not pread in C!
I spread my quilt on my queen bed sideways, letting it hang over the two sides. I have the centers of back, batt, and top marked with pins across the middle. Smooth them out on the bed. Pin centers so all layers match. Then I roll up the top, put glue on the batt, (from the middle to about 1/4 way down the quilt), smooth down the top, and use the iron to just press in a lot of spots. As long as most of it is dry, you can start working on the other end the same way. Then pull the center to the edge of the bed and work on the 1/4 end that was hanging over. When that is partially dry, pull it all over the other way, and work on the last quarter. Now turn the whole thing over, and work on the back in the same way. Those middle pins can stay in until you are done.
Now for the binding: I sew it onto the front with the mitered corners, press that seam open very carefully, (you want to see the ditch into which you will be stitching). Then turn quilt over and glue down the binding so that it extends about 1/8 in over the seam line. Glue the corners, too, just like you want them to look. A little more glue here will hold them in place. Then after it has been all ironed dry (as you go), turn it over and stitch in the ditch from the front.
Doesn't take long at all. No pins to not hit, no pins to take out, no pins to pick you at every turn!
I've done several queen quilts like this, and love it. Soooo fast and fun. After washing, the binding seam relaxes, and you can't see any stitching, (well, most of the time.)

 04-01-2013, 06:49 AM
#50
Super Member

Join Date: Feb 2012
Location: Phoenix, AZ
Posts: 2,876
Just more little thing I didn't notice in the other replies, (I didn't read them all, just skimmed) I do stop and if there is a blob, I smooth it a little with my finger. I don't know if it really makes a difference or if I am just compulsive?? 

Thread
Thread Starter
Forum
Replies
Last Post
barnbum
Pictures
15
11-07-2008 02:59 AM
