
Sentimental Journey Quilt
 06-07-2013, 07:46 AM
#1
Member
Thread Starter
Join Date: Jun 2013
Location: NH
Posts: 2
Sometime ago I was visiting blockcentral.com. There is a quilt there that I was making by doing monthly blocks. The name of the quilt is called Sentimental Journey. The problem is there are no sashing or border instructions. I would like to finish this quilt, but need help, I am a novice quilter and this is my first quilt.
 06-07-2013, 09:05 AM
#2
Senior Member

Join Date: Jul 2012
Location: The Great State of Texas
Posts: 506
I found this information on their web site. Hope it will help you. " I f you have any questions or comments concerning our 2010 Block of the Month series, you can email me here[email protected]
I had a wonderful time designing this quilt. I hope you enjoy it!~Kim Noblin, Editor"
BlockCentral.com
BlockCentral.com
Last edited by richardswife; 06-07-2013 at 09:11 AM.
06-07-2013, 09:57 AM
#3
Super Member

Join Date: Jul 2009
Location: Southwest Kansas
Posts: 4,820
Sometime ago I was visiting blockcentral.com. There is a quilt there that I was making by doing monthly blocks. The name of the quilt is called Sentimental Journey. The problem is there are no sashing or border instructions. I would like to finish this quilt, but need help, I am a novice quilter and this is my first quilt.
06-07-2013, 11:00 AM
#5
Super Member
Join Date: Mar 2010
Location: Canada
Posts: 3,458
There has been a few threads about this same problem. Maybe you can find your answer here.
http://www.quiltingboard.com/main-f1...s-t132502.html
http://www.quiltingboard.com/main-f1...s-t132502.html
06-07-2013, 11:07 AM
#6
Senior Member

Join Date: Apr 2009
Location: Lincoln NE
Posts: 865
Woah, wait a minute! pull up the cutting chart for the entire quilt! Ah, hah! It tells us how big the borders are. I will go ahead and give you what I had figured before I found this part.
Here is how I came up with the answer (as an aid to you in future projects! ):
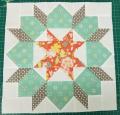
First, I opened the Printable Coloring Page, and saw that the sashing is the same size as the last round of the individual blocks. Also, the little Churn Dash blocks that are in the border are the same size as the Half Square Triangles which are in the individual block corners. So, we just need find out what size those are!
Then, I looked at the individual block patterns. I opened the PDF for Installment #12, which showed in step 7 that the side pieces being added as the final round on the block are 2 �� wide. Woo, hoo! That is what we needed to do our calculating.
Using their finished quilt as a guide I can see that each block ends with the grey strip. Around that goes a pink strip then another grey strip. The unfinished width of these strips is 2 �� (to match the last strip of the block). The dark grey cornerstones will also be 2 ��.
So, you need a top and bottom sash for each block, that makes 24 strips.
And another 4 strips for the sides of the blocks on each row, so 4 X 4 = 16.
That makes 40 pink strips 2 �� wide and 16 �� long (Installment #12 said the unfinished block size is 16 ��).
You need 4 dark grey cornerstones on each row of sashing, and there are 5 rows, that makes 20 squares at 2 ��.
I would sew one dark grey cornerstone to the ends of a pink strip like step 6 shows you to do with your last round of the block (where you add the Half Square Triangle to your red strip). Make 2 blocks for each row this way, but the center block on each row will not have the cornerstones, just the top and bottom pink strips because they share the sashing with the block next to it.
This new �block row� is now unfinished 20 �� tall (16 � block + 2� top sash + 2� bottom sash). When calculating this, we need remember though we cut the sashing at 2 ��, a half inch was used up in the seams as we sewed it to the block. So, that is why I am adding only 2� for each sashing piece.
You have 4 rows, each at 20 �� tall, that makes 82� tall for the grey border. It is good to cut it longer, then trim after it is sewn on, just in case! So, cut 2 strips of 2 1/2� wide grey at 85� for the side border.
Now you need the top and bottom border. Our blocks were unfinished 16 ��. To that we added 4 sashings (remember the center block didn�t get sashing). So, we have 3 blocks plus 4 sashings (16 � x 3 = 49 ��)+(2 � x 4 = 10)=59 ��. I know there will be seams, but we need cut large anyway, so I am not deducting it since I am in a hurry before lunch ends! So, cut 2 strips 2 �� wide by 63�.
Hope this helps. If you need more, shoot me a private message, and I will continue with what I was doing. Good luck, and don't forget to show your quilt!
Here is how I came up with the answer (as an aid to you in future projects! ):
First, I opened the Printable Coloring Page, and saw that the sashing is the same size as the last round of the individual blocks. Also, the little Churn Dash blocks that are in the border are the same size as the Half Square Triangles which are in the individual block corners. So, we just need find out what size those are!
Then, I looked at the individual block patterns. I opened the PDF for Installment #12, which showed in step 7 that the side pieces being added as the final round on the block are 2 �� wide. Woo, hoo! That is what we needed to do our calculating.
Using their finished quilt as a guide I can see that each block ends with the grey strip. Around that goes a pink strip then another grey strip. The unfinished width of these strips is 2 �� (to match the last strip of the block). The dark grey cornerstones will also be 2 ��.
So, you need a top and bottom sash for each block, that makes 24 strips.
And another 4 strips for the sides of the blocks on each row, so 4 X 4 = 16.
That makes 40 pink strips 2 �� wide and 16 �� long (Installment #12 said the unfinished block size is 16 ��).
You need 4 dark grey cornerstones on each row of sashing, and there are 5 rows, that makes 20 squares at 2 ��.
I would sew one dark grey cornerstone to the ends of a pink strip like step 6 shows you to do with your last round of the block (where you add the Half Square Triangle to your red strip). Make 2 blocks for each row this way, but the center block on each row will not have the cornerstones, just the top and bottom pink strips because they share the sashing with the block next to it.
This new �block row� is now unfinished 20 �� tall (16 � block + 2� top sash + 2� bottom sash). When calculating this, we need remember though we cut the sashing at 2 ��, a half inch was used up in the seams as we sewed it to the block. So, that is why I am adding only 2� for each sashing piece.
You have 4 rows, each at 20 �� tall, that makes 82� tall for the grey border. It is good to cut it longer, then trim after it is sewn on, just in case! So, cut 2 strips of 2 1/2� wide grey at 85� for the side border.
Now you need the top and bottom border. Our blocks were unfinished 16 ��. To that we added 4 sashings (remember the center block didn�t get sashing). So, we have 3 blocks plus 4 sashings (16 � x 3 = 49 ��)+(2 � x 4 = 10)=59 ��. I know there will be seams, but we need cut large anyway, so I am not deducting it since I am in a hurry before lunch ends! So, cut 2 strips 2 �� wide by 63�.
Hope this helps. If you need more, shoot me a private message, and I will continue with what I was doing. Good luck, and don't forget to show your quilt!
06-08-2013, 08:40 AM
#8
Super Member
Join Date: Oct 2010
Location: howell, Mi
Posts: 2,345
I printed the instructions for the quilt with the intention of making it later (after the last part was revealed). It does seem like something that can be drafted fairly easily (famous last words). I sent an email to that address, and never heard a thing. I was worried that something happened to the designer, but found references to her on other sites. I am glad that I didn't start the quilt, but it is still something that I would like to make someday. Thanks to Grammatjr for the information she posted, and I think it will help if I ever make the quilt.
Sue
Sue
09-10-2014, 09:08 PM
#9
Member
Join Date: Sep 2014
Location: BC, Canada
Posts: 9

Thread
Thread Starter
Forum
Replies
Last Post
