
Quilt Math Help Please!
 09-24-2015, 06:03 AM
#11
Power Poster
Join Date: Mar 2009
Location: Lake Elsinore, CA
Posts: 15,161
There's something wrong here. In your drawing, the top measurements add up to 17" (8.5+8.5) but the bottom measurements only add up to 16" (8.5+3.25+4.25). What are the angles of your parallelogram, and do they match the angles of your trapezoid?
 09-24-2015, 06:15 AM
#12
Power Poster
Join Date: May 2008
Location: MN
Posts: 24,450
Originally Posted by dunster

There's something wrong here. In your drawing, the top measurements add up to 17" (8.5+8.5) but the bottom measurements only add up to 16" (8.5+3.25+4.25). What are the angles of your parallelogram, and do they match the angles of your trapezoid?
09-24-2015, 06:43 AM
#13
Power Poster
Join Date: May 2008
Location: MN
Posts: 24,450
Your top drawing seems to be
working -
How about getting it enlarged to whatever size you want it to be -
Cut out the pieces - paste them on to template plastic - add seam allowances - and just use those templates for cutting?
You will still need to match the intersections of the angles when you sew the pieces together.
working -
How about getting it enlarged to whatever size you want it to be -
Cut out the pieces - paste them on to template plastic - add seam allowances - and just use those templates for cutting?
You will still need to match the intersections of the angles when you sew the pieces together.
09-24-2015, 06:52 AM
#14
Super Member
Join Date: Nov 2010
Location: SoCal
Posts: 1,813
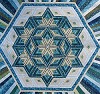
I look at making your pattern a little differently. Your pattern exist of one black triangle; a gray piece consisting of 3 triangles point up, down, up; and yellow of 4 triangles, up, down, up, down. (Look at the gray and divide it into 3 triangles, 1 pointing down, middle up, next one down.) What ever size triangle you want to use will work, and angles will be correct. Just draw around your shapes without seam allowances to make the shapes you need and add 1/4" on edges for seams. If you mark your points for a few times when sewing your seams, you will get the hang of the overlaps at the ends, and the piecing will be easier. Hope I explained this so you can understand.
09-24-2015, 07:37 AM
#15
Power Poster
Join Date: May 2008
Location: MN
Posts: 24,450
Originally Posted by yngldy
I look at making your pattern a little differently. Your pattern exist of one black triangle; a gray piece consisting of 3 triangles point up, down, up; and yellow of 4 triangles, up, down, up, down. (Look at the gray and divide it into 3 triangles, 1 pointing down, middle up, next one down.) What ever size triangle you want to use will work, and angles will be correct. Just draw around your shapes without seam allowances to make the shapes you need and add 1/4" on edges for seams. If you mark your points for a few times when sewing your seams, you will get the hang of the overlaps at the ends, and the piecing will be easier. Hope I explained this so you can understand.
 )
)By the way - I named this attachment "better"
I stand by my "how to pin a triangle to another piece" explanation.
Last edited by bearisgray; 09-24-2015 at 07:46 AM.
09-24-2015, 04:16 PM
#17
Super Member
Join Date: May 2012
Location: S.E. Queensland, Australia
Posts: 1,463
After checking out the rest of those measurements I drew it up again and decided your triangle base has to finish at 4". I would cut the fabric with a base of 5" with a height of 6". After the points are trimmed it should fit perfectly, almost. the seam allowance may be a tad generous.
After my earlier disaster posting images I won't try another.
After my earlier disaster posting images I won't try another.
09-24-2015, 11:22 PM
#19
Super Member
Join Date: Jun 2010
Location: England Alton Towers
Posts: 6,674
Originally Posted by PenniF
If it were me...i'd paper piece this one. Draw it out in a segment....the gray, black and yellow - with seam allowances around the entire outside perimeter only. (remember you need a mirror image if you want it exactly like your picture)...and then make enough copies. This pattern just calls out for paper piecing....and even if you haven't done it before, it would be a very easy one. Best of good luck.
09-25-2015, 05:51 AM
#20
Super Member
Join Date: May 2012
Location: Central Wisconsin
Posts: 4,391
On bearisgray's drawings, you can see that the triangle piece does not need the tip. If you laid your template/pattern on a strip, it would not need to be wider than the other strips, and you cut the triangles with no tips. That gets cut off anyhow.
Sewing with those tips gone makes it much easier to line up the pieces. I did triangles with strips around, and found it was much easier after all the tips were gone.
Sewing with those tips gone makes it much easier to line up the pieces. I did triangles with strips around, and found it was much easier after all the tips were gone.
Last edited by maviskw; 09-25-2015 at 05:55 AM.

Thread
Thread Starter
Forum
Replies
Last Post
jetnica
Main
9
07-12-2010 07:45 AM
