
Design wall questions...I want one in my sewing room
 09-16-2017, 04:42 AM
#31
Senior Member

Join Date: May 2008
Location: San Antonio, Texas
Posts: 568
I bought a large foam board. My husband cut it in half. I covered it with white flannel, wrapped the edges to the back and taped them with wide masking tape. I chose not to mount them because it makes them portable. I use one for smaller quilts and for larger quilts I set two of them side by side. I just prop them up along my sewing room wall. When not in use, they fit perfectly behind my sewing room door.
 09-16-2017, 09:06 AM
#32
Power Poster
Join Date: Jan 2009
Location: Reno, Nv
Posts: 16,518
I mounted a long designer curtain rod over my sliding closet doors. My wall space is limited and that was the only available space to have a design wall. I started out with a large flannel sheet and it works fine, but, I am thinking of making a felt one instead. It would be nice not to have to pin the blocks on.
I take it down when it is not in use. That way I can use the rod the hang clothing on ironing day or to hang items that need repair or altering. My fabric stash and many tools are stored in my closet, and I hated drawing the design board up like a drape to one side. Especially if I had blocks on it. So I put it up only when I need it and keep it folded up when I don't.
By the way lilbitoheaven, I like how you used your baker's rack for your rulers and machine storage.
Last edited by RedGarnet222; 09-16-2017 at 09:09 AM.
09-16-2017, 06:34 PM
#33
Super Member
Join Date: Nov 2009
Location: S C michigan
Posts: 2,118
I used insulation boards, mounted on the wall by hubby and 5 yr old grdsn helping. I put flannel on it, and have to use pins. at the time I didn't want to spend the money on felt. but like the idea of the tablecloths, and using the back side. my straight pins work just fine tho.
09-17-2017, 12:39 PM
#34
Senior Member
Join Date: Jan 2011
Location: Richmond, VA
Posts: 601
Originally Posted by kinminis

I have read online several ideas about a design wall, but can't make up my mind what works best to keep the blocks on the wall without falling off. What do you use to cover the styrofoam insulation? I have read some people use anti-pill fleece, flannel or felt, other have said Warm and Natural batting works.
I would like your opinions and also photos of your design wall. I have wall space of 82" x 82" to mount the design wall.
What worked best for you to apply your covering to the styrofoam.....staples, duct tape, glue, etc.?
I have also read using Command mounting strips work to mount the styrofoam to the wall....I can't put nails in the wall.
Any suggestions would be greatly appreciated! I am tired of running to the spare bedroom to lay out my blocks, then have to remove them if the kids come for the weekend. We have a small dog so laying blocks on the floor is not an option either.
Thanks in advance.
09-17-2017, 03:14 PM
#35
Super Member
Join Date: Jan 2010
Location: Texas
Posts: 5,500
I use Warm and Natural attached to insulation board with duct (duck?) tape. Mine just leans against the closet/wall and I move it when I need to. It has worked great since I started quilting, which was 7 years ago. The board I bought had the pink panther on the back and was 4 feet by 8 feet. I cut about a foot off of the top, and now I wish I hadn't.
I have added a picture of it, in case that is helpful.
Dina
I have added a picture of it, in case that is helpful.
Dina
09-18-2017, 06:43 PM
#36
Senior Member
Join Date: Aug 2010
Location: Beaverton,Michigan
Posts: 802
I used to have a flannel sheet attached to the wall but when I moved and set up I didn't have wall space so I watched craiglist and picked up an office divider that had cloth on it but fabric wouldn't stay stuck so I used the same flannel sheet to cover it with and stretched tight and thumb tacked onto back side trim. If you have floor space.
09-19-2017, 12:46 AM
#37
Senior Member

Join Date: May 2011
Location: Central Ohio
Posts: 988
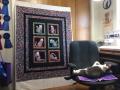
I used two pieces of 2" foam insulation and W&N for mine. The W&N holds perfectly. I also drew a level line across the center of the boards after they were hung so I could line things up nice and straight. Using 2" foam allows me to use any length straight pins, which lay completely flat when I push them in, instead of sticking out.
[ATTACH=CONFIG]580835[/ATTACH]
[ATTACH=CONFIG]580835[/ATTACH]
Last edited by cindi; 09-19-2017 at 12:50 AM.
09-19-2017, 06:20 AM
#38
Super Member
Join Date: Jun 2012
Location: Sonoma County, CA
Posts: 4,299
My design wall is a layer of headliner foam, covered by a layer of batting, covered by a layer of flannel; all thumbtacked up to the wall.
Things stick to the flannel pretty well, though I do slide a few pins in if I'm putting up anything larger than a couple blocks.
I also tend to work on multiple things at once, so often I will decide I need "more" design wall - usually I don't want to take down what's up there but I want to work on something else - in that situation I pin a large old bedsheet up over the current work and then roll out another spare batting I keep on hand and pin that over the whole shebang - now I have a fresh design wall layer! If I need to get at the layer below I can just pull the bottom of the bedsheet out a bit (it's very long) and fold it over the bottom of my new design wall and then roll those two layers up - the sheet keeps the blocks from sticking to the wrong side of the batting and it can all be unrolled again neatly when I am ready to go back to project #2.
It's a little crazy sounding but it really works for me. I often have "my own" project going but work on simpler things with my "students" so it's very useful for me to be able to switch between projects or create a fresh space for someone else's work to temporarily reside.
And yes, I thrive in chaos. LOL!
09-21-2017, 08:07 PM
#39
Super Member
Join Date: May 2011
Posts: 4,688
DSIL made my design wall. He built a frame using 2 pieces of insulation board and 1x2 pieces of wood around the outside and in the middle of each piece of insulation board. I attached warm and natural using hot glue. DSiL then attached the whole thing to studs in my sewing room and there is stayed for 15 years. When we moved 3 years ago, we took it down and moved it to my new sewing room. I had to replace the W&N because it got really dirty, but the insulation board was in great shape. I use pins if I am using long strips, but for blocks I don't need anything.
09-24-2017, 11:47 AM
#40
Member
Thread Starter
Join Date: Dec 2011
Posts: 35
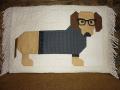
Hubby put up my design wall today! I will love it, no more laying loose blocks on the bed or floor for the dog to walk on. The large one measures 81" wide x 48" long. I had limited room on the wall so we had to cut off 15" of the 4' x 8' insulation board. I did not want to waste the small 15" x 48" piece we cut off the main insulation board, so I made a small design board.
It's is not big enough for an entire quilt, but it's a start. I plan on putting up another design board to mount on the "empty" wall to the left of the current large design wall. We used gorilla tape to attach the Warm & Natural batting to the board and then mounted the boards with Command strips, since we could not nail into the wall. Thank you for all of your replies and suggestions, it made this project much easier with your help!
[ATTACH=CONFIG]581097[/ATTACH] [ATTACH=CONFIG]581098[/ATTACH]

Thread
Thread Starter
Forum
Replies
Last Post
craftybear
Links and Resources
6
08-22-2011 05:12 PM
craftybear
Main
35
05-20-2011 01:45 PM
craftybear
Links and Resources
5
05-18-2011 07:04 AM
