
Tutorial showing how to work on a Singer motor?
 07-28-2012, 05:52 PM
#1
Super Member
Thread Starter

Join Date: Jan 2012
Location: USA
Posts: 1,625
Is there a tutorial or video showing how to work on a Singer motor? I'm replacing the wiring and while I'm in there I'd like to clean out the old grease in my 201, 15-91 and 66-15. I've searched a few places but not having any luck. Can someone point me in the right direction?
I'm mechanically inclined... I replaced the gaskets on the valve covers on my John Deere a couple months ago. Can do minor repairs on a car engine (replace brakes, alternator, starter, fuel injectors, plugs, that sort of thing) so I'm sure I can handle a sewing machine motor. I'd rather not go into the motor blindly that's all.
I'm mechanically inclined... I replaced the gaskets on the valve covers on my John Deere a couple months ago. Can do minor repairs on a car engine (replace brakes, alternator, starter, fuel injectors, plugs, that sort of thing) so I'm sure I can handle a sewing machine motor. I'd rather not go into the motor blindly that's all.
Last edited by Christine-; 07-28-2012 at 06:00 PM.
 07-28-2012, 07:36 PM
#2
Super Member

Join Date: Jul 2012
Location: Not Here
Posts: 3,817
This is the one I followed to rewire my 15-91. Should work for the others as well.
Hah! I bet the link would help.
http://vssmb.blogspot.ca/2012/01/com...ted-motor.html
Hah! I bet the link would help.
http://vssmb.blogspot.ca/2012/01/com...ted-motor.html
07-29-2012, 03:59 AM
#3
Power Poster
Join Date: Mar 2011
Location: Somewhere
Posts: 15,506
In case anybody is interested, Glenn is coming to my shop next weekend and we are going to mess with wiring problems. I have a hundred or so machines in dire need. You wouldn't even have to bring your own machine... PM if interested.
07-30-2012, 12:05 PM
#5
Super Member
Join Date: May 2010
Location: Round Rock,Texas
Posts: 6,135
Sharon W.
07-30-2012, 03:57 PM
#6
Power Poster
Join Date: Mar 2011
Location: Somewhere
Posts: 15,506
I wish we could get Muv to show up with her video and sweet explanations... I'm going to try to get as many pics as I remember to do. Some times I get so absorbed I forget. Pat and Glenn are coming Saturday!!! I'm so excited. We are going to show them some of the local spots - well, hit up all the junk stores and mess around in the shop. I need to spend a week in there cleaning... I can't lift anything - I hurt my shoulder... Probably stay up all night talking like we did at Glenn's house. Anyway, Skip has been holding out on us. Pat says his job in the military was to rebuild/repair small machinery. She says he is very good at showing how it is done and she says he LOVES an audience. HHHMMMMM. Pat knows him better than we do.
07-31-2012, 06:51 AM
#7
Super Member
Thread Starter
Join Date: Jan 2012
Location: USA
Posts: 1,625
One more question... the motor on my 201 doesn't have the typical motor brush caps. The machine was made in Canada, but someone put a 110 volt motor on it, made in New Jersey. I'm hesitant to take the motor apart until I can see photos or a video of what it looks like inside. The grease cups tell me where the brushes are located but I need to take the motor apart in order to reach them. Any suggestions?
Here's a photo:
[ATTACH=CONFIG]352693[/ATTACH]
Here's a photo:
[ATTACH=CONFIG]352693[/ATTACH]
07-31-2012, 07:23 AM
#8
Super Member
Join Date: Feb 2012
Posts: 8,091
Christine,
That motor is made out of Bakelite. If you twist it, drop it, hit it, or otherwise abuse it you will have a broken mess.
All of the wiring comes out the bottom of the motor into the little box formed by the motor mount where the two screws hold it together. The wiring is held together by those twist nuts. Very cramped, but if you follow the pattern from the old wiring you can rewire it.
If that motor is running I see no reason to take it apart. I rewire them from the bottom out if needed, but if they are running I lube them with Singer Motor Lube and leave them alone.
Here is what those motors look like inside.
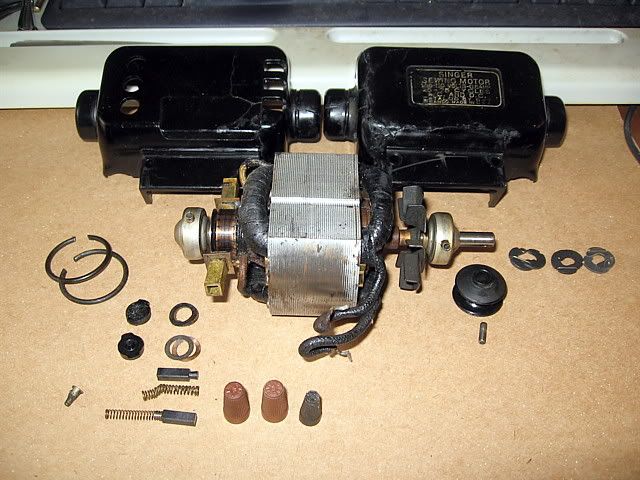
Yours is held together with two screws from the pulley end I think, this one was held together with a snap ring on each end. But inside I think they are similar.
Joe
That motor is made out of Bakelite. If you twist it, drop it, hit it, or otherwise abuse it you will have a broken mess.
All of the wiring comes out the bottom of the motor into the little box formed by the motor mount where the two screws hold it together. The wiring is held together by those twist nuts. Very cramped, but if you follow the pattern from the old wiring you can rewire it.
If that motor is running I see no reason to take it apart. I rewire them from the bottom out if needed, but if they are running I lube them with Singer Motor Lube and leave them alone.
Here is what those motors look like inside.
Yours is held together with two screws from the pulley end I think, this one was held together with a snap ring on each end. But inside I think they are similar.
Joe
07-31-2012, 07:46 AM
#9
Super Member
Thread Starter
Join Date: Jan 2012
Location: USA
Posts: 1,625
Thanks Joe! I haven't plugged this machine in yet, the wiring is in really bad shape. I don't know if the motor runs or not, but am assuming it's a good motor.
I was planning on replacing all the wiring on this machine EXEPT for the 2 wires coming out of the motor. They are the only wires in good shape. Bare copper is showing on all the other wiring.
I was planning on replacing all the wiring on this machine EXEPT for the 2 wires coming out of the motor. They are the only wires in good shape. Bare copper is showing on all the other wiring.
07-31-2012, 08:22 AM
#10
Super Member
Join Date: Feb 2012
Posts: 8,091
Christine,
Then you're good to go. You've probably got smaller fingers than I do so you'll not have as much trouble as I did.
I also have some wiring diagrams for that motor if you need them.
Oh, if that machine hasn't been run in a long time the motor will smoke and stink the first time you use it. Just ignore it and keep going. Mater of fact I've had more than one person tell me to take the belt off and run the motor at full speed until it cleans itself out. Done that a couple times with good results.
Joe

Thread
Thread Starter
Forum
Replies
Last Post
Beautiful_Sound
For Vintage & Antique Machine Enthusiasts
10
10-30-2015 08:36 PM
Bennett
For Vintage & Antique Machine Enthusiasts
41
05-02-2014 06:40 AM
miriam
For Vintage & Antique Machine Enthusiasts
45
04-09-2014 11:52 PM
craftybear
Links and Resources
1
09-19-2011 06:25 PM
wildyard
Pictures
21
01-18-2011 02:19 PM
