Time flies- it's time for our first fall posting already.
In Colorado, the heat of July has given way to more moderate temperatures, usually in the eighties. Many afternoons, clouds gather for a while, but we've only had occasional rain, which we need here.
It's back-to-school time and people are returning from vacations. This month we are featuring Courtney, who has had more than one project going.
Courtney
Courtney had a trip to the southern part of our state, to do some teaching about sewing machines. He tells us about this and other things he's been doing over the last month.
My sewing machine adventures this month started with the Scrappy Ladies Quilting Guild in Colorado City. I talked about the history of Featherweight sewing machines. Several of the ladies had Featherweights and I tried to answer their questions as best as possible. I arrived about 9:40 and everything was finished up shortly before Noon. I had a great time and I think the Scrappy Ladies also enjoyed themselves. After lunch, I started home and arrived about 5 PM. Colorado City is a bit over 200 miles from Greeley and on the way home I had forgotten to fill the car and almost ran out of gas! Ah, adventures. I had driven down to Colorado Springs the afternoon before and stayed with some good friends so I didn't have to leave Greeley at 5:30 AM and make the entire trip in one day.
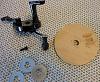
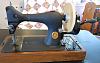
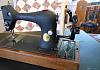
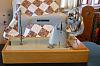
For my talk to the Scrappy Ladies, I had also taken a Willcox and Gibbs hand crank machine. After my presentation, a number of the ladies came up and were fascinated with the idea of a hand crank sewing machine. They had never seen one before. This got me thinking that an interesting future presentation might be on how to use a hand crank sewing machine. I do have two hand cranks, a Singer 201 and a Dutch EFKU. I have bought a couple of cheap hand cranks for little model 99s. They can be had for under $20. Unfortunately, for most machines besides a hand crank you also need a spoked hand wheel which can easily add another $20 to the project. I have a few machines that do have the required spoked wheels but I hate to borrow from them to put on another machine because that is how things get lost. Then the idea that I could perhaps make a required hand wheel out of wood. I had a small piece of 1/2 inch plywood so I cut out 3 circles about 6"� in diameter. (Six inches is about the largest diameter you can use, 5-3/4 inches would give a bit more clearance.) Then I drilled a 13/16 inch center hole. I found that three 3/4" washers would bring the thickness up to about 1" which is just what I needed. When I gave it a try, I found that the bobbin winders on the vintage Singers tended to get in the way. Rather than try to remove the bobbin winders I found that it was easier to remove the belt guard and the bobbin winders together (just one screw). To catch the hand crank tab I drilled a one inch hole about 1/4" deep in the wheel. Unfortunately, the tab did not quite catch the wheel at all times so I glued on a couple of small straight pieces of wood to make a good connection between the crank and wheel. Finally, I traced the lock motion washer on the wooden wheel and drove a small brad so that it would catch on the lock motion washer. I think you can barely see it in the first photo. When I put it all together it worked like a charm. (see attached photos)
Now that I know what I am doing I am going to make some wheels out of 3/4"�� MDF and a spacer out of 1/4" MDF. I can then forget about the washers. The 3/4" MDF is denser and thicker than the plywood I used which will give the wheel more inertia. If I sand the wheels and paint them black I think they will look respectable and work quite well. I think I can make 5 or 6 wheels in a couple of hours in the shop and save myself over $100. The beauty of all of this is that it is quick to set up. All I have to do is remove the motor (one screw) and belt guard (one screw) and replace the original wheel with my homemade one. To turn the machines back into electrics I simply remove the hand crank, replace the original wheel, then replace the belt guard and motor.
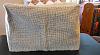
The local Lutheran Church a couple of blocks from my house had their annual garage sale and I found about 4 yards of quilted fabric which I am planning on making some carrying cases for some of my Featherweights. This got me thinking about making a cover for the EFKU hand crank machine that Chris and Cheryl gave me for my talks to 4th graders at History Fest. The machine is quite nice and had a pretty base but no cover. I have been worried that I will get really dusty while waiting for the next history fest. I found an old piece of upholstery fabric, just the right size. I quickly made up a simple cover. It's not fancy but it does seem to work quite well and I am sure my dust worries are over. I have enclosed a couple of pictures.
Courtney
In Closing
We will post here again next month. Until then please be well and thank you for reading.