
January 1, 2013 - Whirling Star 2 direction's & discussion.
 01-01-2013, 12:26 AM
#1
Super Member
Thread Starter
Join Date: Oct 2007
Location: Somewhere in SANTA Land.
Posts: 9,696
HAPPY NEW YEAR EVERYONE!! 
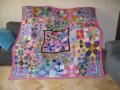
I have volunteered to pick the January BOM pattern for this month. It's called Whirling Star 2, from Quilter's Cache. This was such a fun block to make & I hope that everyone enjoy's making theirs. I chose to make my block, for this year, using floral fabric's with a pink & purple solid fabric. I can hardly wait to see how everyone makes their's.
Here's too................Yes, We can!!
http://www.quilterscache.com/W/WhirlingStar2Block.html
Last edited by SulaBug; 01-01-2013 at 12:28 AM.
 01-01-2013, 01:01 AM
#2
Administrator
Join Date: Nov 2006
Location: Southeast Georgia, USA
Posts: 9,136
Here's the link to the thread SulaBug started for our photos. Her block is sooooo pretty! 
http://www.quiltingboard.com/blocks-...s-t209786.html
I made some .pdf files for templates. They would come in handy for cutting out the pieces needed to put the block together with Y-seams. To ensure they print in the correct size, remember to set printer scaling to None in Adobe Reader.
I also made a file for paper piecing foundations. As with the templates, make sure to set printer scaling to None.
Both templates and foundation patterns are available at the Quilter's Cache site.
I just couldn't get my own printer to cooperate so I made my own.
Very happy to share.
I did mine using Y-seams.
they look scary but are easier than you'd think if you do one side of the Y at a time.
One very important thing to remember is to NOT sew all the way to the end of the pieces where they Y joins.
You need to leave the 1/4" seam allowance.
Otherwise getting the block to lay flat is somewhere between difficult and impossible.
Since there are 4 Ys, I marked the top piece for the first one.
[ATTACH=CONFIG]385168[/ATTACH]
Then I laid down a sticky note to mark the stopping place.
By using that as a reference, I didn't need to mark the remaining 3 pieces.
[ATTACH=CONFIG]385169[/ATTACH]
It's important, also, to remember to either do a lock-stitch or a few back stitches where you stop the seam.
I will be very happy to answer questions and provide tips.
__________________
- necessity is the mother of invention. lazy is the crazy aunt.

- for issues regarding the reminder emails, please contact [email protected]
Last edited by patricej; 01-01-2013 at 01:28 AM.


 01-01-2013, 12:43 PM
#8
Super Member

Join Date: Jun 2007
Location: British Columbia
Posts: 8,157
Hi Patricej, I'm trying your foundation piecing and I have the A/B/C/D pieces stitched but when I lay them out to decide their layout I am confused. I am using black for B2 C1 D1 and white for A1 B1 C2 and green for A2 D2 but I am ending up with a white corner.... I'll post a picture & see if you can tell me what I've done wrong, thanks! I think the C2 piece should really be green rather than the white colouring?[ATTACH=CONFIG]385229[/ATTACH]
Last edited by thimblebug6000; 01-01-2013 at 12:48 PM.
01-01-2013, 01:48 PM
#9
Administrator
Join Date: Nov 2006
Location: Southeast Georgia, USA
Posts: 9,136
i've put yellow in this example where you need the 4th fabric to go.
[ATTACH=CONFIG]385241[/ATTACH]
__________________
- necessity is the mother of invention. lazy is the crazy aunt.
- for issues regarding the reminder emails, please contact [email protected]
01-01-2013, 02:25 PM
#10
Super Member

Join Date: Apr 2011
Location: tennessee
Posts: 1,555
I just did mine and the color was challenging...I was praying I had it right as I was putting it together! I should of had more contrast on one part...don't think I am going to do a 'do over' ...tomorrow, I will decide....it is a pretty pattern...

Thread
Thread Starter
Forum
Replies
Last Post
SulaBug
Blocks of the Month and Week
5
08-02-2014 10:19 AM
SulaBug
Blocks of the Month and Week
5
07-08-2014 06:25 PM
SulaBug
Blocks of the Month and Week
17
04-30-2014 10:16 PM
paperpieceme
Blocks of the Month and Week
9
04-18-2014 03:36 AM
SulaBug
Blocks of the Month and Week
238
03-29-2013 07:59 AM
