
Tumbling my Tumblers
 09-30-2018, 10:33 AM
#1
Super Member
Thread Starter

Join Date: Dec 2015
Location: Ontario, Canada
Posts: 4,348
I used my GO! to make enough Tumblers for a queen sized quilt. I used scraps but there were still more than one tumbler out of some fabrics. I was trying everything to mix them up, so I could just grab them out of the bag as I went along without the likelihood of grabbing two the same when I thought....
Hey! Why don't I really tumble them? Into the dryer they went for 20 minutes with no heat and they are now all mixed up and ready to go.
Watson
Hey! Why don't I really tumble them? Into the dryer they went for 20 minutes with no heat and they are now all mixed up and ready to go.
Watson

 09-30-2018, 10:59 AM
#3
Super Member
Join Date: Aug 2018
Location: Greater Peoria, IL -- just moved!
Posts: 6,056
Good solution! I did a crazy quilt out of "ugly" ties from the 70s. Once I had them gutted and washed I put them in a black plastic garbage bag, shook it out some more and pulled 10 out with my eyes closed and put them into brown paper lunch bags. Then I had to use all 10 (and only those 10) in each crazy block.
It was good for me, I came out of the exercise really feeling free. I'm usually a bit too organized for someone who works in mostly scraps and charms.
One thing I've found over the past 20+ years is no matter how hard I try to keep fabrics away from each other, they always somehow end up right next to the one I was avoiding. LOL there might only be 4 orange pieces in an entire queen size quilt but somehow they are all within a foot of each other. I've learned to let it go and accept it and that no one else but me is likely to notice.
On my current project, a top made up of sailboats each unique along with different water, I laid out my blocks and was happy with them, I think I kept them in the correct order. At least I thought they were ordered when I put on block numbers (alpha goes across, numbers go down). Even though there were only 12 blocks now that the top is completely put together I put two of the red hulled boats right next to each other, and I'm not so happy about two of the water choices next to each other either. Oh well... the old me would have taken the top apart and switched some of the blocks around. The new me figures there's always next time!
 10-02-2018, 05:44 AM
#7
Super Member
Join Date: Aug 2010
Location: Michigan Thumb
Posts: 1,956
Originally Posted by Watson

I used my GO! to make enough Tumblers for a queen sized quilt. I used scraps but there were still more than one tumbler out of some fabrics. I was trying everything to mix them up, so I could just grab them out of the bag as I went along without the likelihood of grabbing two the same when I thought....
Hey! Why don't I really tumble them? Into the dryer they went for 20 minutes with no heat and they are now all mixed up and ready to go.
Watson
Hey! Why don't I really tumble them? Into the dryer they went for 20 minutes with no heat and they are now all mixed up and ready to go.
Watson
Boston1954 asked if you had any fraying, am really interested in that also.

 10-02-2018, 12:09 PM
#10
Super Member
Thread Starter
Join Date: Dec 2015
Location: Ontario, Canada
Posts: 4,348
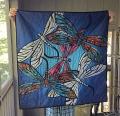
I did have some fraying on some but not enough to worry about in my opinion. I think because it was cut so precisely with the GO it likely cut down on the fraying.
[ATTACH=CONFIG]601990[/ATTACH]
Watson
[ATTACH=CONFIG]601990[/ATTACH]
Watson

Thread
Thread Starter
Forum
Replies
Last Post
