
Table Runner has me stumped..
 01-17-2025, 09:37 AM
#1
Super Member
Thread Starter

Join Date: Dec 2015
Location: Ontario, Canada
Posts: 4,475
I love this table runner that I happened across but I can't quite figure out how to put it together. I see that it is three strips that have a black "snowball" on the corner, but how do you then put the strips together? Just like a French Braid?
Can't seem to get the book here in Canada.
Any tips appreciated. I think I hurt my brain trying to figure it out!
Watson
Can't seem to get the book here in Canada.
Any tips appreciated. I think I hurt my brain trying to figure it out!
Watson
 01-18-2025, 07:55 AM
#3
Super Member

Join Date: Mar 2015
Location: Denver, CO
Posts: 4,669
This is what I posted in your other thread Table Runner has me stumped..
The table runner is from the book Tabletastic 2 Quilt Book that Watson said could not get in Canada. https://www.fatquartershop.com/tabletastic-2-quilt-book
Here are a couple other showing the other way https://www.pinterest.com/pin/272538214946763043/ and https://sewhappybysarah.com/2021/07/...-table-runner/
It looks like it is a combination of Staggered Flying Geese and French Braid. I found this image that might help but you would need to extend the sides for the three strip pieces.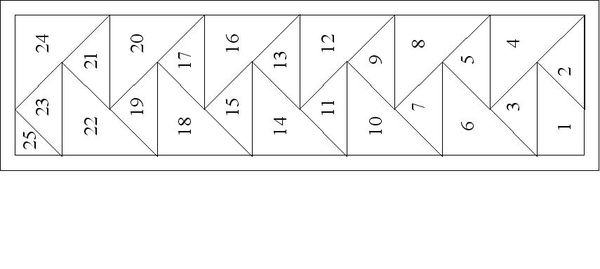
I found at this post - Staggered Flying geese
Last edited by OurWorkbench; 01-18-2025 at 07:59 AM.
01-19-2025, 07:27 AM
#5
Super Member
Join Date: Mar 2015
Location: Denver, CO
Posts: 4,669
I played around a bit and possibly the original diagram got numbers 1 and 2 transposed so I changed those.. So the strip pieces would be the even numbers in my edited diagram and the odd number be the solid color. I would think that one would join 2 (the strips) to 3 (solid) to add to 1 (solid color). Maybe this diagram will help.

01-19-2025, 07:56 AM
#6
Super Member
Join Date: Oct 2008
Location: The Finger Lakes of upstate NY
Posts: 3,819
I played around a bit and possibly the original diagram got numbers 1 and 2 transposed so I changed those.. So the strip pieces would be the even numbers in my edited diagram and the odd number be the solid color. I would think that one would join 2 (the strips) to 3 (solid) to add to 1 (solid color). Maybe this diagram will help.
This looks like it would be exactly what OP is looking for. I'm crazy impressed!
01-19-2025, 10:25 AM
#7
Power Poster
Join Date: May 2008
Location: MN
Posts: 25,198
I played around a bit and possibly the original diagram got numbers 1 and 2 transposed so I changed those.. So the strip pieces would be the even numbers in my edited diagram and the odd number be the solid color. I would think that one would join 2 (the strips) to 3 (solid) to add to 1 (solid color). Maybe this diagram will help.
When i was playing with it a had joined 2 to 3 and attached that to 1.
1.and then attached 4 to 5 and attached that to triangles 1 and 3.
I like your method better.
01-19-2025, 11:09 AM
#8
Super Member
Join Date: Mar 2015
Location: Denver, CO
Posts: 4,669


