
* I SPY SWAP* Join by May 12th, 2014
 05-03-2014, 12:55 PM
#71
Senior Member
Join Date: Mar 2014
Location: Colorado
Posts: 479
Library Lil -
For the books, I basically followed the tutorial on Skip to my Lou (hope this link works):
http://www.skiptomylou.org/2011/09/1...ic-i-spy-book/
But I did not use a wonky piecing. I just used mostly square charms. I pieced the pages first. On my first book, it was very randomly sewn together....lots of work. On the following books, I did two "columns" - first was 5" square on top of either two 2 1/2 inch squares or a 2/ 1/5 X 5 strip (this was easier by far). Second column had the smaller piece(s) on top and another 5 inch on bottom....so your two 5 inch blocks are overlapping by a row when you place them side by side. See the pictures in the post-book-making party thread for an idea of what I mean by that.
When I had four or six pieced pages, I cut an equal number of full size page pieces with lots of objects on them. I cut these to the trimmed size of the other pages. Sew these together into two equal strips, alternating pieced and full pages. Iron fusible fleece onto the wrong side of the back strip. Lay the front strip on top of the back strip, right sides facing. Pin and sew all the way around leaving a four inch gap in one of the full pages for turning. Turn, push out the corners, iron, and sew a very close seam along the side with the gap - all the way across. Stitch in the ditch along page seams.
Iron accordion style, and sew a ribbon to the back page. You can make a tab instead, as I did in my first one and as she does in the tutorial...BUT make sure you attach this, facing inward before you sew around the two strips. I choose the ribbon because I didn't care for the way the accordion style still left the back open, and I was also looking for a quick way to add a closure to the books.
That's it! Have fun!
 05-04-2014, 07:09 AM
#72
Member
Join Date: Sep 2013
Location: Charlotte, NC
Posts: 94
Thanks! I really want to try it! I take it you used 5" squares instead of the 6 1/2 in the tutorial? I think 5" will work better for me since I have so many. And I'm more likely to have 5" long batting scraps.
For those who also need the tutorial, the link didn't completely work, but it did get me to Skip to My Lou. From there, I used her search function and typed in "I Spy Book" and that found it.
For those who also need the tutorial, the link didn't completely work, but it did get me to Skip to My Lou. From there, I used her search function and typed in "I Spy Book" and that found it.
05-05-2014, 04:53 AM
#74
Senior Member
Join Date: Mar 2014
Location: Colorado
Posts: 479
Ok, two things....
first, Library Lil - the blocks were 5" and 2.5" but when assembled, the whole page was about 7 x 5 1/2 (some came out at 8 x 6).
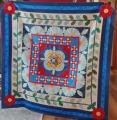
second, regarding fussy cutting....I always thought this meant getting at least one whole image in the square (remembering to visually take away the 1/4-inch seam) but not necessarily dead center. So, it hit me that this may not be the true definition. Can someone clarify for me? For instance, I personally would accept these in the picture below...but maybe someone else would be unhappy with this? If so, I might have to substitute some fabric. If it does need to be dead center, I'll have more questions.
first, Library Lil - the blocks were 5" and 2.5" but when assembled, the whole page was about 7 x 5 1/2 (some came out at 8 x 6).
second, regarding fussy cutting....I always thought this meant getting at least one whole image in the square (remembering to visually take away the 1/4-inch seam) but not necessarily dead center. So, it hit me that this may not be the true definition. Can someone clarify for me? For instance, I personally would accept these in the picture below...but maybe someone else would be unhappy with this? If so, I might have to substitute some fabric. If it does need to be dead center, I'll have more questions.
05-05-2014, 09:32 AM
#76
Super Member
Thread Starter
Join Date: Nov 2010
Posts: 6,006
Those are good to me as well. As long as the chicken isn't cut apart on all four sides and nothing in the middle. It is to my thinking as well as long as one image is whole on the fabric and yours are fine.
I'm sure more will be on their way to let us know. I'm a self taught sewer and learned a lot when I joined the quilting board. So I'm not always the best to give directions. Just what I have learned over the years and what others have helped me with. But I'm sure each quilter does something different than the other and have different terms for fussy cutting.
I'm sure more will be on their way to let us know. I'm a self taught sewer and learned a lot when I joined the quilting board. So I'm not always the best to give directions. Just what I have learned over the years and what others have helped me with. But I'm sure each quilter does something different than the other and have different terms for fussy cutting.
Last edited by owlvamp; 05-05-2014 at 09:35 AM.


Thread
Thread Starter
Forum
Replies
Last Post
owlvamp
Member Swaps and Round/Row Robins
173
06-28-2014 02:31 PM
lauriejo
Member Swaps and Round/Row Robins
449
06-05-2014 09:53 AM
owlvamp
Member Swaps and Round/Row Robins
156
05-03-2014 03:54 PM
charlotte37830
Member Swaps and Round/Row Robins
67
02-25-2014 06:38 AM
