Go Back  Quiltingboard Forums >
  • Pictures
  • Hexi Project--Stick a fork in it, it is Done! >
  • Hexi Project--Stick a fork in it, it is Done!

  • Hexi Project--Stick a fork in it, it is Done!

    Thread Tools
     
    Old 01-15-2018, 11:40 AM
      #11  
    Super Member
     
    Join Date: Feb 2014
    Location: Wis
    Posts: 5,928
    Default

    It's really beautifully done
    Doggramma is offline  
    Old 01-15-2018, 12:14 PM
      #12  
    Power Poster
     
    Join Date: Jul 2010
    Location: McLoud, OK
    Posts: 13,264
    Default

    Congratulations on a beautiful finish.
    Homespun is offline  
    Old 01-15-2018, 03:08 PM
      #13  
    Super Member
     
    Join Date: Aug 2016
    Posts: 3,304
    Default

    Good job!!
    jlt37869 is offline  
    Old 01-15-2018, 03:20 PM
      #14  
    Super Member
     
    Join Date: Jun 2010
    Location: USA
    Posts: 5,813
    Default

    You surely have the patience of a saint. So pretty. I love it.
    QuiltingNinaSue is offline  
    Old 01-15-2018, 03:51 PM
      #15  
    Super Member
     
    patsan's Avatar
     
    Join Date: Apr 2017
    Location: Long Island
    Posts: 1,323
    Default

    That's really so nice!
    patsan is offline  
    Old 01-15-2018, 03:54 PM
      #16  
    Super Member
     
    Join Date: Mar 2011
    Location: in the sticks of PA
    Posts: 2,313
    Default

    You should be very proud of yourself it's beautiful.
    Ariannaquilts is offline  
    Old 01-15-2018, 04:30 PM
      #17  
    Super Member
    Thread Starter
     
    Join Date: Jan 2012
    Location: NE Missouri
    Posts: 6,418
    Default

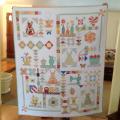
    I am not going to make it square. It is going to stay a hexagon. Thanks for the leads to bind the edges. I want to maintain the individual hexagon shapes on edge. When you do the birthing method, does anyone else have "extra" on the back side? I have done this and the back tends to be baggy. Do you make it slightly smaller to begin with?
    Quilter 65 is offline  
    Old 01-15-2018, 05:02 PM
      #18  
    Power Poster
     
    Join Date: Apr 2011
    Location: Ontario, Canada
    Posts: 18,351
    Default

    Originally Posted by Kitsie
    Thanks for posting the link Kitsie ... great youtube tutorial.

    Congratulations Quilter65 ...
    You have done yourself proud with this beautiful labour of love!

    Last edited by QuiltE; 01-15-2018 at 05:05 PM.
    QuiltE is offline  
    Old 01-15-2018, 06:42 PM
      #19  
    Super Member
     
    Teen's Avatar
     
    Join Date: Dec 2017
    Location: Southwest Idaho
    Posts: 6,000
    Default

    Congratulations on this beautiful finish and labor of love. It really is gorgeous. I don't know why you can't bind like normal binding. Just do a miter at each turn/corner. Or I suppose you could cut binding on the bias but I like the miter' sharp corner/angles for something like this. Well done...
    Teen is offline  
    Old 01-15-2018, 07:17 PM
      #20  
    Power Poster
     
    Join Date: Dec 2010
    Location: California
    Posts: 14,723
    Default

    Super. BrendaK
    BrendaK is offline  
    Related Topics
    Thread
    Thread Starter
    Forum
    Replies
    Last Post
    Quilter 65
    Pictures
    12
    11-09-2013 04:02 PM
    Caroline S
    Main
    3
    03-20-2012 08:38 PM
    MisBehavin'
    Introduce Yourself
    28
    07-16-2011 07:35 PM
    p38flygirl
    Main
    2
    03-23-2011 04:21 AM
    0tis
    Main
    5
    09-11-2010 07:13 AM

    Posting Rules
    You may not post new threads
    You may not post replies
    You may not post attachments
    You may not edit your posts

    BB code is On
    Smilies are On
    [IMG] code is On
    HTML code is On
    Trackbacks are Off
    Pingbacks are Off
    Refbacks are Off


    FREE Quilting Newsletter