
Up date on quilt repair
 08-22-2014, 12:45 PM
#1
Senior Member
Thread Starter
Join Date: Oct 2011
Location: Cape Cod
Posts: 490
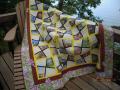
Last June I posted some pictures of my a quilt that my niece and eh husband ha inherited, asking for advice on how to repair it. She came to visit me last month and brought the quilt with her. We went to my LQS to see what they suggested. We decided to buy some reproduction prints and replace only the damaged squares in the blocks. For a young lady that doesn't sew I am very proud of the start she has made. These are her words:
Tonight I chose to start with the block with the most need for repair. The pink block had a few corners fraying, so I reinforced them with the adhesive material and secured the corners with the existing squares. Then, I started with the first tan square!
I was a little bit hesitant at first because it looks so much more raised than the existing quilt. However, smaller and tighter stitches really seemed to help. Still, it isn't exactly level with the existing material. I think ill iron out the square a bit more on the next one..


Thread
Thread Starter
Forum
Replies
Last Post
