
Vintage Linens Whole Cloth
 02-09-2015, 04:02 PM
#1
Super Member
Thread Starter

Join Date: Jun 2010
Location: Flagstaff, AZ
Posts: 2,082
I'm almost finished with a whole cloth quilt I started a couple of weeks ago in a Cindy Needham Whole Cloth Quilt workshop in Phoenix.
I began practicing free motion quilting skills about 5 years ago, and first encountered Cindy Needham’s gorgeous linen quilting work in 2012 when she was a guest expert on SewCalGal’s Free Motion Quilting Challenge. I loved the linen whole cloth work Cindy had posted on her web site, and when she started offering on-line classes through Craftsy, I took advantage of the opportunity to learn more about her techniques. I feel like Craftsy is the next best thing to in-person workshops, but when I saw that Cindy was going to be in Phoenix (a mere 3 hour drive from home), I signed up right away!
Then I started digging through my small collection of vintage linens, picked out a few “class project” options, put together some fabrics for underlayment and backing, prepared some gourmet batting following Cindy’s method using a half a layer of wool on top of a firmer batting layer, and began waiting anxiously for January 22[SUP]nd[/SUP] and the first day of the workshop to come.
Finally it was time to load up my quilting supplies and head south where I got to spend 2 fun and informative days with Cindy learning about her process of working with vintage linens! After seeing some of Cindy’s gorgeous pieces, and listening to her talk about all kinds of wonderful techniques she uses to enhance vintage linens, my head was swimming with ideas. Although I had brought along a couple of “special” linens, I knew I should heed Cindy’s advice and start with some pieces that didn't hold a lot of sentimental value to me, so I chose four matching embroidered doilies and a rather plain bread basket liner with some cutwork on the tips. I planned to arrange them on a solid background fabric that would give me a lot of open space to experiment with layering a whole cloth quilting design.
In the workshop Cindy provided a huge selection of stencils to choose from, and I picked out a couple that could be layered underneath the linens to create some visual depth. This was my first time utilizing stencils in a large project and I was pleasantly surprised at how easy it was to stitch the designs after they were marked!
During the 2-day workshop, I was able to plan and mark my whole cloth top fabric, determine the exact placement for the linen pieces, and get a good start on the actual quilting process. Cindy was there to answer all kinds of questions about how to work with stencils, how to attach the linens onto my quilt top and what steps to take in what order to ensure a successful project. It was also wonderful meet other participants and to learn from the variety of whole cloth and linen projects they were working on. And, I learned a new free motion technique Cindy calls scribbling! I used it in the background of the stencil design on the center bread basket liner and love the way it enhances the design.
Two weeks later, my “Vintage Doilies” piece is almost complete. It is quilted, blocked, the binding is attached, and I am in the process of finding just the right beads to enhance the crosshatching and the lace around the doilies.
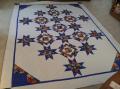
This quilt measures about 40" square.
The whole quilt
[ATTACH=CONFIG]509486[/ATTACH]
Detail of a corner doily
[ATTACH=CONFIG]509487[/ATTACH]
And a closeup view of the center
[ATTACH=CONFIG]509488[/ATTACH]
This quilt makes me smile!
I began practicing free motion quilting skills about 5 years ago, and first encountered Cindy Needham’s gorgeous linen quilting work in 2012 when she was a guest expert on SewCalGal’s Free Motion Quilting Challenge. I loved the linen whole cloth work Cindy had posted on her web site, and when she started offering on-line classes through Craftsy, I took advantage of the opportunity to learn more about her techniques. I feel like Craftsy is the next best thing to in-person workshops, but when I saw that Cindy was going to be in Phoenix (a mere 3 hour drive from home), I signed up right away!
Then I started digging through my small collection of vintage linens, picked out a few “class project” options, put together some fabrics for underlayment and backing, prepared some gourmet batting following Cindy’s method using a half a layer of wool on top of a firmer batting layer, and began waiting anxiously for January 22[SUP]nd[/SUP] and the first day of the workshop to come.
Finally it was time to load up my quilting supplies and head south where I got to spend 2 fun and informative days with Cindy learning about her process of working with vintage linens! After seeing some of Cindy’s gorgeous pieces, and listening to her talk about all kinds of wonderful techniques she uses to enhance vintage linens, my head was swimming with ideas. Although I had brought along a couple of “special” linens, I knew I should heed Cindy’s advice and start with some pieces that didn't hold a lot of sentimental value to me, so I chose four matching embroidered doilies and a rather plain bread basket liner with some cutwork on the tips. I planned to arrange them on a solid background fabric that would give me a lot of open space to experiment with layering a whole cloth quilting design.
In the workshop Cindy provided a huge selection of stencils to choose from, and I picked out a couple that could be layered underneath the linens to create some visual depth. This was my first time utilizing stencils in a large project and I was pleasantly surprised at how easy it was to stitch the designs after they were marked!
During the 2-day workshop, I was able to plan and mark my whole cloth top fabric, determine the exact placement for the linen pieces, and get a good start on the actual quilting process. Cindy was there to answer all kinds of questions about how to work with stencils, how to attach the linens onto my quilt top and what steps to take in what order to ensure a successful project. It was also wonderful meet other participants and to learn from the variety of whole cloth and linen projects they were working on. And, I learned a new free motion technique Cindy calls scribbling! I used it in the background of the stencil design on the center bread basket liner and love the way it enhances the design.
Two weeks later, my “Vintage Doilies” piece is almost complete. It is quilted, blocked, the binding is attached, and I am in the process of finding just the right beads to enhance the crosshatching and the lace around the doilies.
This quilt measures about 40" square.
The whole quilt
[ATTACH=CONFIG]509486[/ATTACH]
Detail of a corner doily
[ATTACH=CONFIG]509487[/ATTACH]
And a closeup view of the center
[ATTACH=CONFIG]509488[/ATTACH]
This quilt makes me smile!

 02-09-2015, 04:42 PM
#7
Super Member

Join Date: May 2009
Posts: 7,741
It should make you smile Wendy, you have done an excellent piece of art.
I have had the pleasure of meeting Cindy when she did a workshop in my city. She is a wonderful instructor. I have been going through her classes on Craftsy.
I have had the pleasure of meeting Cindy when she did a workshop in my city. She is a wonderful instructor. I have been going through her classes on Craftsy.


Thread
Thread Starter
Forum
Replies
Last Post
nygal
General Chit-Chat (non-quilting talk)
31
07-30-2012 07:31 PM
