
Will the Real 15 clone please stand up


 02-14-2012, 04:46 PM
#72
Super Member
Join Date: Feb 2012
Posts: 8,091
The little wire on your machine is NOT wrong. I have two and both of them are that way. There is more than one style of spring. Here is a picture of my HOTHER threaded correctly with red thread.
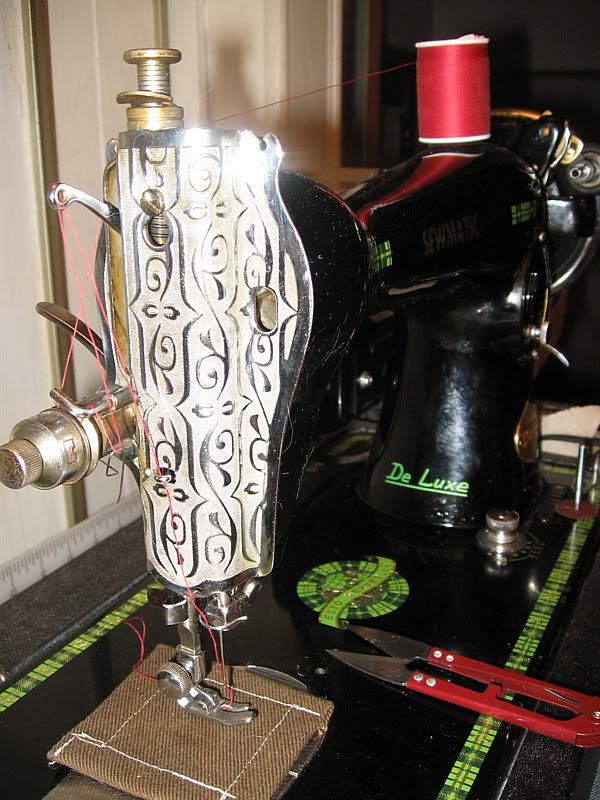
To thread the machine:
The thread from the spool goes to the thread guide on the back side of the face plate
Then down to the outside of the tensioner
Under the bottom of the tensioner then up and over the outside of the curved thread guide
Then under the bottom of the thead spring
From the spring up to the outside of the thread take-up lever
Then from the take-up lever down to the faceplate guide
Then to the guide on the needle arm
Then to the needle from the outside in, left to right as you're facing the machine.
I hope this helps.
Joe
02-14-2012, 04:53 PM
#73
Super Member
Join Date: Feb 2012
Posts: 8,091
One more comment. As I've been looking at all the beautiful machines I noticed that many of them have the presser foot down on the feed dogs. In many of the owners manuals I have there is a caution to not store the machines with the presser foot down on the feed dogs or to run the machine with the presser foot down and no material under the foot.
To keep the metal to metal contact to a bare minimum I make a little pad out of denim to put between the foot and feed dogs. You can see this pad in the pic above.
This is just a suggestion as I've replaced many presser feet that are badly scored by running on the dogs with nothing between them.
Joe
02-14-2012, 04:58 PM
#74
Power Poster
Thread Starter
Join Date: Mar 2011
Location: Somewhere
Posts: 15,506
Muv has a video about threading a Singer 15 - it also applies to the Japanese 15 clones!!!
http://www.youtube.com/watch?v=H2tii...re=uploademail get yourself a nice cup of tea and enjoy!!!
http://www.youtube.com/watch?v=H2tii...re=uploademail get yourself a nice cup of tea and enjoy!!!
02-14-2012, 05:01 PM
#75
Power Poster
Thread Starter
Join Date: Mar 2011
Location: Somewhere
Posts: 15,506
One more comment. As I've been looking at all the beautiful machines I noticed that many of them have the presser foot down on the feed dogs. In many of the owners manuals I have there is a caution to not store the machines with the presser foot down on the feed dogs or to run the machine with the presser foot down and no material under the foot.
To keep the metal to metal contact to a bare minimum I make a little pad out of denim to put between the foot and feed dogs. You can see this pad in the pic above.
This is just a suggestion as I've replaced many presser feet that are badly scored by running on the dogs with nothing between them.
Joe
To keep the metal to metal contact to a bare minimum I make a little pad out of denim to put between the foot and feed dogs. You can see this pad in the pic above.
This is just a suggestion as I've replaced many presser feet that are badly scored by running on the dogs with nothing between them.
Joe
02-14-2012, 05:33 PM
#78
Super Member
Join Date: Feb 2012
Posts: 8,091
So, now back to the regularly scheduled program:
Here are the pics of my HA-1 15 clones;
HOTHER:
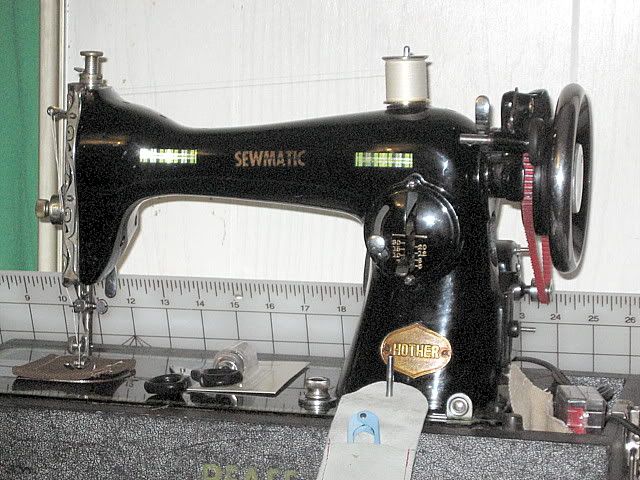
The HOTHER was my mothers machine and she sewed on it for decades. Towards the late 80s it started giving her trouble so she retired it when she bought a cabinet machine. Later she gave it to my wife. Somewhere about 90 or 91 we took her Singer 538 and the HOTHER to my late uncle Charlie who owned his own sewing machine shop. He fixed the HOTHER right up for us. After that she ended up on the bottom shelf of a wooden shelving unit in the sewing room. This shelf was against a wall that adjoined the bathroom. Unknown to use the bath tub had developed a rust hole and leaked. The water seeped under the wall and the shelf unit soaked it up. The HOTHER in it's case was on the bottom shelf and also soaked up a lot of water. The old paper/fabric on the case molded and the bottom warped and the latches rusted. But somehow inside the HOTHER endured unscathed. About three months ago I dug the HOTHER off the shelve and with great dread pulled the case of her. I was thrilled. NO rust. I plugged her in and she worked. YAYYYYYYY. Unfortunately the motor wires were melted. A chemical action I think.
So I put a new motor on her and bought a used case at the local sewing machine shop. I'm working on restoring the original case but other things get in the way.
Until I get the original case finished the HOTHER will live happily in the PHAFF case.
EDISON:
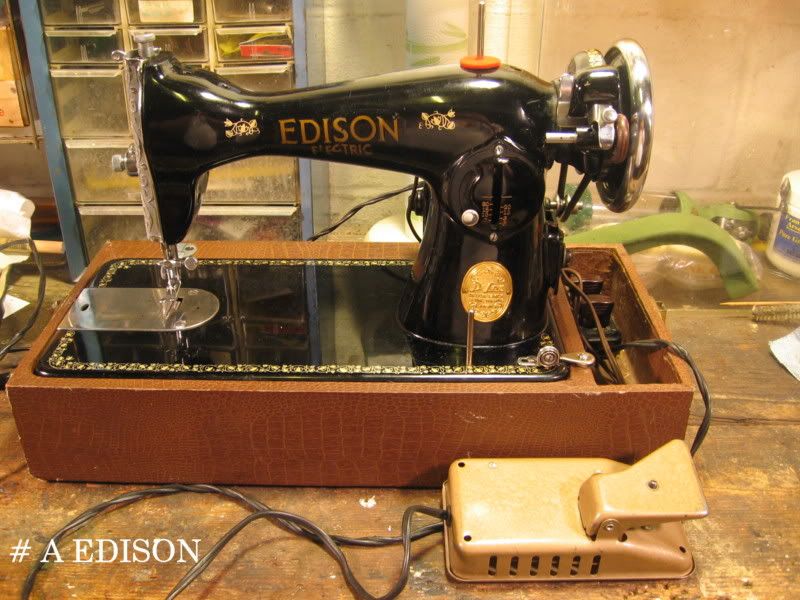
We actually bid on the EDISON because it came with a complete set of attachments, a button holer, a zig-zager, a bunch of bobbins and an instruction manual for the machine and the attachments. The machine is really nice looking to but that was secondary.
The auction house said pick up only so we made a day of it and drove to Terre Haute, IN to pick it up.
When we got it in the back of my Pathfinder I was looking through all the stuff inside and I noticed a ton of bent and broken needles inside the machine case. That was a big precursor to what was to come.
When we got it home I noticed there was an interference fit between the presser foot and the needle thread guide. The feed dogs were also miss-adjusted and were impacting on the needle plate.
I used Singer 15 instructions to do some adjusting and as soon as the presser foot, needle shaft and feed dogs were adjusted I tried to sew with it. NO WAY. This poor machine was also very much out of time. So I put it back for later attention. Another project for a rainy (snowy) day.
SEWMORE 404:
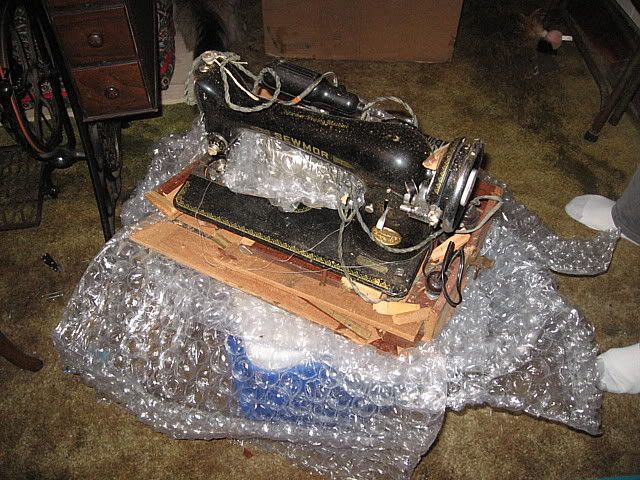
This machine just got here yesterday. This is what I found when we cut open the bubble wrap. The bottom of the case had litterally fallen apart. The top was in better shape but was also damaged.
From the photos from the sellers I knew the case was in bad shape but I hoped it would get to me intact. Oh well, I have lots of Elmers wood glue.
This machine is a kind of a cross between the Singer 66s with a couple features of the 15s. I'll get her cleaned up tomorrow and see if the LSMG has a case I can buy. Then I'll know for sure if she'll sew or if I'll have to coax and cajole her. More than likely I'll have to whisper sweat nothings in her hand wheel as I clean and oil her.
I want a blue one next.
Joe
Here are the pics of my HA-1 15 clones;
HOTHER:
The HOTHER was my mothers machine and she sewed on it for decades. Towards the late 80s it started giving her trouble so she retired it when she bought a cabinet machine. Later she gave it to my wife. Somewhere about 90 or 91 we took her Singer 538 and the HOTHER to my late uncle Charlie who owned his own sewing machine shop. He fixed the HOTHER right up for us. After that she ended up on the bottom shelf of a wooden shelving unit in the sewing room. This shelf was against a wall that adjoined the bathroom. Unknown to use the bath tub had developed a rust hole and leaked. The water seeped under the wall and the shelf unit soaked it up. The HOTHER in it's case was on the bottom shelf and also soaked up a lot of water. The old paper/fabric on the case molded and the bottom warped and the latches rusted. But somehow inside the HOTHER endured unscathed. About three months ago I dug the HOTHER off the shelve and with great dread pulled the case of her. I was thrilled. NO rust. I plugged her in and she worked. YAYYYYYYY. Unfortunately the motor wires were melted. A chemical action I think.
So I put a new motor on her and bought a used case at the local sewing machine shop. I'm working on restoring the original case but other things get in the way.
Until I get the original case finished the HOTHER will live happily in the PHAFF case.
EDISON:
We actually bid on the EDISON because it came with a complete set of attachments, a button holer, a zig-zager, a bunch of bobbins and an instruction manual for the machine and the attachments. The machine is really nice looking to but that was secondary.
The auction house said pick up only so we made a day of it and drove to Terre Haute, IN to pick it up.
When we got it in the back of my Pathfinder I was looking through all the stuff inside and I noticed a ton of bent and broken needles inside the machine case. That was a big precursor to what was to come.
When we got it home I noticed there was an interference fit between the presser foot and the needle thread guide. The feed dogs were also miss-adjusted and were impacting on the needle plate.
I used Singer 15 instructions to do some adjusting and as soon as the presser foot, needle shaft and feed dogs were adjusted I tried to sew with it. NO WAY. This poor machine was also very much out of time. So I put it back for later attention. Another project for a rainy (snowy) day.
SEWMORE 404:
This machine just got here yesterday. This is what I found when we cut open the bubble wrap. The bottom of the case had litterally fallen apart. The top was in better shape but was also damaged.
From the photos from the sellers I knew the case was in bad shape but I hoped it would get to me intact. Oh well, I have lots of Elmers wood glue.
This machine is a kind of a cross between the Singer 66s with a couple features of the 15s. I'll get her cleaned up tomorrow and see if the LSMG has a case I can buy. Then I'll know for sure if she'll sew or if I'll have to coax and cajole her. More than likely I'll have to whisper sweat nothings in her hand wheel as I clean and oil her.
I want a blue one next.
Joe
02-14-2012, 05:55 PM
#79
Super Member
Join Date: Feb 2012
Posts: 8,091
One of the first things I check when we get a new machine is the presser foot. In the last couple three months I've found at least five of those we bought had damaged presser feet. The SEWMORE I just got is really bad. Looks as if they actually ran the machine with the foot down on the feed dogs. So, I replace them.
I've found some that are pock marked on the top from needles too. My HOTHER foot is like that. I polished that down a bit and ran the bottom over some ceramic polishing plates to touch it up. It wasn't really bad.
Joe
02-17-2012, 05:58 PM
#80
Power Poster
Thread Starter
Join Date: Mar 2011
Location: Somewhere
Posts: 15,506
Oh NO Muv's video about how to work a Japanese 15 doesn't come up. I'll have to look for it again. Muv? http://www.youtube.com/watch?v=H2tii...eature=channel
ok here we go - this one came up for me.
ok here we go - this one came up for me.

Thread
Thread Starter
Forum
Replies
Last Post
OurWorkbench
For Vintage & Antique Machine Enthusiasts
106
03-14-2016 04:40 PM
olebat
For Vintage & Antique Machine Enthusiasts
14
04-06-2013 03:54 PM
