
FMQ learning curve - try what?
 05-04-2013, 01:59 PM
#1
Super Member
Thread Starter

Join Date: Aug 2010
Location: Texas Gulf Coast
Posts: 1,463
I got a Janome 6600 in February and thought it would solve all my FMQ issues - skipped stitches, breaking threads, nests on back ... well ... until I've finally been patient enough to deal with one variable at a time those problems went with me from my old Brother to my new Janome. So ... after much frustration and much ripping I finally have some things narrowed down. I'm not trying to recreate LA quilting - I don't think that's possible. My stitching may be a bit primitive, but I'm okay with that. I'm certainly no expert, but I have moved a little farther down the path.
What I've learned:
Read everything you can because some of it will make sense - both on here and in books/magazines.
Try stabalizing the quilt with some zigzag or scallop stitches that divide the quilt into sections. Then FMQ within each section. I spray baste and this has worked very well. Also allows me to start quilting in the outer blocks without concern that the whole thing will shift as I sew.
Develop a repertoire of simple stitches. Use them until you're tired of them and then work on a few more. I started with the simple meander, added loop-de-loops, hearts, flowers, leaves (I think these are really feathers, but they feel like leaves to me), and echo quilting.
If thread is breaking it could be - tension too tight - change it a TINY bit looser, could also be dust bunnies in bobbin case
If skipping stitches try a larger size needle - I'm currently using a 16/100. After you've done that if still skipping stop and rethread both top and bottom.
When things are working take a picture of your machine to save the settings.
If stitches are not right on back - little loops of threads - tension is too loose. Tighten it a TINY bit. If big loops on back then tighten two tiny bits. Also slow down your hand movements.
Clean out dust bunnies from bobbin case with every bobbin change. Change needles with every quilt.
Be sure the weight of the quilt is supported - I put a stool next to my chair, but know people like to use small tables and ironing boards for this. I sew on my dining table with the machine far to the right - that leaves room on the left for some of the quilt.
I was making too many changes to too many degrees and creating problems as I solved other ones. So tiny changes, then sew to test the change.
Check the back OFTEN so you don't end up ripping miles of stitches.
I have made many FMQ quilts, but with varying success. I understand the idea of making practice sandwiches, but ... so far... haven't done that. Trying to finish my last project I got so frustrated I pulled out my little old Brother to finish. Hopefully writing down these hints will help ME remember what I'm doing that's almost working. And hopefully ya'll can add some others or refine mine.
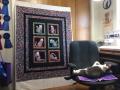
What can you add to this list? (Edited to add: I have no idea why my sewing machine is upside down - interesting - or why the pic of the block is fuzzy, but hopefully you can still see what I'm talking about.)
What I've learned:
Read everything you can because some of it will make sense - both on here and in books/magazines.
Try stabalizing the quilt with some zigzag or scallop stitches that divide the quilt into sections. Then FMQ within each section. I spray baste and this has worked very well. Also allows me to start quilting in the outer blocks without concern that the whole thing will shift as I sew.
Develop a repertoire of simple stitches. Use them until you're tired of them and then work on a few more. I started with the simple meander, added loop-de-loops, hearts, flowers, leaves (I think these are really feathers, but they feel like leaves to me), and echo quilting.
If thread is breaking it could be - tension too tight - change it a TINY bit looser, could also be dust bunnies in bobbin case
If skipping stitches try a larger size needle - I'm currently using a 16/100. After you've done that if still skipping stop and rethread both top and bottom.
When things are working take a picture of your machine to save the settings.
If stitches are not right on back - little loops of threads - tension is too loose. Tighten it a TINY bit. If big loops on back then tighten two tiny bits. Also slow down your hand movements.
Clean out dust bunnies from bobbin case with every bobbin change. Change needles with every quilt.
Be sure the weight of the quilt is supported - I put a stool next to my chair, but know people like to use small tables and ironing boards for this. I sew on my dining table with the machine far to the right - that leaves room on the left for some of the quilt.
I was making too many changes to too many degrees and creating problems as I solved other ones. So tiny changes, then sew to test the change.
Check the back OFTEN so you don't end up ripping miles of stitches.
I have made many FMQ quilts, but with varying success. I understand the idea of making practice sandwiches, but ... so far... haven't done that. Trying to finish my last project I got so frustrated I pulled out my little old Brother to finish. Hopefully writing down these hints will help ME remember what I'm doing that's almost working. And hopefully ya'll can add some others or refine mine.
What can you add to this list? (Edited to add: I have no idea why my sewing machine is upside down - interesting - or why the pic of the block is fuzzy, but hopefully you can still see what I'm talking about.)
Last edited by JanTx; 05-04-2013 at 02:02 PM.

 05-04-2013, 02:29 PM
#4
Member
Join Date: Oct 2012
Location: Eastern Oklahoma
Posts: 80
I too have begun to play with FMQ. I want to be comfortable doing my own quilting. I only have a DSM, and I am totally infatuated with FMQ. I have done many of the same things that you suggest. Iwas wondering what is the timeline for you, from start to where you are now?
05-04-2013, 02:49 PM
#5
Super Member
Thread Starter
Join Date: Aug 2010
Location: Texas Gulf Coast
Posts: 1,463
Timeline - hmmm - not quite a year? I know last June I was at a quilting retreat and had started doing some. A girl there was doing FMQ and people were very impressed. I had done several at that point so was very interested in what she was doing. She favored an allover pattern. I've done some of them, but like to do my little patterns better for now. The quilt I'm working on right now will be #95. Probably the last 30 have some sort of FMQ in them. If I'm in a bigger hurry - or just don't have the time to experiment and rip - I still do straight line diagonals - starting corner to corner with a marked line then sewing parallel lines from there. I like the way that looks, but the FMQ is so much more fun!
Of my 95 completed quilts I've sent maybe 6 to a long-arm quilter. I like to do mine from start to finish, but the biggest reason is budget. Just can't afford to add the cost of LA quilting to what it takes to complete a quilt.
Of my 95 completed quilts I've sent maybe 6 to a long-arm quilter. I like to do mine from start to finish, but the biggest reason is budget. Just can't afford to add the cost of LA quilting to what it takes to complete a quilt.
Last edited by JanTx; 05-04-2013 at 02:51 PM.
 05-04-2013, 03:14 PM
#7
Super Member
Thread Starter
Join Date: Aug 2010
Location: Texas Gulf Coast
Posts: 1,463
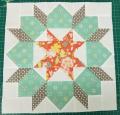
For the pictured flower I started from the lower right corner of the block - entered the block then did a loop-de-loop then not quite a straight line to the center to make the little circle that is the center of the flower - then just make petals for as many layers as I have room. That flower has pretty defined petals for the inner ring. Others I've made have the inner ring looking pretty much like the outer rings - maybe more like a camillia than a daisy. It doesn't matter what corner I enter from - depends on what I've done just before.
05-04-2013, 04:07 PM
#8
Super Member
Join Date: Mar 2010
Location: Canada
Posts: 3,458
Your FMQ looks really nice. What thread do you use with the 16/100 needle?
Is this quilting needle or something else? Thanks for sharing your experiences
with us.
Is this quilting needle or something else? Thanks for sharing your experiences
with us.
Last edited by EasyPeezy; 05-04-2013 at 04:10 PM.
05-04-2013, 04:25 PM
#9
Super Member
Thread Starter
Join Date: Aug 2010
Location: Texas Gulf Coast
Posts: 1,463
I was using Aurofil thread for the needle and a quilt shop pre-filled bobbin for the bottom. THat's one of the things that I changed. Now I use exactly the same thread on top and bottom. I now have a Connecting Threads thread in the top and in the bottom. So ... when I'm quilting anyway - no more prefilled bobbins for me. For piecing it seems to work just fine. THe needle is simply a larger one. Someone on this board recommended I go to it to avoid the skipped stitches I was having. I usually use a 14/90. The 16/100 is the next size up. It may also be called a denim needle. I'd rather use the smaller one, but ... no skipped stitches since I changed.
Last edited by JanTx; 05-04-2013 at 04:36 PM.


Thread
Thread Starter
Forum
Replies
Last Post
moonwork42029
Main
80
10-20-2022 12:35 AM
