
Elisabrat's Medallion Style Quilt Along!

 01-01-2014, 07:04 AM
#233
Super Member
Thread Starter

Join Date: Oct 2009
Location: Cody, Wyoming
Posts: 6,344
Welcome Quilters!
Its here! Its here! Happy New Years!
Today as promised we both have some fun options for you as we start our quilt along! I hope you have your cutting board cleared and your rotary blades ready!
I would like to offer first off a couple options for a CENTER block if you have not chosen one already to work with. I hope your chosen center works with the rounds but even if its not a perfect fit there are always solutions and options so no worries!
My first center is one I personally have used twice now and love a whole bunch. its from About quilting free quilt block patterns and it comes in two sizes 12.5 or 24.5 unfinished. Its called the ALL HALLOWS BLOCK you can see how easy the pattern is, all square/half squares yet it looks so difficult! you gotta love that!
http://quilting.about.com/od/quiltpa...uilt-Block.htm
Summer winds is also a pattern that can be made large or small and would make a lovely center :
http://quilting.about.com/od/quiltpa...uilt-Block.htm
Last suggestion (full of them trust me lol) and this is what I chose.. the 20" Christmas Star quilt block
http://quilting.about.com/od/quiltpa...uilt-Block.htm
NOW onto the borders: this month I have chosen a 9 patch what I call checker patch block there will be two of them. one with the darker of two fabrics in the corners, one with the lighter of the two fabrics in the corners. for those with in between quilt sizes you can use a half block at the end Jaba has done a quick picture tutorial for anyone who needs instructions. Remember this quilt can be made by the Experienced and the Less Experienced (me) the whole way through. You can chose my border the easy one, Jabas the more complicated one, or you can simply opt out of the border and do a strip border after your center with or without corner stones. (a block in the corner). So please play along and we can quilt together! I am starting out with you, no head starts so to speak for me (ie I am not a quick quilter). I promise to post pictures of my quilt as I go and hope to see yours also. Mine will be a scrappy type colorful quilt. Jaba is making a beautiful southwestern quilt. You?? Only you will know unless you share it with us!
Jan: please insert what you would like anywhere along the way. also photos instructions yada yada and of course remove this little last two sentences. gracias and post away in an hour ok?
Linda and Jan
01-01-2014, 07:10 AM
#234
Super Member
Thread Starter
Join Date: Oct 2009
Location: Cody, Wyoming
Posts: 6,344
here is the corrected links sorry for the mess up!
ok I need help here getting these loaded. I have gone to the site, its all in my favorites, click on it and it opens fine here I try to cut paste it doesn't work! help ladies!!! what am I doing wrong?
ok I need help here getting these loaded. I have gone to the site, its all in my favorites, click on it and it opens fine here I try to cut paste it doesn't work! help ladies!!! what am I doing wrong?
01-01-2014, 07:16 AM
#236
Super Member

Join Date: Jan 2011
Location: Wyoming in the summer, Florida in the winter
Posts: 7,583
Directions for the 9 patch as follows:strips 1 7/8" wide WOF strips[ATTACH=CONFIG]454205[/ATTACH][ATTACH=CONFIG]454206[/ATTACH]Make 2 different strip sets, press, then cut in sections of 1 7/8" and sew the 3 rows together.[ATTACH=CONFIG]454207[/ATTACH]
01-01-2014, 07:20 AM
#237
Super Member
Thread Starter
Join Date: Oct 2009
Location: Cody, Wyoming
Posts: 6,344
please note on Jan's grand example: do one block sewn together as such dark in each corner, the next block switch it up alternating to light in each corner so you achieve a checkerboard affect in the end. Jan will be posting her rounds immediately so I can't wait to see what you come up with. Mine are different oranges/yellows and whites randomly situated. I also had to make my strips 2" and cut down as I am not nearly as accurate at Jan is at making 1/4 inch seams even with a quarter inch foot. sew two together, trim, then sew the last one on trim.. shorter strips mean less wobbly strips btw.. so if your using a full yard cut that strip in half to make it easier on you and the seams 
01-01-2014, 07:34 AM
#238
Super Member
Join Date: Jan 2011
Location: Wyoming in the summer, Florida in the winter
Posts: 7,583
This round is for my 24 1/2" center block. Choose your 2 colors and cut strips 1 1/2" wide, press toward the dark. If you have the Fon's and Porter 1/2 & 1/4 triangle ruler, place the ruler so your strip width is the 2 1/2" line and your sewn seam should match the 1 1/4" line. Cut out triangles across the strip set, turning your ruler every other cut. Be sure your 1 1/4" line stays consistant so your seams match up in the center. If you don't have the F&P ruler, cut a square 5 1/4" by 5 1/4" and cut from corner to corner twice (X) and use one of these triangles as your pattern. Here are some examples of how you can put the blocks together for your border and you can see how I turned the hourglass to get the look I wanted. [ATTACH=CONFIG]454210[/ATTACH][ATTACH=CONFIG]454211[/ATTACH][ATTACH=CONFIG]454212[/ATTACH][ATTACH=CONFIG]454213[/ATTACH][ATTACH=CONFIG]454214[/ATTACH][ATTACH=CONFIG]454217[/ATTACH]
01-01-2014, 07:34 AM
#239
Super Member
Thread Starter
Join Date: Oct 2009
Location: Cody, Wyoming
Posts: 6,344
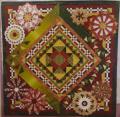
[ATTACH=CONFIG]454215[/ATTACH]
[ATTACH=CONFIG]454216[/ATTACH]
these are my first attempts I will not be putting them directly next to each other and think I will go more scrappy less coordinated so I will use less repeats and definitely less white
[ATTACH=CONFIG]454216[/ATTACH]
these are my first attempts
I will not be putting them directly next to each other and think I will go more scrappy less coordinated so I will use less repeats and definitely less white
01-01-2014, 07:54 AM
#240
Super Member
Join Date: Jan 2011
Location: Wyoming in the summer, Florida in the winter
Posts: 7,583
For my 16 1/2" center I chose a pattern called Pyramids. Depending on the rotation of this block it can also be a curling ribbon border. This is strictly 1/2 sq. and 1/4 sq triangles. For the 1/2 sq. cut squares 4 7/8" square and cut in half. For your 1/4 sq. triangles, cut a sq. 5 1/4" cut in 4 pieces (X). Sew the 1/4 squares together and then sew them to your 1/2 sq. triangle[ATTACH=CONFIG]454221[/ATTACH][ATTACH=CONFIG]454222[/ATTACH]This last pic note how the corners rotate around the quilt[ATTACH=CONFIG]454223[/ATTACH]The directions and the pic for curling ribbons can be found at www.quilterscache.com. In the search box type in borders and she has several listed that you may want to use instead of any of these. If you have questions ask, and please be patient, I have never done this before and kind of going by the seat of my pants. Happy New Year everyone!

Thread
Thread Starter
Forum
Replies
Last Post
Quilter 65
Pictures
18
06-06-2014 08:19 AM
Elisabrat
Member Swaps and Round/Row Robins
944
11-14-2013 07:00 AM
Elisabrat
Member Swaps and Round/Row Robins
745
08-01-2013 03:26 AM
