
Repeat a Boom NEw New New - Signups Closed
 04-07-2014, 07:57 AM
#461
Super Member

Join Date: Jul 2010
Location: Thumb of Michigan
Posts: 2,250
I'm thinking that I would stop the quilting out from the seams a couple of inches and go back in and quilt that little bit after it is sewn together. That would reinvorce the "joint" and make it look like it was done all together. Depending on the type of quilting you do, this could be simple, or not. But definitely better than fighting the entire big quilt the entire time!!
Finished up my squares this weekend. Have them with me to mail, but not the address. Could somone please PM me the address I am supposed to send them to? Thank you.
Gonna try and post pictures today, but really need to get some work done, first. LOL
Finished up my squares this weekend. Have them with me to mail, but not the address. Could somone please PM me the address I am supposed to send them to? Thank you.
Gonna try and post pictures today, but really need to get some work done, first. LOL

 Here goes, in no particular order
04-07-2014, 09:31 AM
Here goes, in no particular order
04-07-2014, 09:31 AM
#466
Super Member
Thread Starter

Join Date: Dec 2011
Location: Disneyland
Posts: 1,719
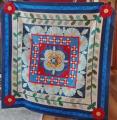
ok here goes. I have never taught anyone how to do this so bear with me. this is how I do it. It took me about three quilts to narrow it down to this technique and I am sure that i will keep tweeking it as I make more.
This is what the finished quilt looks like. I picked this one to show you because the quilting is not fancy
[ATTACH=CONFIG]470564[/ATTACH]
I put a row going across together or you could do it in columns. So the most you are dealing with is a 12 1/2 strip of fabric. If I am doing a design, I mark it with the Frixon pens that you just iron off when you are finished. They work great for me. On this quilt I did not need to mark anything until I got to the borders.
[ATTACH=CONFIG]470565[/ATTACH]So going across I just sewed inside each piece. I leave about an inch at the bottom so that I can attach the next row. Then I do the next row by itself. Then I attach the two rows by sewing tops back to back.
Then I turn the quilt over and by hand I cut off excess batting and material so that I have enough there to turn under to attach to each other. Then I hand sew across. I also will on some quilt use the machine to stitch in the ditch across where it is attached. I did that on this quilt.
04-07-2014, 09:38 AM
#467
Super Member
Thread Starter
Join Date: Dec 2011
Location: Disneyland
Posts: 1,719
Sorry about the blurry picture. Next step
[ATTACH=CONFIG]470566[/ATTACH]This is the back. don't know why it is showing red there because it is bright yellow.
Because I used the same material it is difficult to see the stitching across but you can see the machine work.
I repeat this process. As you get down to the last rows you are now getting heavy work but at least it wasn't heavy all the time. I only work on the row side so it is easier going through the machine.
when I am done. I add borders. Borders are easier sort of. Grin. I take the border material for the front and the backing and attache them to the quilt. Then I cut the batting and fix it to fit the border. I spray baste it down and then I quilt it. I am only working with the outside of the quilt so it is easier. I did put a feather pattern on this. I am practicing and learning how to do free motion quilting with m darning foot. When you use this foot it frees your material to move where ever you want it to go. The practice comes in being consistent in your stitching. I am not perfect on this yet. I know they tell you to practice on scraps but I have to practice on the real thing.
[ATTACH=CONFIG]470567[/ATTACH]Hope you can see it. I hope this helps all of you. I know some people do each square at a time and that was too much for me. Then someone here on the board said they do it by columns......so I decided why not. I did columns on my grandson's quilt because of the design I picked. I will look for a picture of that one and post it.
04-07-2014, 06:22 PM
#469
Super Member
Join Date: Jul 2013
Location: Michigan
Posts: 2,751
Buslady~ Thanks! I like the block you made for me! :-) Are they all flowers-- or is the one in the center something else? It's sort of hard to tell what that middle print is. I can't wait to see it in person!
04-07-2014, 06:32 PM
#470
Super Member
Join Date: Jul 2013
Location: Michigan
Posts: 2,751
urgodschild, So how close do you come to the seam with your quilting? Do you leave an inch space not quilted in order to sew the next row on? Or can you quilt closer to the seam than that? Or is it just an experiment for how close I'm comfortable? I think if I quilt out to the edge, leaving only 1/4", then try to make that last 1/4" into the seam it will be too much of a struggle, or will it? I could see all your pictures and directions well, thanks. I didn't think about sewing both the top and the back when I got to the border, then stuffing the batting in afterward. Good tip!

Thread
Thread Starter
Forum
Replies
Last Post
urgodschild2
Member Swaps and Round/Row Robins
277
01-28-2015 01:17 PM
LovingIzabella
Member Swaps and Round/Row Robins
2532
01-23-2012 07:50 PM
