
How do you piece a tshirt quilt of different sized blocks???

 01-26-2015, 05:01 AM
#13
Power Poster
Join Date: Jun 2011
Location: Southern California
Posts: 19,127
pgreeno, have you made a t-shirt quilt before?? I have made of a half a dozen and they tend to be very heavy and with the back being also make from t-shirts, you are talking about twice the weight. I don't see how you could line the back up with the same size shirt without sewing thru some of the graphics on the bottom unless you did something like a QAYG. Sorry, just my opinion. I quilted all of them on my older Bernina.
01-26-2015, 01:51 PM
#14
Senior Member
Join Date: Jun 2011
Location: Orlando, FL
Posts: 416
This method assumes that the pieces were cut in increments of 4 inches (plus seam allowances). This is from the Too Cool TShirt method. This is the one that I have used for all the quilts that I have made. You cut the pieces in these increments so that they will all (eventually fit together). You may have to do partial seaming to put all the units together.l
01-26-2015, 08:12 PM
#15
Member
Thread Starter

Join Date: May 2011
Location: Colorado
Posts: 30
Hello pgreeno,
I search the web to get ideas how to piece this quilt. Previous posts have described the two main ways: Cut all blocks with measurements all divisible by the same number. Like all dimensions are divisible by 4 so everything is 4, 8, 12, 16, etc. Pad each block to fill in any open spacing, like sashing but not always the same width and height. I couldn't use these because my grandson didn't want any sashing or fabric except the shirts and because some of the shirts were so little, I couldn't even always cut blocks that were divisible by 1. So what I did was that a photo of each shirt and upload it to my computer. Then I measured each logo. I cropped the photo down to the logo and resized it to 50% of the actual size. For example, if the logo was 6.5" x 8 inches on the shirt, I would crop the photo to where it had only the logo. Then I would resize it to be 3.75x 4. The advantage to using cropped photos that are sized proportionally to each other is that you can "uncrop" to fill in spaces. Then I just played around to get them arranged so they fit and I like them. I only ended up with two small spaces. I filled these with a crossed stitch piece that said Sally (long story) and an embroidered US flag with lax sticks as the stripes that I found on T shirts on the web. It took only one partial seam. Partial seams aren't difficult. There are lots of tutorials and videos on the web. I used this one: http://www.jinnybeyer.com/quilting-w...5A3116BD5790D1.
I've attach a couple of documents I created that show what I have discussed above and show the assembly steps. I hope this helps. Please don't hesitate to ask for clarification if I didn't explain something well enough.
Bragging grandmother alert!!! My grandson is a very good lacrosse player and has played on some of the top club teams in the country over the years. He verbally committed to DI Air Force Academy in November of his sophomore year in high school. I am very, very proud of him and love to watch him play. I live is south Denver, so I'll be able to watch him play all through his college years as well!
01-26-2015, 08:15 PM
#16
Member
Thread Starter
Join Date: May 2011
Location: Colorado
Posts: 30
Forgot to mention I didn't put the numbers on the back. I felt like one poster stated that it would be too heavy. Another quilt for another day I guess. Also I had it quilted by Happy Crafters. They are very inexpensive compared to what I have paid in the past, and I was very happy with their work. They use a large stipple on T shirt quilts and avoid piercing any logos in order to avoid the logos coming off.
01-27-2015, 11:30 PM
#18
Senior Member

Join Date: Dec 2010
Location: Appleton, WI
Posts: 738
I made a huge biker quilt for someone. I ironed stabilizer on the back of the shirts I was going to use, and then I trimmed them up. I had a lot of flannel fat quarters in men's shirt colors. So no mater the size of the t-shirt piece, the squares were all the same. It was king size and very nice. I will try to find a picture of it for you to see soon.
01-27-2015, 11:33 PM
#19
Senior Member
Join Date: Dec 2010
Location: Appleton, WI
Posts: 738
I made a huge biker quilt for someone. I ironed stabilizer on the back of the shirts I was going to use, and then I trimmed them up. I had a lot of flannel fat quarters in men's shirt colors. So no mater the size of the t-shirt piece, the squares were all the same. It was king size and very nice. I will try to find a picture of it for you to see soon. I don't think you could make a double sided t-shirt quilt and not quilt over the emblems, because of different sizes on the back and front. I did just large meandering, and it worked very well, and it made the t-shirt material even more stable. I even used the emblems from the pockets.
01-28-2015, 02:19 AM
#20
Member

Join Date: Feb 2013
Location: Coventry, UK
Posts: 70
Like another poster I picked blocks that were divisible (in my case by 4) and cut the TShirts down into 4.5, 8.5 and 12.5 inch blocks. This meant I could create a complete block sized at 12.5 inches. In some cases I also cut some rectangles eg 4.5 x 8.5.
I was working with baby clothes so needed something really flexible
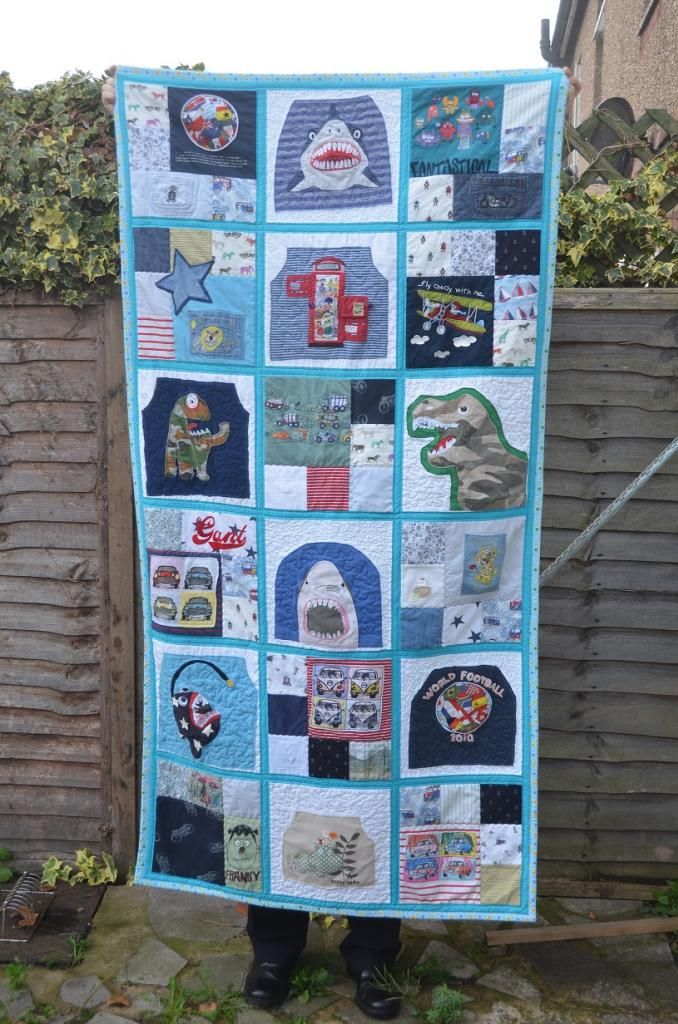
I was working with baby clothes so needed something really flexible


Thread
Thread Starter
Forum
Replies
Last Post
