
Struggling With T-Shirt Quilt Layout
 04-25-2015, 09:10 PM
#1
Junior Member
Thread Starter
Join Date: Mar 2014
Location: USA
Posts: 174
I'm making a t-shirt quilt using my old toddler and childhood quilts. Because some of the t-shirts are quite small, there was no way to trim all the t-shirts to the same size. I've decided to fit each of the t-shirts into either 15x15 or 14x14 squares (14x14 is looking like the way I want to go). I want to expand upon the t-shirts by adding blocks and rectangles. But I want these added seams to line up. Like in these pictures:
http://www.connectingthreads.com/cfT...%20DeLeonardis
(the quilt on the left, with the pink, is the general look I am going for).
Another example:
http://www.connectingthreads.com/cfT...%20DeLeonardis
(the one on the right with the orange).
You can see what I mean, in that the t-shirts are not the same size, but the added blocks and such all line up together nicely. If I had quilt software, this would likely be a lot easier, but I don't. The other issue is while I tried to keep all my t-shirts cut at either half or whole inches, some are 1/4 and 3/4. A few of these I could potentially trim down more, but some were so small to start with that I had just about enough for the seam allowance.
Where I am now:
I've laid out the t-shirts in the general arrangement I want them to be in.
I've measured each t-shirt and drew a basic table and filled the measurements.
I made a large grid with graph paper that I've split into 14x14 blocks and have started filling in t-shirts, but things just don't seem to be coming together well.
I'll attach a picture of both the table I made and the t-shirt layout. If anyone has any suggestions on how to tackle this without going insane, (if it's even possible) I would greatly appreciate it!
Originally I was going to start by adding a 1" border of different fabrics to each t-shirt, but as I picked bright, fun colors I figured this would make it too busy, and I'd still have to grid the rest of it out anyways...


http://www.connectingthreads.com/cfT...%20DeLeonardis
(the quilt on the left, with the pink, is the general look I am going for).
Another example:
http://www.connectingthreads.com/cfT...%20DeLeonardis
(the one on the right with the orange).
You can see what I mean, in that the t-shirts are not the same size, but the added blocks and such all line up together nicely. If I had quilt software, this would likely be a lot easier, but I don't. The other issue is while I tried to keep all my t-shirts cut at either half or whole inches, some are 1/4 and 3/4. A few of these I could potentially trim down more, but some were so small to start with that I had just about enough for the seam allowance.
Where I am now:
I've laid out the t-shirts in the general arrangement I want them to be in.
I've measured each t-shirt and drew a basic table and filled the measurements.
I made a large grid with graph paper that I've split into 14x14 blocks and have started filling in t-shirts, but things just don't seem to be coming together well.
I'll attach a picture of both the table I made and the t-shirt layout. If anyone has any suggestions on how to tackle this without going insane, (if it's even possible) I would greatly appreciate it!
Originally I was going to start by adding a 1" border of different fabrics to each t-shirt, but as I picked bright, fun colors I figured this would make it too busy, and I'd still have to grid the rest of it out anyways...
 04-26-2015, 03:44 AM
#2
Super Member

Join Date: Mar 2009
Location: FL
Posts: 7,084
When I did one like that, I used graph paper to help figure it out. You have the right idea of picking a finished size. You just need to know how much to add to each piece to get there. Graphing it out will help. Another thing that might help is to use the graph paper and cut out pieces to scale of the tee shirt sections and on another sheet, draw a grid of the finished size quilt and block outlines. Then you can move the little pieces around and get a feel for what it might look like different ways. You can add borders all around the tee shirt piece, or use it to make a block that comes out to the finished size you need. I did a border all around. On some, I had cut the fabric bigger than I needed and squared the blocks up to the same size after.
04-26-2015, 04:17 AM
#4
Super Member

Join Date: Jan 2011
Location: Monroe, IN
Posts: 2,283
Another option is to find a fabric you like as "sashing" and buy enough to make an entire quilt top (like making a backing). Then applique the t-shirt blocks to the top in whatever layout you like. The blocks automatically get the same "sashing" and you don't have to struggle with differing block sizes. I've done this when the shirt blocks were hugely different in sizes. It saves lots of headaches, you don't have to add any sashing, and finishes nicely.
 04-26-2015, 02:15 PM
#6
Senior Member
Join Date: Feb 2013
Location: 1000 miles from nowwhere
Posts: 671
if top left and mickey and nz are all the same size i would use that for a finished size ....then just add to the rest to make all them the same size weather you add solid,ir piano keys or patches .....but to get that look i would add it on just one side and one top OR bottem so it is bolder ...depending on what you do to one do it different to the next one ......[so if the shirt is small you may be adding 5'' if it is larger maybe only 2'' ......hoping this is not to confusing
04-26-2015, 02:29 PM
#7
Junior Member
Thread Starter
Join Date: Mar 2014
Location: USA
Posts: 174
Thanks for all the helpful advice so far. While I do like the look of sashing on some quilts, I really wanted a "blocking" scheme for this and I had already bought ($$$$)  my filler fabrics. I do have the book the pictures I linked to above came from. The author does explain how she achieved that look but her t-shirts were all cut in multiples of 2 plus the 1/2 seam allowance. That's why the layout looks so nice with block infill. I think what you are saying yel is similar to what I just decided is the best course of action - sew a border around each t-shirt until they are multiples of 2. Then they will fit into the grid much easier and extra space can be added with squares, rectangles, etc. Now, when I add these borders, I do of course need to add the seam allowance, corrrect? So for instance, the Mickey t-shirt is 11.5 x 13, so I'd add either an inch to the 11.5 side to get 12 inches with the seam allowance, or inches to get 14 inches aftr seam allowance; and an inch and half to the 13 inch side to get a 14 inch block with seam allowance? Oh man my head is spinning.
Edit: And maybe no added border on the ones that are already multiples of 2, like El Paso which is 10 x 12. But that doesn't take in account the seam allowance.....soooo
my filler fabrics. I do have the book the pictures I linked to above came from. The author does explain how she achieved that look but her t-shirts were all cut in multiples of 2 plus the 1/2 seam allowance. That's why the layout looks so nice with block infill. I think what you are saying yel is similar to what I just decided is the best course of action - sew a border around each t-shirt until they are multiples of 2. Then they will fit into the grid much easier and extra space can be added with squares, rectangles, etc. Now, when I add these borders, I do of course need to add the seam allowance, corrrect? So for instance, the Mickey t-shirt is 11.5 x 13, so I'd add either an inch to the 11.5 side to get 12 inches with the seam allowance, or inches to get 14 inches aftr seam allowance; and an inch and half to the 13 inch side to get a 14 inch block with seam allowance? Oh man my head is spinning. Edit: And maybe no added border on the ones that are already multiples of 2, like El Paso which is 10 x 12. But that doesn't take in account the seam allowance.....soooo
Last edited by Skylark53; 04-26-2015 at 02:32 PM.
04-27-2015, 06:19 AM
#8
Power Poster
Join Date: Jun 2011
Location: Southern California
Posts: 19,127
Yes, this can be very confusing trying to get various size t-shirts in a layout. Just take your time and get it where it is what you like.
Last edited by ManiacQuilter2; 04-27-2015 at 06:22 AM.
04-27-2015, 08:58 AM
#9
Super Member

Join Date: Jun 2012
Location: North Texas formerly The Burgh
Posts: 3,392
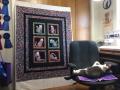
Hi...here is the "start" of one i made for my nephew. I laid out the pieces until i got them how i wanted them - leaving spaces as necessary between them to account for different sizes. Then i measured the spaces and made sashings as needed using the left over fabrics from the tshirts. Maybe this method would work for you?[ATTACH=CONFIG]518152[/ATTACH]
04-27-2015, 09:51 AM
#10
Senior Member
Join Date: Jun 2011
Location: Orlando, FL
Posts: 416
Sounds like you have already cut every thing. I use the Too Cool T-shirt method. Every piece cut is a multiple of 4 inches (plus seam allowances) with the largest size being 16 x 16. This way you can use the size most appropriate for the logo on the shirt. So you could have 4 x 4, 4 x 8, 4 x 12, 4 x 16, 8 x 8, 8 x 12, 8 x 16, etc. I bought the book which has a great formulat for calculating an approximate size of quilt layout - based on the number of pieces of each dimension that you have.
Then I use a graphics program to draw the appropriate number of pieces in each size (for example 4 - 8 x 8 squares, move them around. Where there are gaps - I fill in with plain t-shirt fabric saved from the shirts. By having all the pieces in incements of 4 I know that everything will fit together.
Then I use a graphics program to draw the appropriate number of pieces in each size (for example 4 - 8 x 8 squares, move them around. Where there are gaps - I fill in with plain t-shirt fabric saved from the shirts. By having all the pieces in incements of 4 I know that everything will fit together.

Thread
Thread Starter
Forum
Replies
Last Post
chairjogger
Pictures
11
02-07-2012 02:24 PM
