FPP Tips
#1
Junior Member
Thread Starter
Join Date: Jan 2013
Posts: 269
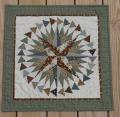
I'm new to foundation paper piecing, but I've been reading about it for years. I've read so many wonderful posts from the board members, blog posts, tutorials, watched videos, and made exactly 2 (super easy) paper pieced blocks before I tried this one. I read the entire thread on Carol Doak's Fabulous 50 Stars and drooled the entire time, and ckcowl's quilt in particular just jumped out at me screaming "make something like me now now now!" It's taken several years, but I finally got the time and inspiration to make a block from the Fabulous 50 Stars book.
[ATTACH=CONFIG]599656[/ATTACH]
Things I've learned that worked for me:
1) Using a stitch length of 1.2 worked to perfectly perforate copy paper.
2) Glue stick to hold down piece 1 is awesome.
3)After gluing down piece 1, fold all around piece 1 so that you've pre-folded the lines. Trim the seam allowance before adding piece 2 so you know exactly what angle and where to place the piece. That add-a-quarter ruler was a cheap and absolutely useful gadget!
4) Double sided tape to hold down piece 2 is doubly awesome - just don't sew over it!
5) Keep the paper on the units until after the block is assembled. Take the paper out of the first stitched seam allowances before joining the second seam. I was way more accurate than if I took the paper off first. I read somewhere where it said it was easier to ease the joins without the paper, but boy that did not work for me at all even with a million pins.
6) Don't use pins. Use small dots of Elmer's glue and iron to set. Full of win.
Any other tips? I can see why people love to paper piece. This was really fun and really rewarding even if it took multiple hours!
#6
QTips!! Yes I said QTips - when removing the paper I moisten a Qtip and run it down the seams. By the time I am done, the paper under the stitches has softened and with out tugging removes easily
#7
Using a glue stick is a great idea! I didn't think of that. I find PP hard but I need to practice more.
Your block is absolutely gorgeous! You'd got this thing!
I have all of Carol's books and her Craftsy video and Peggy Martin's. I really need to get going on PP
Your block is absolutely gorgeous! You'd got this thing!
I have all of Carol's books and her Craftsy video and Peggy Martin's. I really need to get going on PP

Thread
Thread Starter
Forum
Replies
Last Post


