
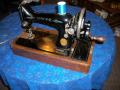
my new 66!


 01-10-2020, 12:39 PM
#12
Member
Thread Starter
Join Date: Dec 2019
Posts: 85
Thank you everyone! Yep juliasb, I do love it! I'm looking forward to restoring it. I'll keep you all updated. It's going to be a little while before I can start, company coming and other things have to be done first.
Just like with the 27-Pheasant, yes I went back and got her too, if you see anything from the pictures that I should address first or right away, don't hesitate to let me know. I welcome all tips and suggestions.
I've got the manuals saved to download, but I'm sure I'm going to have all sorts of questions.
Off to clean the house!
 01-10-2020, 03:11 PM
#15
Super Member
Join Date: Mar 2016
Posts: 2,828
What Janey and WIChix are talking about is a Singer cabinet 304 or 306. Apparently, they are not common. I didn't understand what they were talking about either, so started searching. This will explain it:
http://ismacs.net/singer_sewing_mach...y/304_cab.html
Apparently, the 304 is wider than the 306, which, apparently, you and WIChix both have. Janey is commenting that the table was probably sold with a Singer 101 sewing machine originally.
I've never seen one of those tables, so I originally thought the one you had was missing the fold out leaf.
Congrats on the machine.
bkay
01-10-2020, 06:10 PM
#16
Super Member

Join Date: Mar 2015
Location: Denver, CO
Posts: 4,264
What bkay said. I may have seen one or the other in real life, once. I may have seen one or the other on Craigslist a few times. I am kind of surprised that ismacs doesn't list the 306 cabinet. The 306 cabinet can be seen in the 101 manual which can be found at https://res.cloudinary.com/singer-se...g_Machines.pdf
Janey - Neat people never make the exciting discoveries I do.
Not affiliated with off-site link
Janey - Neat people never make the exciting discoveries I do.
Not affiliated with off-site link
01-11-2020, 07:37 AM
#17
Member
Thread Starter
Join Date: Dec 2019
Posts: 85
I've looked at those cabinets on ismacs and I still don't see one like this one. Difference being, it doesn't have a fold-out leaf and the drawer/door is on the side.
If not today (company coming), I'll try and get more detailed pictures of the cabinet, the top, sides, etc. and start a new thread. And if I don't get it posted tomorrow, the storm that's headed this direction will be just as bad as what they're predicting and we'll have lost electricity.
If not today (company coming), I'll try and get more detailed pictures of the cabinet, the top, sides, etc. and start a new thread. And if I don't get it posted tomorrow, the storm that's headed this direction will be just as bad as what they're predicting and we'll have lost electricity.
 01-13-2020, 09:27 AM
#20
Member
Join Date: Oct 2019
Posts: 29
Little tip
The wheel for my bobbin threader was trashed. and i had no time to order another
I cut a 1/4'' wide strip of leather. and applied contact cement to the wheel and the leather, let it sit for 5 minutes. then put the leather on the wheel. then trimmed it to length
The wheel for my bobbin threader was trashed. and i had no time to order another
I cut a 1/4'' wide strip of leather. and applied contact cement to the wheel and the leather, let it sit for 5 minutes. then put the leather on the wheel. then trimmed it to length
