
Kaleidoscope Quilt - Need Tips Please
 08-16-2020, 03:27 PM
#11
Super Member
Thread Starter
Join Date: Sep 2011
Location: Mendocino Coast, CA
Posts: 5,664
Thanks everyone! You won't believe it. I went to town today and did the shopping. I treated myself to a couple of quilting magazines, (which I do about once every 3 or 4 years.) They were sealed in plastic, so I had no idea what was in them. The issue 62 of Today's Quilter has a big spread on these kinds of quilts! Oh lucky me! They are calling them, "Millefiori," quilts and Willyne Hammerstein is the designer. I love all of them. If any of you have that magazine, please look it up. I wanna make one of those. I'll have to look up her book.
Thanks for that video, Barb.
~ C
Thanks for that video, Barb.
~ C
Last edited by tropit; 08-16-2020 at 03:30 PM.
 08-16-2020, 03:49 PM
#12
Super Member
Thread Starter
Join Date: Sep 2011
Location: Mendocino Coast, CA
Posts: 5,664
Ok, I'm going to watch and not participate  I've done several of the Ruby McKim newspaper version
https://vintagecraftsandmore.com/201...quilt-pattern/
I think this is more the type of thing where you take 6 panels to make a one block wonder.
I've done several of the Ruby McKim newspaper versionhttps://vintagecraftsandmore.com/201...quilt-pattern/
I think this is more the type of thing where you take 6 panels to make a one block wonder.
~ C
08-16-2020, 06:54 PM
#13
Member
Join Date: Nov 2012
Location: Houston, TX
Posts: 89
Oh yes...one block wonder is on my bucket list of quilts i'd like to make. I like the idea that Barb suggested of having the original fabric as either a border or part of the backing so you know where the quilt started from.
08-17-2020, 03:09 AM
#14
Super Member
Join Date: Dec 2015
Location: Ontario, Canada
Posts: 4,472
I have an OBW all cut and the half hexi's sewn, I just need to arrange them, but can't quite get there.It was fun, but you really must have the right fabric because it is a lot of work if you don't. Mine was a bit too blended for my liking. I really liked it Here is the border to the original fabric. but there just wasn't enough contrast.
There is a program that you can enter your fabric into and it will give you all sorts of ideas on how it will look that is useful. OBW Design Helper
Have fun!
Watson
There is a program that you can enter your fabric into and it will give you all sorts of ideas on how it will look that is useful. OBW Design Helper
Have fun!
Watson
08-17-2020, 03:41 AM
#15
Senior Member
Join Date: Nov 2011
Location: West Virginia
Posts: 898
There is a lady that has a blog with great directions and suggestions for the One Block Wonder.
She has made them from panels and yardage. She has tutorials and a downloadable
instruction sheet. https://ifthesethreadscouldtalk.com/blog-posts/
She has made them from panels and yardage. She has tutorials and a downloadable
instruction sheet. https://ifthesethreadscouldtalk.com/blog-posts/
08-17-2020, 06:54 AM
#16
Super Member
Thread Starter
Join Date: Sep 2011
Location: Mendocino Coast, CA
Posts: 5,664
Watson, that design helper is so cool!
QuiltBaer, that tutorial give a lot of great info...thanks. It almost makes me cry to see her cut up that Wizard of Oz print, because I love it.
So, I went on Ebay last night a bought some fabric panels (6 of each) and a few other fabrics that might work. I probably spent more money than I should have, but I like making scrappy quilts too, so I should be able to get a few quilts out of my purchases. I also bought a couple of the books. They were kind of expensive for my frugal lifestyle, but I'll have them for a long time and I can always pass them on to others later. I can rationalize just about anything if I put my mind to it.
I'm inspired by the turning leaves that I noticed yesterday on my drive to town. It's been a dry year around here and some of the oaks are already turning. I want to make a millefiori quilt that resembles the various colors of the leaves. They are so beautiful and delicate. I'm going to have to get out there soon and take some pix for reference.
Alas, I don't have room for a design wall. I'll just have to use the bed to do my layouts, provided that the cat doesn't mind. I'm going to start working on it just as soon as my fabric arrives. I'll post pix on the next Quilt Along.
~ C
QuiltBaer, that tutorial give a lot of great info...thanks. It almost makes me cry to see her cut up that Wizard of Oz print, because I love it.
So, I went on Ebay last night a bought some fabric panels (6 of each) and a few other fabrics that might work. I probably spent more money than I should have, but I like making scrappy quilts too, so I should be able to get a few quilts out of my purchases. I also bought a couple of the books. They were kind of expensive for my frugal lifestyle, but I'll have them for a long time and I can always pass them on to others later. I can rationalize just about anything if I put my mind to it.
I'm inspired by the turning leaves that I noticed yesterday on my drive to town. It's been a dry year around here and some of the oaks are already turning. I want to make a millefiori quilt that resembles the various colors of the leaves. They are so beautiful and delicate. I'm going to have to get out there soon and take some pix for reference.
Alas, I don't have room for a design wall. I'll just have to use the bed to do my layouts, provided that the cat doesn't mind.
I'm going to start working on it just as soon as my fabric arrives. I'll post pix on the next Quilt Along.~ C
08-17-2020, 06:56 AM
#17
Super Member

Join Date: Oct 2019
Location: Corpus Christi, Texas
Posts: 2,814
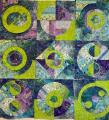
Kaleidoscope is my absolute favorite quilt to make. I designed my own pattern from seeing a picture on a magazine cover.
https://www.quiltingboard.com/attach...8-blue-kq2.jpg
Rust Kaleidoscope Quilt
I don't know where to start with tips. I've been making them for years.
I guess I'll start with fabric selection. It is the most important. The images have to be the right size. Too big will cause you to lose the effect. Too small causes too busy. I make an eight pieced circle kaleidoscope block as shown in 2nd link above. I form a "triangle" with my hands to visualize! At first, I uses several different pieces of fabric for one quilt, but I found that I prefer quilts that use one fabric selection for all 20 blocks. I buy 4 yards of whatever I think will be used for a kaleidoscope quilt.
I don't understand "stack and whack". I cut each "slice" individually. I think it's called "fussy cut". I use two clear plastic templates: one for the "pie" and one for the "crust". Hint: Retired teacher-I use Xerox sheets for overhead transparencies.
I position the pie piece on the fabric, I pay attention to the tip (past the SA) It makes a more interesting block if the pattern is angled across the point rather than straight across. After I trace around the template with a permanent marker, I trace part of the fabric pattern with a thin permanent marker on the template to help position it for the next 7 pieces. Top, middle, and bottom areas- doesn't need to be too detailed at all.
When I have all 8 pie pieces, I pin them together and clean my template with rubbing alcohol to find next block pattern.
Each block needs 8 crust pieces for which I have developed a system. I chose 7 shades of a background color and cut a stack of outside "crust" pieces from each.( Each block will have 1 color repeated). Keeping in mind that 4 pieces mirror the other 4 pieces-make sure they fit correctly to form the circle's frame.
Sewing curves:
Good luck with your project and look forward to pictures.
https://www.quiltingboard.com/attach...8-blue-kq2.jpg
Rust Kaleidoscope Quilt
I don't know where to start with tips. I've been making them for years.
I guess I'll start with fabric selection. It is the most important. The images have to be the right size. Too big will cause you to lose the effect. Too small causes too busy. I make an eight pieced circle kaleidoscope block as shown in 2nd link above. I form a "triangle" with my hands to visualize! At first, I uses several different pieces of fabric for one quilt, but I found that I prefer quilts that use one fabric selection for all 20 blocks. I buy 4 yards of whatever I think will be used for a kaleidoscope quilt.
I don't understand "stack and whack". I cut each "slice" individually. I think it's called "fussy cut". I use two clear plastic templates: one for the "pie" and one for the "crust". Hint: Retired teacher-I use Xerox sheets for overhead transparencies.
I position the pie piece on the fabric, I pay attention to the tip (past the SA) It makes a more interesting block if the pattern is angled across the point rather than straight across. After I trace around the template with a permanent marker, I trace part of the fabric pattern with a thin permanent marker on the template to help position it for the next 7 pieces. Top, middle, and bottom areas- doesn't need to be too detailed at all.
When I have all 8 pie pieces, I pin them together and clean my template with rubbing alcohol to find next block pattern.
Each block needs 8 crust pieces for which I have developed a system. I chose 7 shades of a background color and cut a stack of outside "crust" pieces from each.( Each block will have 1 color repeated). Keeping in mind that 4 pieces mirror the other 4 pieces-make sure they fit correctly to form the circle's frame.
Sewing curves:
- I clip on the crust side- once in the middle and then 2 more.
- I fold my pie piece to find middle to line it up with middle clip in the crust piece and pin.
- Then I pin each outer edge
- Then I ease the rest into place and pin.
- When I stitch, the piece isn't flat, but more curved up and lifted and fed into the machine slowly-practice helps find your groove.
Good luck with your project and look forward to pictures.
08-17-2020, 04:50 PM
#19
Member
Join Date: Jul 2020
Posts: 6
Agree with Jordan Fabrics tutorials - they were very helpful. I made one using 8 pieces and had trouble with the center of the block not being flat. I had success when I started stitching the pieces together 2x2 at a time if I started from the center about 1 thread deeper than 1/4� and tapered to edge about 1 thread less than 1/4�. I also had better luck pressing the seams open, which I typically never do.
08-18-2020, 09:07 AM
#20
Super Member
Thread Starter
Join Date: Sep 2011
Location: Mendocino Coast, CA
Posts: 5,664
Kaleidoscope is my absolute favorite quilt to make. I designed my own pattern from seeing a picture on a magazine cover.
https://www.quiltingboard.com/attach...8-blue-kq2.jpg
Rust Kaleidoscope Quilt
I don't know where to start with tips. I've been making them for years.
I guess I'll start with fabric selection. It is the most important. The images have to be the right size. Too big will cause you to lose the effect. Too small causes too busy. I make an eight pieced circle kaleidoscope block as shown in 2nd link above. I form a "triangle" with my hands to visualize! At first, I uses several different pieces of fabric for one quilt, but I found that I prefer quilts that use one fabric selection for all 20 blocks. I buy 4 yards of whatever I think will be used for a kaleidoscope quilt.
I don't understand "stack and whack". I cut each "slice" individually. I think it's called "fussy cut". I use two clear plastic templates: one for the "pie" and one for the "crust". Hint: Retired teacher-I use Xerox sheets for overhead transparencies.
I position the pie piece on the fabric, I pay attention to the tip (past the SA) It makes a more interesting block if the pattern is angled across the point rather than straight across. After I trace around the template with a permanent marker, I trace part of the fabric pattern with a thin permanent marker on the template to help position it for the next 7 pieces. Top, middle, and bottom areas- doesn't need to be too detailed at all.
When I have all 8 pie pieces, I pin them together and clean my template with rubbing alcohol to find next block pattern.
Each block needs 8 crust pieces for which I have developed a system. I chose 7 shades of a background color and cut a stack of outside "crust" pieces from each.( Each block will have 1 color repeated). Keeping in mind that 4 pieces mirror the other 4 pieces-make sure they fit correctly to form the circle's frame.
Sewing curves:
Good luck with your project and look forward to pictures.
https://www.quiltingboard.com/attach...8-blue-kq2.jpg
Rust Kaleidoscope Quilt
I don't know where to start with tips. I've been making them for years.
I guess I'll start with fabric selection. It is the most important. The images have to be the right size. Too big will cause you to lose the effect. Too small causes too busy. I make an eight pieced circle kaleidoscope block as shown in 2nd link above. I form a "triangle" with my hands to visualize! At first, I uses several different pieces of fabric for one quilt, but I found that I prefer quilts that use one fabric selection for all 20 blocks. I buy 4 yards of whatever I think will be used for a kaleidoscope quilt.
I don't understand "stack and whack". I cut each "slice" individually. I think it's called "fussy cut". I use two clear plastic templates: one for the "pie" and one for the "crust". Hint: Retired teacher-I use Xerox sheets for overhead transparencies.
I position the pie piece on the fabric, I pay attention to the tip (past the SA) It makes a more interesting block if the pattern is angled across the point rather than straight across. After I trace around the template with a permanent marker, I trace part of the fabric pattern with a thin permanent marker on the template to help position it for the next 7 pieces. Top, middle, and bottom areas- doesn't need to be too detailed at all.
When I have all 8 pie pieces, I pin them together and clean my template with rubbing alcohol to find next block pattern.
Each block needs 8 crust pieces for which I have developed a system. I chose 7 shades of a background color and cut a stack of outside "crust" pieces from each.( Each block will have 1 color repeated). Keeping in mind that 4 pieces mirror the other 4 pieces-make sure they fit correctly to form the circle's frame.
Sewing curves:
- I clip on the crust side- once in the middle and then 2 more.
- I fold my pie piece to find middle to line it up with middle clip in the crust piece and pin.
- Then I pin each outer edge
- Then I ease the rest into place and pin.
- When I stitch, the piece isn't flat, but more curved up and lifted and fed into the machine slowly-practice helps find your groove.
Good luck with your project and look forward to pictures.
~ C
