
Perfect Points?
 09-21-2021, 12:51 PM
#11
Super Member
Join Date: Mar 2010
Location: Canada
Posts: 3,460
Your points look good to me. I don't stress over my points.
They fall where they fall. I trim using bloc loc for FG and HST's.
If it's slightly off I don't redo. I redo only if I'm way off.
Otherwise, once the quilt is done and washed nobody will notice.
Unless the quilt is for show then that's another story.
They fall where they fall. I trim using bloc loc for FG and HST's.
If it's slightly off I don't redo. I redo only if I'm way off.
Otherwise, once the quilt is done and washed nobody will notice.
Unless the quilt is for show then that's another story.
 09-21-2021, 01:38 PM
#13
Super Member
Join Date: Dec 2017
Posts: 1,866
Have you tried alignment pinning? That's what I use when I want really good points.
Here is how I do alignment pinning.
1) Pick up the bottom piece to be joined and put a pin in through the back to the front exactly where you want the seam to be at the point in question.
2) Pick up the top piece and put the tip of the pin (from step 1) in through the front to the back, again exactly where you want the seam. Take you time here and look carefully at where the pin is in each piece to make sure it spot on.
3) Push the two pieces all the way together and position them so they are in the middle of the pin. Make sure the pin is perpendicular to the pieces, not tilted to any side.
4) Use a washable marking pen/pencil to mark 1/4" of the sewing line coming up to the pin.
5) Pin on either side of the alignment pin, about 1/4" from the alignment pin. Make sure the alignment pin stays perpendicular to the pieces during the pinning process here. (Sometimes it's hard to avoid a little skewing of the pin, but a lot of skewing shows that pieces have moved out the positioning you want.) Remove the alignment pin.
6) Sew slowly when you get near the critical area; sometimes using the hand wheel is the only way to get the control needed, especially if there are a lot of layers due to many seams. You may need to sew 1-4 threads to the right of the marked line (step 4) to avoid cutting tips of points off. How much to right depends on the number of layers involved. Be prepared for a bit of experimentation here when you first try the method; you may to experiment with some scrap fabric first to get the exact feel for how to get the exact right placement of the seam.
Using the above method allowed me to get really precise points for a big Lone Star quilt, but I did still have to occasionally rip and resew some seams.

 09-21-2021, 04:40 PM
#16
Super Member
Thread Starter
Join Date: Dec 2010
Location: Michigan
Posts: 3,334
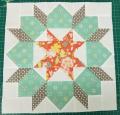
I'm going to try some of the methods I'm reading about. I don't want to avoid quilt blocks with points to match but it took me a day and a half to make this block. The person on the website said it took her and hour and a half. I'm obviously doing something wrong and can use some advice. I appreciate every suggestion.
I hope Bearisgrey is right and the quilting will hide some of the imperfections.
09-22-2021, 03:06 AM
#19
Super Member
Join Date: Mar 2011
Location: Central NJ
Posts: 5,572
First, I didn't notice any missing points in your block either! I think it's very well done.
That said, I also agree with platyhiker's pinning suggestion (except I do the alignment pin in reverse - start with top piece then do the bottom piece). I do not mark the 1/4" seam line but do put stabilizing pins about 1/4" on both sides of the stabilizing pin. Another trick you might try is if your 1/4" seam is great and consistent on any given unit in the block, when getting to the 'point' of said unit, stitch 1-2 thread widths into your seam allowance over that specific intersection. Your point should show up and no one will ever notice that you seam 'wiggled' a thread or 2 in any given spot.
That said, I also agree with platyhiker's pinning suggestion (except I do the alignment pin in reverse - start with top piece then do the bottom piece). I do not mark the 1/4" seam line but do put stabilizing pins about 1/4" on both sides of the stabilizing pin. Another trick you might try is if your 1/4" seam is great and consistent on any given unit in the block, when getting to the 'point' of said unit, stitch 1-2 thread widths into your seam allowance over that specific intersection. Your point should show up and no one will ever notice that you seam 'wiggled' a thread or 2 in any given spot.
09-22-2021, 03:24 AM
#20
Power Poster
Join Date: May 2008
Location: MN
Posts: 24,654
First, I didn't notice any missing points in your block either! I think it's very well done.
That said, I also agree with platyhiker's pinning suggestion (except I do the alignment pin in reverse - start with top piece then do the bottom piece). I do not mark the 1/4" seam line but do put stabilizing pins about 1/4" on both sides of the stabilizing pin. Another trick you might try is if your 1/4" seam is great and consistent on any given unit in the block, when getting to the 'point' of said unit, stitch 1-2 thread widths into your seam allowance over that specific intersection. Your point should show up and no one will ever notice that you seam 'wiggled' a thread or 2 in any given spot.
That said, I also agree with platyhiker's pinning suggestion (except I do the alignment pin in reverse - start with top piece then do the bottom piece). I do not mark the 1/4" seam line but do put stabilizing pins about 1/4" on both sides of the stabilizing pin. Another trick you might try is if your 1/4" seam is great and consistent on any given unit in the block, when getting to the 'point' of said unit, stitch 1-2 thread widths into your seam allowance over that specific intersection. Your point should show up and no one will ever notice that you seam 'wiggled' a thread or 2 in any given spot.
