
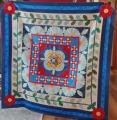
Finished with my very first quilt top!
 02-23-2017, 05:23 PM
#81
Senior Member

Join Date: Jan 2010
Location: Calgary, Alberta
Posts: 565
What a beautiful quilt! Everything is lined up perfectly! My eyes could be deceiving me but it looks rectangular rather than a square quilt. If the blocks are all the same size and there are five blocks one direction and six the other, I think you have the correct dimensions according to the pattern. I remember when I first started quilting, sometimes I would turn the tape measure over and get the wrong measurement. LOL! I'm very impressed with your quilt - it sure looks better than my first one! You are on a wonderful journey - enjoy!
 02-23-2017, 05:57 PM
#82
Member
Join Date: May 2013
Location: Memphis, TN
Posts: 35
Hi Jennifer 23, I have a question on the diagram you posted on my quilt. Since I have never quilted before, I've read that you don't want a lot of starts and stops when quilting. If I did the above straight line quilting, would I start quilting around the entire outside first, then stop, then start on the diagonal lines across the blocks and stop after every line? Or should I start in the middle with the diagonal line across the middle blocks? Would I go across the blocks then down the sides and try to keep moving without stopping? Sorry for all the questions, but I really want to do it right and have it look good at the same time. I also backstitch with every start and stop, correct? Thanks again for taking the time to reply.
 ) Beautiful quilt, btw. You can be very proud of your piecing!
You can approach the vertical, horizontal, and diagonal quilting lines in any order, but you might find it easiest to sew all of one group before switching directions. (Personally, I’d start with the vertical or horizontal, and get used to manipulating the body of the quilt, before attacking the diagonals.)
To help prevent ripples and accidental folding/bunching of the backing, it will help to sew the middle-most line first, then sew the next one to either side and so on working from the inside of the quilt to the outside.
NOTE: If you sew the outer box that surrounds your blocks first, you might end up with rumples/folds on the back of the quilt when you add all the inside quilting, so I would sew that box after the inside lines. (And the very outermost lines last of all.) But, since you are not sewing all the way to the edge of the quilt top, it will help to mark the boxed sewing area so that you don’t overrun a stopping point. You can use strips of painters tape to mark where to stop sewing along each side of the quilt. Painters tape will not damage your fabric or leave a residue. It could also be useful for marking your diagonals before sewing those lines. Simply position the tape so you sew alongside it but not on it.
I hope this is helpful!
Last edited by dhsewsalittle; 02-23-2017 at 06:03 PM.
02-23-2017, 06:08 PM
#83
Power Poster

Join Date: Jan 2009
Location: Reno, Nv
Posts: 16,889
Hurray What a nice job you did on it. I think the combination of the stitching down the lines With your walking foot a across the side lines lines, and then the cross hatching will make it last and last. It is just one step at a time, don't worry, you can do it! Just make sure you have some space on the left of your machine to support the quilt as you sew. The tugging can wear a gal out!


 02-24-2017, 08:47 AM
#89
Member
Thread Starter
Join Date: Dec 2016
Location: Turlock, CA
Posts: 37
Hi tebil, yes, my original measurement was off, the quilt is a rectangle. And yes, all the blocks are the same size. Or at least they were cut the same size when I started, lol. I didn't know that I should square up each block before sewing them together. I have so much to learn! I'm starting on piecing my backing fabric now and hopefully, will be pinning it soon. I didn't realize how many different steps there are to quilting, but I'm enjoying it. Thank you
02-24-2017, 08:52 AM
#90
Member
Thread Starter
Join Date: Dec 2016
Location: Turlock, CA
Posts: 37
Hi dhsewalittle, Thank you for your response! I wasn't sure if I should post my question directly to Jennifer 23 or not as this post was a while back. But thank you for responding in great detail. I'm going to print these out to follow when I get to the actual quilting part. Also wanted to say thank you to everyone on this board. I really appreciate all of your positive encouragement and advice for a newbie like me. I can't believe that I am already thinking of my next quilt before this one is even done! I'll be sure to post a picture when I'm done.

Thread
Thread Starter
Forum
Replies
Last Post
noveltyjunkie
Links and Resources
28
04-11-2013 11:46 PM
Future Quilter
Pictures
129
02-25-2012 08:06 AM
