Disappearing Hourglass/Pinwheel Cutting Chart
Subscribe
#1
PaperPrincess , 08-13-2014 08:07 AM
Power Poster
 08-15-2025
This chart will work for Disappearing Hourglass and Disappearing Pinwheel blocks.
I wanted to make MSQC's disappearing Hourglass but don't care for the method Jenny uses to create the HSTs with bias edges and wanted to use yardage rather than Layer Cakes.
I also wanted to use sizes where the original cut squares, trimmed HSTs and 9 patch units would be cut on 1/4" increments. Didn't want to make a block that you needed to slice into 5 27/32" cuts! I put together an Excel spread sheet to calculate these sizes and thought that others could use it also. Here's my quilt:
http://www.quiltingboard.com/picture...t-t251739.html
For general instructions on the hourglass, take a look at Tartan's excellent tutorial, or the MSQC's YouTube videos:
http://www.quiltingboard.com/tutoria...a-t249219.html
Skip the first 2 pictures and construct the HST units using the 'draw diagonal line' method, then follow the rest of the general directions.
Remember that in Tartan's (and Jenny's) instructions, you make 4 HSTs from 2 squares. In this method, a light & dark pair will yield only 2 HSTs, so you need 2 light & 2 dark squares for each completed hourglass or pinwheel.
[ATTACH=CONFIG]487467[/ATTACH]
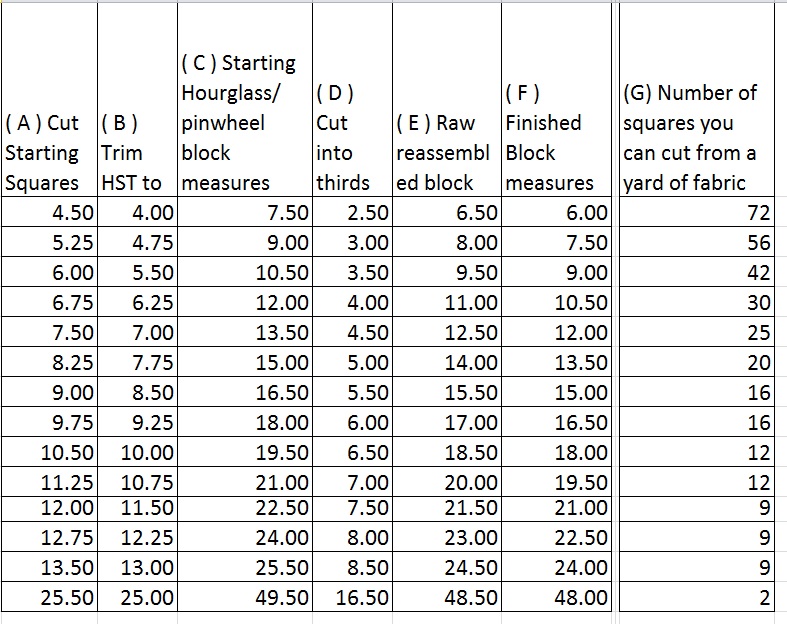
Column "A" - cut squares to prepare the HSTs. You will need to cut TWO light & TWO dark squares for each block.
Column "B" - pair a light & dark square, draw a diagonal line, sew 1/4" on each side of the drawn line. Cut on line then trim to the size indicated. Do this with both light/dark pairs, resulting in 4 HST patches.
http://www.generations-quilt-pattern...-triangle.html
Column "C" - Check your seam allowance!!! Following the video, sew the 4 HSTs into an hourglass or pinwheel which should measure as indicated.
Column "D". Cut the block into thirds in both directions. As indicated in the videos, measure the center section.
Column "E". After rotating, rearranging & sewing your new block, it should measure this.
Column "F". This is the finished block size
Column "G". If you cut accurately, this is how many squares you can get from a perfectly cut yard of fabric. Remember: you will need both light and dark fabrics, and you will need 2 squares of each to make one finished block.
I wanted to make MSQC's disappearing Hourglass but don't care for the method Jenny uses to create the HSTs with bias edges and wanted to use yardage rather than Layer Cakes.
I also wanted to use sizes where the original cut squares, trimmed HSTs and 9 patch units would be cut on 1/4" increments. Didn't want to make a block that you needed to slice into 5 27/32" cuts! I put together an Excel spread sheet to calculate these sizes and thought that others could use it also. Here's my quilt:
http://www.quiltingboard.com/picture...t-t251739.html
For general instructions on the hourglass, take a look at Tartan's excellent tutorial, or the MSQC's YouTube videos:
http://www.quiltingboard.com/tutoria...a-t249219.html
Skip the first 2 pictures and construct the HST units using the 'draw diagonal line' method, then follow the rest of the general directions.
Remember that in Tartan's (and Jenny's) instructions, you make 4 HSTs from 2 squares. In this method, a light & dark pair will yield only 2 HSTs, so you need 2 light & 2 dark squares for each completed hourglass or pinwheel.
[ATTACH=CONFIG]487467[/ATTACH]
Column "A" - cut squares to prepare the HSTs. You will need to cut TWO light & TWO dark squares for each block.
Column "B" - pair a light & dark square, draw a diagonal line, sew 1/4" on each side of the drawn line. Cut on line then trim to the size indicated. Do this with both light/dark pairs, resulting in 4 HST patches.
http://www.generations-quilt-pattern...-triangle.html
Column "C" - Check your seam allowance!!! Following the video, sew the 4 HSTs into an hourglass or pinwheel which should measure as indicated.
Column "D". Cut the block into thirds in both directions. As indicated in the videos, measure the center section.
Column "E". After rotating, rearranging & sewing your new block, it should measure this.
Column "F". This is the finished block size
Column "G". If you cut accurately, this is how many squares you can get from a perfectly cut yard of fabric. Remember: you will need both light and dark fabrics, and you will need 2 squares of each to make one finished block.


#10
Amazing! Thank you so much for figuring this all out. I'm thinking of making a queen-sized one for the guest room so will need to figure out whether I want to do scrappy (I've been collecting green and blue fabrics for it for a while) or perhaps one print and one white. Your chart will help me decide what size blocks I want to make so I'll figure yardage from there. Thanks again.