
Pieced Setting Triangles
 10-23-2020, 05:23 AM
#1
Power Poster
Thread Starter
Join Date: Dec 2010
Location: Michigan
Posts: 11,276
I've had several inquiries about the border I used on this quilt:
Scrappy Rescue
A working knowledge of setting quilts on point and the general idea of properly cutting setting triangles to keep the fabric grain going in the right direction is helpful. I think it was especially effective because I used the same neutral fabric for all the sashing, and strongly contrasting cornerstones and accent squares in the border. Basically, I added a plain background block to the end of each row, and finished with pieced setting triangles. Adding an additional narrow border at the end will secure all those additional seams for when you take your creation to guild meetings. Your longarm quilter will thank you.
Fig 1 shows the finished quilt edge.
You can see how you add plain squares, cut the size of the unfinished block, using the sashing fabric,
with matching cornerstones. (Actually, I thought I was smart and cut rectangles sized to include the sashing & cornerstone dimensions, but when I put the quilt together, I ran into a situation where I had to use partial seams. When I do this border again, I will just cut & sash squares. Much easier)
Pieced setting triangles. This took longer to write than actually making them... (Pattern writers earn every penny.) This will require a bit of experimentation and I would suggest make them a bit bigger then trim to size, and for sure make a sample before cutting them all out.
First calculate your setting triangle size. Normally, you would use your block size, but since you are adding sashing all the way to the edge, you need to include this measurement. Add the finished block size and the finished sashing width to determine your setting triangle size.
This link provides both the math to calculate the size needed for your quilt and a link to a handy chart you can download with dimensions for common sizes
https://www.generations-quilt-patter...triangles.html

Decide how big you want your accent square to be. I would suggest half the block size or less. This way, your square will not reach the edge of the quilt and you won't risk cutting the corner off.
Next create a paper pattern which will help you get the dimensions correct before you cut fabric. See Fig 2.
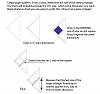
Fig 3 Walks you through constructing your test triangle
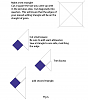
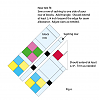
Fig 4 Shows final assembly.
Hope this helps. Let me know if you have any questions.
Scrappy Rescue
A working knowledge of setting quilts on point and the general idea of properly cutting setting triangles to keep the fabric grain going in the right direction is helpful. I think it was especially effective because I used the same neutral fabric for all the sashing, and strongly contrasting cornerstones and accent squares in the border. Basically, I added a plain background block to the end of each row, and finished with pieced setting triangles. Adding an additional narrow border at the end will secure all those additional seams for when you take your creation to guild meetings. Your longarm quilter will thank you.
Fig 1 shows the finished quilt edge.
You can see how you add plain squares, cut the size of the unfinished block, using the sashing fabric,
with matching cornerstones. (Actually, I thought I was smart and cut rectangles sized to include the sashing & cornerstone dimensions, but when I put the quilt together, I ran into a situation where I had to use partial seams. When I do this border again, I will just cut & sash squares. Much easier)
Pieced setting triangles. This took longer to write than actually making them... (Pattern writers earn every penny.) This will require a bit of experimentation and I would suggest make them a bit bigger then trim to size, and for sure make a sample before cutting them all out.
First calculate your setting triangle size. Normally, you would use your block size, but since you are adding sashing all the way to the edge, you need to include this measurement. Add the finished block size and the finished sashing width to determine your setting triangle size.
This link provides both the math to calculate the size needed for your quilt and a link to a handy chart you can download with dimensions for common sizes
https://www.generations-quilt-patter...triangles.html

Decide how big you want your accent square to be. I would suggest half the block size or less. This way, your square will not reach the edge of the quilt and you won't risk cutting the corner off.
Next create a paper pattern which will help you get the dimensions correct before you cut fabric. See Fig 2.
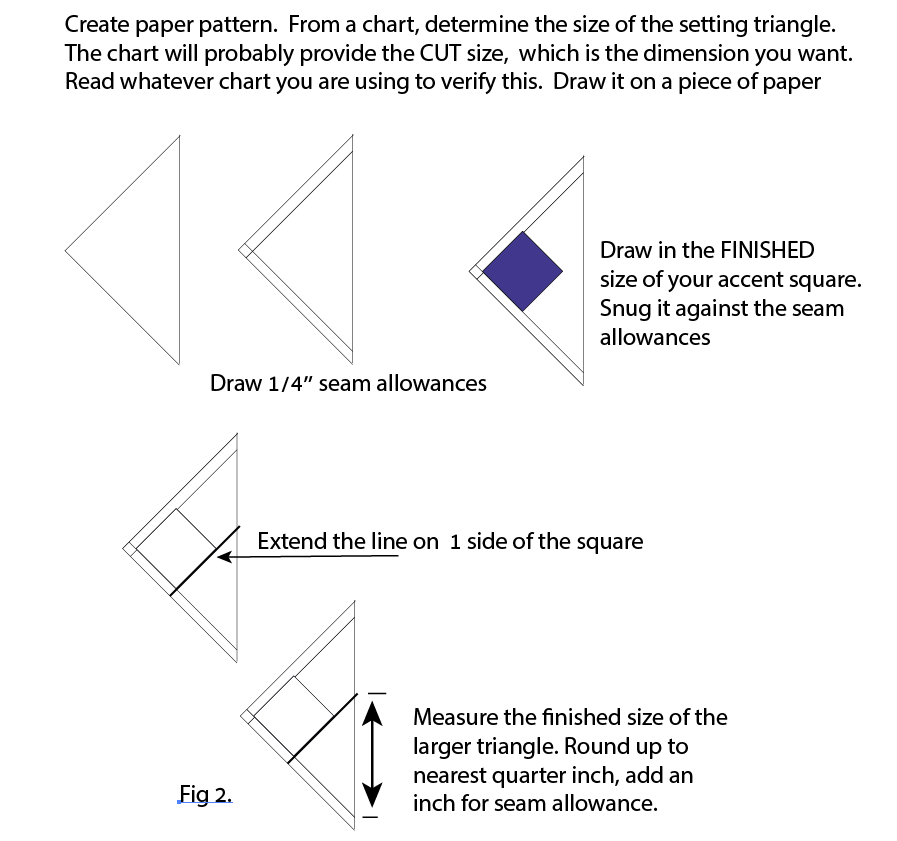
Fig 3 Walks you through constructing your test triangle

Fig 4 Shows final assembly.

Hope this helps. Let me know if you have any questions.
 10-23-2020, 07:05 AM
#2
Power Poster
Join Date: May 2008
Location: MN
Posts: 25,186
Well written and very nicely illustrated instructions/directions.
The most helpful line in the whole narrative was this one:
Basically, I added a plain background block to the end of each row, and finished with pieced setting triangles. Adding an additional narrow border at the end will secure all those additional seams for when you take your creation to guild meetings.
Repeating the sashing/cornerstones in plain white is/was a nice touch.

 08-19-2021, 06:20 AM
#9
Super Member

Join Date: Jun 2010
Location: Waterford Michigan
Posts: 7,241
Thank you for this illustration and directions. I am saving this for future reference. I don't do quilts on point very often but when I do it is helpful to have something like this as a reminder.
