
Twinning border
 12-02-2019, 02:02 PM
#1
Super Member
Thread Starter
Join Date: Apr 2010
Location: Northeastern Indiana
Posts: 2,800
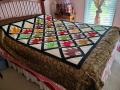
Some of you have asked me to explain how I make these.
This one is made with two color fabrics and the background. I'll try to include some pics.
[ATTACH=CONFIG]620433[/ATTACH]Here are the two fabrics cut 5 1/2 inches wide with a 1 3/4 wide border on each side of background. I must emphasize that this must be measured and remeasured to get it right. Then it must be pressed with the seam allowance toward the center.
For a queen sized quilt I made 4 panels of each one, but had this one left over for each color. The other panel, you need two for each unit. So I made 4 of those and used them .
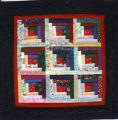
[ATTACH=CONFIG]620434[/ATTACH][ATTACH=CONFIG]620435[/ATTACH]This is the double panel with both fabrics. 1 1/2 cuts of each fabric with a 1 1/2 strip between them and two 2 3/4 background on the outside.This is a difficult panel to get straight. As you can see by the strips, you need two of these doubles and one of each of the two fabrics for each unit. Put them together in units of 4.
Lets say my bronze one is A and then with bronze part of the double on the outside and the seams matching. I'll make a drawing. Nesting the seams, make a straight line. Not an almost straight line, but a perfect line I suggest you get Janet Kime's book to get a better explanation of how to do it. And just keep after it til you get i
Don't let the pointed edges scare you. I would measure, then sew, then measure again, then press and eyeball it.
[ATTACH=CONFIG]620436[/ATTACH]This one did not pass.
I'll let you digest this and then please direct any question my way and I will try to answer.
This one is made with two color fabrics and the background. I'll try to include some pics.
[ATTACH=CONFIG]620433[/ATTACH]Here are the two fabrics cut 5 1/2 inches wide with a 1 3/4 wide border on each side of background. I must emphasize that this must be measured and remeasured to get it right. Then it must be pressed with the seam allowance toward the center.
For a queen sized quilt I made 4 panels of each one, but had this one left over for each color. The other panel, you need two for each unit. So I made 4 of those and used them .
[ATTACH=CONFIG]620434[/ATTACH][ATTACH=CONFIG]620435[/ATTACH]This is the double panel with both fabrics. 1 1/2 cuts of each fabric with a 1 1/2 strip between them and two 2 3/4 background on the outside.This is a difficult panel to get straight. As you can see by the strips, you need two of these doubles and one of each of the two fabrics for each unit. Put them together in units of 4.
Lets say my bronze one is A and then with bronze part of the double on the outside and the seams matching. I'll make a drawing. Nesting the seams, make a straight line. Not an almost straight line, but a perfect line I suggest you get Janet Kime's book to get a better explanation of how to do it. And just keep after it til you get i
Don't let the pointed edges scare you. I would measure, then sew, then measure again, then press and eyeball it.
[ATTACH=CONFIG]620436[/ATTACH]This one did not pass.
I'll let you digest this and then please direct any question my way and I will try to answer.
 12-02-2019, 04:18 PM
#3
Super Member
Join Date: May 2017
Location: Sunny Florida
Posts: 4,476
Thanks for the photos and the how-to for your borders. I love how these special techniques add such interest to the quilt.
I'm just starting the journey and entertaining different borders. Thanks for the inspiration!
I'm just starting the journey and entertaining different borders. Thanks for the inspiration!
 12-03-2019, 04:17 AM
#6
Super Member
Thread Starter
Join Date: Apr 2010
Location: Northeastern Indiana
Posts: 2,800
Making the border is just the first part. I hate to tell you what is next! Then you have to fit it onto the quilt top that you made for it.
The trick is to make the border estimating what you'll need only slightly bigger. Make a frame, like a picture frame. Sew it all into one piece. Then carefully measure what you have and then what you need. Fill in the extra space with background strips called cop[ATTACH=CONFIG]620448[/ATTACH]nig strips. Like you are coping with a disease, well we are. Sew in the strips onto the top and then trim off what you won't need and sew in the border.[ATTACH=CONFIG]620447[/ATTACH]Here are my 4 corners.[ATTACH=CONFIG]620449[/ATTACH][ATTACH=CONFIG]620450[/ATTACH]
The trick is to make the border estimating what you'll need only slightly bigger. Make a frame, like a picture frame. Sew it all into one piece. Then carefully measure what you have and then what you need. Fill in the extra space with background strips called cop[ATTACH=CONFIG]620448[/ATTACH]nig strips. Like you are coping with a disease, well we are. Sew in the strips onto the top and then trim off what you won't need and sew in the border.[ATTACH=CONFIG]620447[/ATTACH]Here are my 4 corners.[ATTACH=CONFIG]620449[/ATTACH][ATTACH=CONFIG]620450[/ATTACH]


Thread
Thread Starter
Forum
Replies
Last Post
